
Notes:
-
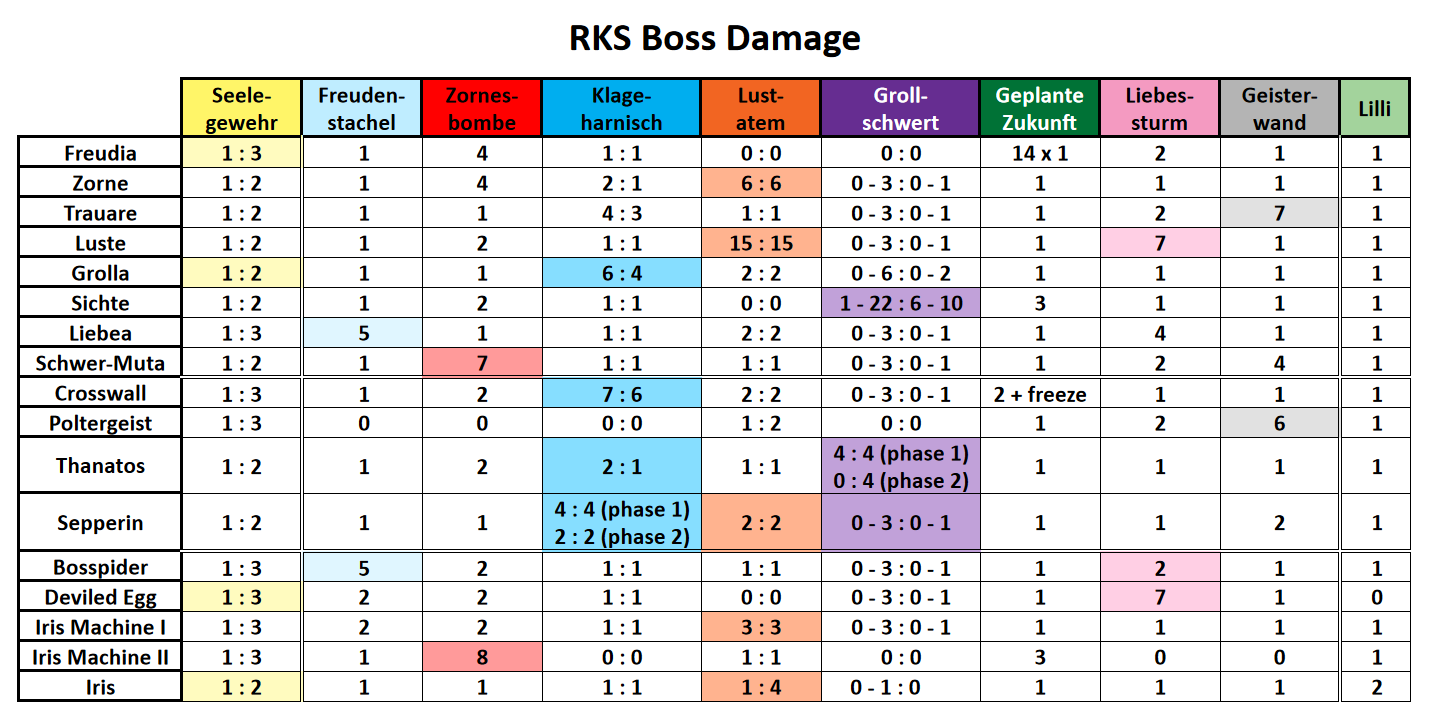
If there is more than one value listed it usually means [uncharged damage] : [charged damage].
-
Seelegewehr's middle charge deals the same damage as an uncharged shot.
-
Zornesbombe can be charged to drop a line of bombs over the entire screen, but this doesn't increase damage.
-
The charged Klageharnisch often deals less damage per hit than the uncharged version. While it stays active long enough to double hit bosses it's ultimately not worth using.
-
Lustatem's charged version has a trail following the main shot that is also able to damage enemies. In terms of a speedrun this is only relevant for the final Iris fight, where the trail sometimes does 1 additional damage. In general the trail does half the damage rounded down, with the exception of Iris as mentioned.
-
Grollschwert's damage output depends on Tia's current health. The less health she has, the more damage she deals. This is also true for the charged version, although to a much lesser extend. Range on the uncharged version will also drastically increase at half health.
The table above lists the entire range of possible damage. For a more detailed breakdown check the table below. -
Geplante Zukunft freezes time and lets you shoot armor piercing bullets while it is active. However, you can not switch weapons or pause the game to cancel out of the activation until ammo runs out.
The only bosses affected by the time stop are Freudia and Crosswall. Freudia takes passive damage for simply being frozen in time. Two bars of weapon energy equate 1 damage, for a maximum of 14 damage when you enter the fight with full energy. Crosswall needs to be actively shot in the weakspot. -
Geisterwand can be charged to send the barrier spiraling outwards. When doing this, each segment of the barrier acts as its own projectile, unlike the normal version.
This is relevant for Poltergeist, where the last big cluster can be destroyed in one charge attack this way. -
Lilli doesn't want to home in on the Deviled Egg, so it's assumed 0 damage.
-
Poltergeist's life bar depletes when you destroy the individual glass shards.
The six small clusters need to take 5 damage each to be destroyed, the final big cluster needs 9 damage. This is also the only boss without i-frames.