NOTE: This guide is based on the original US version. The Japanese version and Graduation version have differences in them and requires a different guide, those will be WIP until I start running it.
Speed Tech:
-
To make battles faster, I suggest using two things, firstly Somersault:
 this will allow you to launch them up in the air and will not provide them with the red invincibility once they land. Therefore allowing for more attacks to be chained. Please do remember that this can only be done after you are level 2, one or two fights with B - S rank in Chapter 1 will do just fine.
 -
Secondly, Pick a single shot long to medium range weapon, weapons like these:
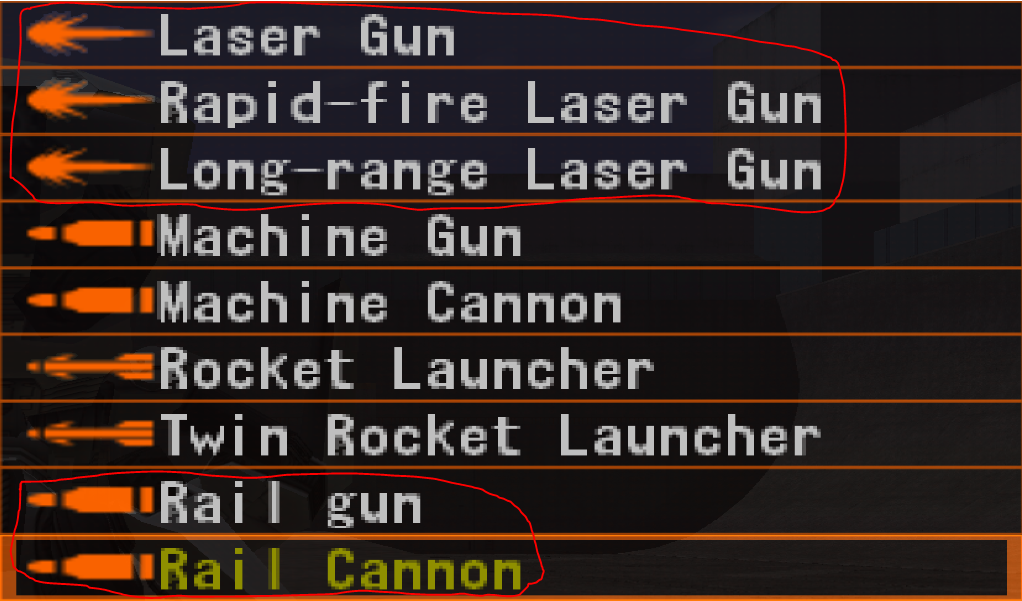 these weapons will allow you to shoot twice in succession making it deal tons of damage thus closing fights a whole lot faster.
 -
The way to shoot twice is to hold TRIANGLE while locked on to shoot a "Missile Locked" shot, once you let go of TRIANGLE, press it again and you will shoot a normal shot which most of the time will hit because the enemy is staggered unless however, you decide to move then your shot will not be accurate, please keep that in mind
-
Always equip anything that increases your damage and the Vernier gauge, this is because if you retry 3 times in a level you will be able to get extra health that will completely heal you if you ever run out. As for the Vernier gauge, this is your bread and butter as doing "special" moves and/or boosting uses that gauge which means the more the better plus you have to manage it less. Fights will close out sooner and there's the 3 retry method to fall back on if you need the extra health
-
You can "hotswap" your weapons, this can be useful if you have multiple weapons and run out of ammo with one of them, swapping into another weapon will fully replenish your ammo. (Yes this can be done in personnel combat too)
Routing:
CHAPTER 1
- After the cutscene, immediately press start to skip the opening
- DO NOT fight Ruri, just run straight at her head-on and let her burst you down, this is how its supposed to end as defeating her is nigh impossible right now and will result in a huge timeloss
- After the cutscenes and control is given back to you, check the shop and immediately close it then move to Steven and talk to him to move on (you have to choice to save after, it does take some time since you need to input a lot so not saving is also an option)
- Once the cutscenes are over, you are put into a tutorial, press X to clear all the popup messages then press select and choose next subject until the option to press End Tutorial appears. You will have to skip messages twice for this section.
- Again after the cutscenes and control is given back, you will be in Lifting training. Press X to clear all popup messages then press select and choose next subject until you are able to press End Tutorial. You will have to skip messages 3 times this section
- After the cutscenes, you will be in a mock battle, since you cannot utilize Somersault yet, I suggest using normal moves paired with double shot barrages with the Rail gun, see the tech section above on how to shoot twice
- Once the battle is over and the cutscenes have finished, you will be put into battle once again. At this point you should be lv 2, now you should be able to abuse Somersault and I highly recommend it to clear this battle and future battles fast.
- After one LFO battle, you will be put into the Personnel combat tutorial, again you can skip this by pressing X to clear all pop-ups and pressing select --> next subject until you are able to press end tutorial
- After the cutscenes, the game will prompt you if you would like to use the shop, choose yes and buy either a Power Cylinder, FCS or Power Booster, you can only afford one of them and its up to your preference. Investing in Armor is a waste due to the fact that you can retry 3 times to get extra health. Power Cylinder increases your Melee damage by 15%, FCS increases your Shooting damage by 15% and Power Booster increases your Vernier by 15%
- WARNING CONSIDER THIS LFO AS A BOSS, IT HURTS. after a mock battle with Gillian, you will be put into a 2v1 fight with an unknown black LFO. This LFO chunks your health so pay attention to your health and vernier gauge, also don't forget to equip whatever you bought by pressing starting and choosing LFO in the equipment row.
DO NOT rely on Gillian or any NPC other than HOLLAND. the NPC AI in this game isn't the best and won't be of much use to you, the speedrunner. If you are having trouble with this boss, consider pressing retry 3-4 times to get extra health and abusing the Emergency Spin (R2) button whenever the boss LFO boosts to attack you.
- After the cutscene, you will be put into a combination of an LFO fight and a Lifting race. These LFO fights should be fairly simple and will be fast if you implemented the tech I introduced earlier in the guide.
- After another slew of cutscenes, the game will once again prompt if you would like to shop, choose yes, by now you should have 200,000+ money depending on how you rated in the past few fights. Choose whichever attachment you did not get from the earlier shop buy in step 10 e.g if you chose Power Cylinder then choose FCS and Power Booster, you will be able to afford both, however if you cannot then Personal preference is fine too.
- After shopping, you will be put in a slew of battles, DO NOT FORGET to equip whatever equipment you bought. These battles should net you a fortune and will let you buy whatever is missing after.
- The game will prompt you to use the shop before the last match, use that opportunity to buy out whatever it is that you are missing otherwise continue into the last match- this marks the end of all Chapter 1 player controlled sections, the remaining sets are all cutscenes before you are taken into the scoreboard signaling the end of the chapter and a split in your timer.
CHAPTER 2
- After a LARGE amount of cutscenes, the game will put you into the shop lobby area, talk to the receptionist and shop. I recommend buying a Laser Gun to abuse double shooting (see the tech section to find out how to double shoot). Once you are done shopping, talk to Hooky twice and choose "Shopping Complete" once you are given a choice prompt.
- You will now be put into a mock battle with Shaun, Shaun will mostly be using his Rail Gun and spacing you out- one well placed Laser Gun will let you be able to juggle him with Somersault + Double shoot with a Laser Gun and this battle will be over in no time.
- After another set of mind numbing unskippable cutscenes, the game will put you in a 2v3 fight- to make things easier, try to focus on one LFO at a time, bursting them down with your chosen weapon, remember that you have an emergency spin button, any time they come in close, use that button and retaliate, this battle will be over in no time. Shaun will be of no help, so you have to deal with it 1v3. You should be fine 9/10 of the time, however if it proves difficult, consider pressing the retry button in the pause menu 3 times for extra health.
- Another set of cutscenes and the game will put you in another 1v3, the same deal as the previous step, this shouldn't be too difficult if you abuse double shooting and somersault. After that it will put you into another with 6 rocket launching LFOs, these LFOs CANNOT melee and are very weak to Laser Guns, abuse double shooting and spacing yourself well to avoid their rockets and you should be A-OK
- After that, you will be put into another 1v3 situation, now you have to protect a vehicle and dodge rockets, melee and machine guns at the same time. This shouldn't prove too difficult with proper Vernier management and double shooting + Somersault + Emergency Spin abuse. Right after, you will be put in a 1v5 situation, 3 rocket launchers and 2 Humanoid LFOs- I recommend dealing with the 3 rocket launchers because their rockets can and WILL stagger you to kingdom come.
- The game will once again prompt to ask you if you would like to shop- choose no if you are fine with your current loadout, choose yes if you have something missing. I personally do not recommend getting the Rocket Launcher as it does little damage to multiple units though if you prefer to do that then please go right ahead there is nothing else in the shop that you can use though if you are lazy you can buy the Rapid Fire Laser Gun for later since you can't equip it right away.
- After the cutscene, you will be put in a fight alongside Holland, a simple 2v5, 3 rocket launchers and 2 humanoids- as usual I suggest clearing the rocket launchers then moving to the humanoid LFOs. Keep in mind that Holland CAN and WILL hold out on his own making this a simple 2v4, probably the best NPC you can ask for in the whole series.
- Following after that, you will be put in a very difficult 1v3 situation against an armored land attack vehicle, THIS THING WILL RIP YOU TO SHREDS IF YOU DON'T DODGE ITS SHOTS. Luckily this thing cannot move and the most annoying thing it can do is stagger you with either its rockets or lasers if you don't dodge them in time. This thing is a HUGE damage check, abuse double shooting and keep your distance, getting up close will guarantee a shot and will stagger you to kingdom come.
- After you defeat it, you will have to fight the Gears' boss in a 1v3 situation, I recommend abusing Somersault and double shooting and just go straight for the Gears' boss' LFO (colored purple) as it will end the fight regardless if you defeated the others. This marks the end of Chapter 2's player controlled segments, the rest are cutscenes and the score screen will appear signaling a split in your timer.

