Maps are annotated versions of the excellent guide maps from Llamakazi on Steam, with the magenta annotations being the run route. I assume this is the quickest route for both cherry and gold even though we fulfill the cherry requirement, but that may change if anyone finds a good route for the Bugg-Body terminal code (and they fix the crash on trying to level up with that so you could get at least some increase in stamina or smth).
Pierce is our most used spell to get around enemy defenses, Gate is used at some places to open hidden doors and Minor Heal is useful if you make some mistakes.
Floor 0:

Engage Mimic at [1] with Pierce, get Red Potion for floor 4 Boss safety, get Keys from [2] and [3]. Open gate with switch [4]. You should just be able to walk over deactivated spikes without passing at turn. Leave floor with maximum magic.
Floor 1:
immediately turn right and open hidden door with Gate spell, then fight mimic at [1] for Rapier. Equip Rapier, this is our main weapon until fighting Abyss. It doesn't require STR level-ups, is fast and in total deals more damage than anything else relative to how little stamina it uses. Get Key from [2], take any fights you can on your way through [3]-[7]. Equip Wooden Shield after fighting the mimic [6]. That's about the minimum block-ability you need for the end boss. We need 200 essence to level up at the throne. ONLY LEVEL CON for this run. We need as much stamina as we can reasonably get for Red Star Sword against Abyss, as it absolutely devours stamina.
Floor 2:
Open door [1], fight Mimic [2] for guaranteed 60 essence, flip switch [3]. Exhaust searches in column room [4]. We need space in the inventory for the Zweihander for the Red Knight quest, but this is also a good place to grind. Activate switches [5] and [6], grind until you have 400 essence, level up at [7]. Backtrack, go to 10 and use Gate on the hidden door, make your way down to switch [11] and fight the boss. The boss on this floor is pretty easy, you can stunlock it with attacks, then Pierce after it moved a pixel, etc. if your rhythym is off, it flies up for a second pattern where your hits slowly move it upwards out of your range.
Floor 3:

Do not use any switches for the poison here. The placement is pretty good as it is by default. Most of this floor is just hunting the switches [1] - [3], with some grinding for our level up. Not pictured in the map here is a small pool of poison in the corridor to chest [3], so don't mash into it when you want to move fast. Ignore that chest and flip switch [3]. Get 800 essence, level up, leave floor. From this level up onwards, any non-boss fight is a waste of time. We don't need any more essence and the enemies don't give anything useful aside from maybe potions, which can't be relied on.
Floor 4:

Move into the big room [1], hope you only need to search twice and don't get fights. Take east exit to get to switch [2] which shifts the poison. Use Gate at [3], flip switch [4], wade through poison to boss. Let poison run out before the fight, use Red Potion for safety. That way even if your stamina needs to recover, you can take a hit. In the boss fight, focus on attacking one arm until it's down, then you can attack the boss with good positioning. Equip Fungal Cloak for maybe some more defense and definitely some damage on enemies when you are hit.
Floor 5:
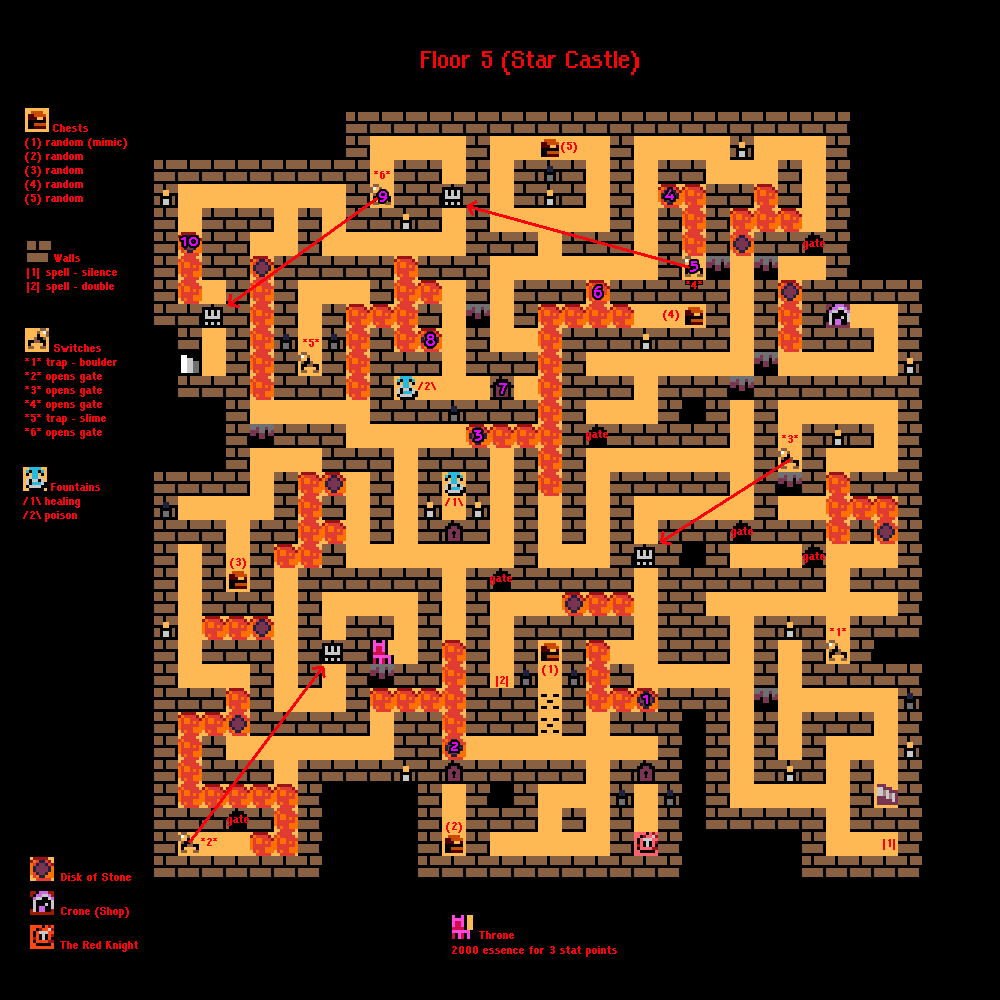
This is mostly lever hunting and winding paths. Use discs to float over lava from [1] - [4], flip switch [5], return where you left the disk on [6] and open door [7], rest is pretty straigh forward.
Floor 6:

Go north to get Ruby (you likely need to drop stuff from your filled inventory for every gem). Make your way to big room [5]. Pass turns on the way when you see enemies patrole to avoid fighting Hands, as they waste the most time. Use Ruby to get it out of the inventory, exit east, flip switch [7] and give Red Knight the Zweihander. They will give you a Red Coin. Flip switch [9], get Sapphire, return to big room, use Sapphire, exit south. Go through door [12], make your way up to the fountain, use Red Coin and ask for HONOR, which makes the Red Knight give you the Red Star Sword. Flip switch [17], open the north door [17.5] if you have a key, if not, use the south door. Level up at throne [18] for free, get Emerald at [19] and on your way back pass turns to evade patroles near the emerald. DO NOT use Emerald at the boss chamber yet, just exit east to go to Red Knight. Drop off items BEFORE Red Knight, not on their square. You need space in your inventory for the Red Star Sword, which you get by talking to him. If you have no space, that will make the sword disappear when they try to give it to you, softlocking you out of cherry and the (currently) fastest route. We also don't drop things on the Red Knight square because that gives them the item, which seems to sometimes also lead to problems. Return to Boss Room [22], equipping Red Star Sword and drinking any useful potions just before entering. Use Emerald to start the boss fight against Abyss. Use the Red Star Sword's projectile to destory the gems quickly even when they're flying up top, keeping an eye on your HP. You only get the projectile on high HP. The Red Star Sword also devours your stamina, which is what all the levels in CON are for. After the gem phase, you'll attack Abyss head-on. Usually, you can attack twice and recharge your stamina for another two attacks before Abyss comes down again, but it's still a relatively long fight. Hope you don't get hit by fire columns and you should be about fine.
UFO 50 now officially has a Category Extensions page! A couple of categories have already been added/moved, and there will be more categories in the future. Enjoy!