Difficulty ratings: ! = Very Easy. Only conscious thought required to execute !! = Easy. Basic, straightforward execution !!! = Fairly Difficult. Practice required !!!! = Very Difficult. Extensive practice required
Note 1: Firehopping (and related tech) doesn’t work in MK8DX. It is only possible in MK8U.
Note 2: I generally tried to order tech by difficulty, but soft-drifting is so important that I felt the need to explain it first and in the greatest detail, at the very least to educate people. If it’s a bit much to take in or execute at first, don’t worry. The techniques directly after are much easier and require less explanation. Now you at least know soft-drifting exists, which was my goal!
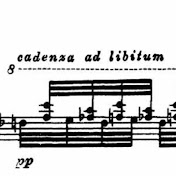
!!-!!!! Soft-drifting: Hold the control stick at approximately 30-40 degrees above or below horizontal (in the direction of the drift) while in a drift. By doing this, you turn as little as possible while still charging an MT (mini-turbo) at the maximum rate. This is the most efficient method of charging an MT, although "efficient" is not quite the same as "fastest"! There are exactly two different mini-turbo charging rates: slow and fast. If the control stick is held opposite the direction of the turn, left neutral, or even pushed slightly in the direction of the turn, MTs will charge slowly. If you hold the control stick far in the direction of the drift, mini-turbos will charge quickly. The result of this is that there are a variety of turning angles that charge MTs at the same speed but lead to different lines. Here we're interested in the entire zone where MTs charge quickly. This zone extends almost 45 degrees above and below the left-right line. Soft-drifting refers to holding an angle very near the edge of the zone (or roughly around a "2-o'clock" or "4-o'clock" position for a right drift if you picture the circle as a face of a clock); with this angle, you manipulate this zone to turn as little as possible (at the “softest” angle) while still charging MTs at the maximum rate. Soft-drifting allows you to charge MTs that would be impossible to achieve with just full left/right inputs. It prevents you from wiggling the stick back and forth quite as much. It helps you take better lines on shallow turns and straightaways because you aren’t turning as much. It isn’t faster on EVERY turn—sometimes it’s not necessary, or holding hard right or left gives you a tighter line around a sharp corner. With that said, once you know how to spot it, you’ll see it everywhere in top-level play. Soft-drifting is rated !! because it’s relatively straightforward to execute, and it’s rated !!!! because many of the MT strats that stem from it are extremely difficult. Mastering soft-drifting is essential to mastering the game. For more info on soft-drifting and drifting in general, along with helpful visuals, see Vike's Guide to Drifting https://vikemk.com/drifting-guide
! Choosing the Animal Crossing season: Hold down one of the shoulder buttons while selecting the first track. Each button corresponds to a different season: L = Spring (ramps on beginning section) R = Summer (same as time trials: ramp on the beach section) ZL = Fall (no ramps) ZR = Winter (icy, low-traction ground) Summer (R) is generally considered the fastest season on both 150cc and 200cc, although Fall is easier for 200cc for most people. Just don’t choose Winter, ever. Please. For your own sake!
! Quick Cannon: Before glider cannons like on Sweet Sweet Canyon and Sunshine Airport, hop before the blue ramp so you land on the middle/end of it (don't trick). This lets you enter the cannon slightly sooner and saves ~.1 each time you pull it off. It's easiest to tell if you got it from the controller vibration. I'm not exactly sure how to describe it, but over time you can easily learn to recognize it.
! Not tricking: Tricking is almost always a good idea, but there are three scenarios where you should not trick off of ramps.
- When you’re in the middle of a UMT (ultra mini-turbo) boost, it's generally best not to trick on glider ramps. Like glider cannons, they set your speed to a set value before giving you a boost, and in these situations it’s faster to just be propelled by your MT. Often there are other nuances you can implement such as hopping onto the ramp instead or pressing R just after passing the ramp to get a low glider and save a little time, too (see "Low Glider").
- When you should glider vector (see "Glider Vectoring") instead—most applicable on 150cc.
- When the turn after the trick is too tight and you don't want extra speed—most applicable on 200cc. For example, the second ramp of Bowser's Castle on both 150cc and 200cc leads to a very tight corner. You should start a drift on the edge of the ramp instead of tricking (this is generally a good idea when you don't trick).
!! Getting good coins: Not exactly tech, but still VERY important!!! The difference between 0 and 10 coins is equivalent to 5 bars of speed in the in-game stats menu, which is nearly the difference between the heaviest and slowest combos in the game. Learning the correct coin routes for each course is critical once you know basic lines. Watch time trial WRs or top speedruns to learn details. Note that coins do not respawn in time trials, but they do in every other game mode. This can lead to slight differences between TTs and longer speedruns.
!-!! Hopping left or right: Tap R and hold a direction while in the air to change your alignment significantly. This can be used to correct or manipulate your alignment in various circumstances. Be sure to only tap R—you'll start drifting if you're still holding it when you hit the ground. This doesn’t work with inside-drifting bikes.
!! Counterhopping: Hopping in the opposite direction before a turn can allow you to charge a mini-turbo more easily once you start a drift from the next hop. This is something that some advanced MT strats take advantage of; it is NOT tech you should use on every turn.
!! Hard-drifting: Holding fully left or fully right in the direction of a drift. This charges MTs at the same speed as soft-drifting and is less efficient in terms of amount of MT charged per amount turned, but it allows you to make tighter turns, which can sometimes be more important than charging MTs.
!! Delayed Drift: Press R to hop with the control stick in a neutral position, then don't push the stick into the desired direction of your drift until just before you hit the ground. This can improve your lines in some places by allowing you to hold into the turn more to charge MTs slightly faster at the start of your drift. This isn’t always faster, but it often is.
!! Slip Drift: While in the air from a jump or an air pocket, press R and hold the direction you want to drift. When you hit the ground you will immediately begin a drift without having to hop.
!!-!!! Low Trick: In general, you slow down whenever you're airborne, so it's desirable to minimize air-time. Along with that, there’s actually a pretty large window to trick off of ramps, and tricking early in that window will usually give you less airtime than tricking late. In some specific situations, doing other things like hopping before a ramp or going off a ramp and an angle can give you low tricks too. Watch top-level runs to get an idea of some of these more advanced applications (for example, the last trick of Sherbet Land on 200cc).
!! Up/Down Underwater Tricks: Holding a direction on the control stick while tricking gives a different trick animation depending on the direction. Normally this is just a visual thing and doesn't affect your speed, but holding up or down while tricking underwater delays the boost until the flip is completely done, which is significantly faster in most underwater sections (especially the underwater ramp in Piranha Plant Slide on 150cc and most of the ramps on Dolphin Shoals). This is because trick boosts while grounded are much stronger than trick boosts while airborne underwater (waterborne? Not sure if that's the right word for it XD), so it's best to delay the boost until you've landed. Up is usually the best option because it pushes you down to land faster.
!!! Neutral Hopping: Precise NISCs (no-item shortcuts) often require you to have the control stick completely neutral when you initially jump over the off-road. Doing so ensures that you have maximum forward momentum and no unhelpful sideways movement.
!!! Super-bounce: Before a bounce pad, charge a mini-turbo off the preceding ramp, then release the MT just before tricking. You should fly forward significantly farther than normal. For 150cc at least, I recommend learning this tech on rDKJ first, and then you can apply it to the first bounce pad of Cloudtop Cruise and later to both of Music Park's. Here's a tutorial by Bayesic with an overview of the execution.
!!! Chaining: Timing boosts so one starts just as the next one ends. This saves time because it keeps your kart at the highest speed for the longest amount of time possible. If you don't chain, then some of your time in a boost is spent accelerating back to top speed. Each chain only saves a small amount of time, so it's not worth thinking about this until you have learned strats very well, but at the top level it's a fairly easy and important thing to be aware of. With that said, boosts don't usually stack in this game, so also be careful to avoid what I've heard some people call "boost cannibalization". If you get a boost while another is already active, the overlap will waste some of both. Chaining is about finding the perfect timing where you don't lose time from overlapping boosts or having to re-accelerate. This (obviously) isn't MKW, but if you're familiar with wheelie chaining in that game, that's an extreme, easy-to-see example of this same principle that might help you understand why chaining is fast in general.
!!-!!!! Glider Vectoring: On many tracks, especially on 150cc, tricking off glider ramps is very slow. Instead, it's faster to drift off a glider ramp, release an MT while angled sideways, then, once you've sunk down a little bit, hold roughly 45 degrees down on the control stick to move up and sideways back towards the track through the air. On other glider ramps, such as Twisted Mansion, Bowser's Castle, and a few others, vectoring off of UMTs (ultra mini-turbos) is so powerful that it's worth it to hold a drift and bump against the wall to charge one up, which is then released similarly to an MT. Why is this faster? First, the boost from an MT is slightly more powerful than a trick in this game. This is only a small part of why this technique save so much time, though; the angle you hold in the glider is crucial. Forcing your vehicle up and sideways simultaneously results in a somewhat unintuitive speed boost. This is thought to happen because speed is capped along each axis, but you can surpass this one-dimensional speed cap if you're moving at very high forwards, up, and sideways speeds all at once. This is a fairly common oversight in games; for example, vectoring is also possible in SMO and Subnautica , just to name a few. Bayesic also made a great video guide for this which also includes a tutorial for motion glider (which isn't covered in this guide because it's not relevant for RTA speedruns).
!!-!!! Low glider: When you go off of glider ramps, pressing R/ZR again just after the glider comes out makes you get less air and sink faster. This is incredibly powerful when combined with glider vectoring because allows you to get into position to hold the vectoring angle more quickly. Press R just after the MT releases, and you'll be able to hold a better angle sooner. Being good with this technique requires a lot of intuition, and it's hard to spot if you don't know it's there. So, to first start I recommend watching a good 150cc WR speedrun (keeping an eye out on courses like Water Park, Twisted Mansion, Sunshine Airport, and Royal Raceway - there are other instances, too, which you should be able to spot better after watching those).
!!!! Neutral Drifting: As I explained in the soft-drifting section, there are two speeds a mini-turbo can charge at: quickly (hard-drifting and soft-drifting) and slowly (every other angle). Neutral drifting generally refers to keeping your control stick in the slow-charging zone (not necessarily keeping the control stick completely neutral, although sometimes it can also refer to that. It can be a bit confusing, but that's just how the term is used). Charging quickly actually slows you down a little, especially on 200cc. This has several implications: First of all, on 200cc there are a few specific cases where it's slightly faster to hold a neutral or more shallow angle on an entire turn rather than charging up the next MT level. For example, on the turn after the glider on Cheep Cheep Beach, you should only charge an MT. As far as I know, this is never the case on 150cc, where the speed penalty of hard drifting is barely noticeable and never outweighs the benefit of charging the next MT level. Secondly (and much more generally), the fastest way to charge MTs (especially on 200cc, but also on 150cc) is to save some of the soft/hard drifting for the end of the drift, rather than wiggling throughout. There are even some courses like Moo Moo Meadows that contain many corners that should be approached early and wide so you can neutral drift throughout them entirely. Finally, for items runs, neutral drifting can allow you to maintain enough speed to outrun blue shells and red shells on certain courses. Here's a MarioKartCentral thread that breaks down track-specific strats in excruciating detail. Overall, this is a quite advanced concept, and I don't recommend thinking about this much until your lines and MTs are solidly consistent overall.
!! Random coin info: Collecting a coin gives you a slight boost, even when you already have 10 coins. Air speed (which refers to gliding, not hopping or going off ramps) is unaffected by coins and is faster until you have around 5-8 coins (exact number depends on your combo). 1 coin increases your speed by 2 levels (equivalent to 0.5 bars on the in-game combo selection screen), and having 10 coins makes you around 6.6% faster (which is a huge difference).
This is not a comprehensive list of all tech, but it's everything I know of that shows up in multiple courses. If you have a track-specific question, join the Discord and feel free to ask someone there!
LINKS EMBEDDED IN THE GUIDE:
- Vike's Guide to Drifting: https://vikemk.com/drifting-guide
- Glider Vectoring Tutorial:
- DK Jungle Superbounce tutorial:
- Blue Shell Outruns: https://www.mariokartcentral.com/forums/index.php?threads/200cc-blue-shell-outrun-poof-guide.12184/
Edit (2/15/20): Added techniques I’ve become more familiar with over the past few months. I also heavily edited existing explanations for clarity and ease of reading. Edit (8/1/20): Added glider vectoring, low gliders, and neutral stick drifting, as well as clarifying coin info. Edit (6/11/22): Further clarified terms and descriptions throughout the document.