New-Game runs are a ton of fun if you like a challenge. Killing the final boss in a grueling 5 minute marathon of a slug fest, with just a +9 weapon and 3 heals, it's the most satisfying thing I've ever done in any game. To learn the run you'll have to master all of the bosses, learn how to dodge every individual attack and how to maximize your DPS.
In Ward 13, Reggie sells a bunch of items that you can unlock by playing the game casually. Black Cat Band is a great defensive ring that you probably already have unlocked. This route also uses Dran Scavenger Sigil and Daredevil's Charm, which are a bit tough to unlock. They're not necessary when you're starting, so if you don't have them unlocked don't worry too much about it.
Starting the Run
Create a Handler character.
Handler has a really really strong weapon, and the dog is incredibly helpful. The dog will take agro from and kill many small enemies that would otherwise hit/stagger you. When you inevitably die to a boss he'll resurrect you, which comes in clutch. The Explorer's movement speed boost is good,
When you spawn in, run to McCabe to buy Hot Shot, then run back to the crystal.
RNG Check
If you have only played the game once or twice you might not realize that there's two major variants of each location, and we need the fast variants of N'Erud, Losomn, and Yaesha to have a competitive time. Here's what the good and bad versions of each zone look like:


If you don't have the good N'Erud as your start, open up "World Settings" and choose "Reroll Campaign". Keep rerolling until you get the good N'Erud.
We start with N'Erud because it has good iron drops, and several useful items that'll help with the rest of the run.
Now you can use a menu glitch to see what variants for Yaesha and Losomn:
-
In "World Settings", create a Yaesha adventure mode.
-
Open the Yaesha map display once and close it. This "binds" the space bar to open Yaesha's map.
-
Switch back to the campaign, but before closing the menu you should hover your mouse over where Yaesha appears in the map select.
-
Quickly spam click and spacebar as fast as you can while you close the "World Settings" menu. If you time it correctly you will open Yaesha in the campaign even though you don't have it unlocked.
If you got a bad roll, you'll have to reroll the entire campaign. If you got a good Yaesha then repeat the check for Losomn. This can be pretty tiring, so I recommend not resetting back to character creation unless you've lost like 2 or 3 minutes here. This is the least fun part of the run, and until you've mastered all of the locations and zones the 2 or 3 minutes here won't make a huge difference.
Once you have good variants on all 3 locations, warp to N'Erud to start the run. SPLIT world prep
N'erud
When riding the initial elevator take off your pants to get into a lower weight class, so that your stamina will last longer. Also hotkey Liquid Death so you can deathwarp quickly.
This location can be very confusing, but once you understand it it's actually the easiest and fastest location. Run through the opening tunnels, and once you get the open area "Abyssal Rift" stick to the left wall. There will be a dungeon or elevator just past the structure on the left, that will always be the exit for this zone.
One of the reason's we're doing N'Erud first is for iron, so try to pick up any iron that's on the way. Ideally you'll leave N'Erud with around 20 iron.

The tunnel to the midboss is always this L shape, with a tiny little split in the middle. the top path is typically a smidge longer, but there is a small chance the Momentum Driver will spawn on the top so in general you should go top.


What the Momentum Driver spawn looks like on the minimap
I split as I walk into the midboss room, and split as I walk out. After the midboss you'll enter "The Eon Vault" which can be easy to get lost in, but once you understand it it's almost as quick as "Abyssal Rift". You'll be death warping back to the checkpoint here, so no need to sit even if you're completely out of ammo. You'll leave the checkpoint and hug the right wall until you can climb on this little ledge. Look to the right and you'll see the first pit. You can identify from a distance if it's the right one, if not you'll head left to the other pit spawn.

The correct pit has this big spike right on top of the door, and a light at the entrance. It also has a big black cliff on the left that is very distinct, often only that cliff part is visible and the spike/entrance are obscured.

The wrong pit has the spike offset to the left, no light at the entrance, and a big hole in the ground in front of it.


The distant screenshot above is from this lookout spot. From here you will be able to determine which spawn has the soulspark pit. Once you've found the right pit, go inside and grab the Soul Spark. Immediately kill yourself with liquid escape to deathwarp closer to the boss.
Leave the checkpoint area and do a hard turn left, and run straight to the boss. Try to save ammo so you don't need to sit when you get there.
Tal'Ratha doesn't have too many tricks, for the most part keep shooting at him until he dies. Use your Hot Shot mod to do quick reloads when its available. When he does his homing spirit ball attack it's best to keep DPSing, and walk forward directly towards him right before they hit you. Split as you touch the crystal and warp to the Lab.
Lab
The first part of the lab is a race to make the quick cycle on the portal. If you are not fast here you will lose ~55 seconds waiting for the next cycle of the portal. The cycle starts as soon as you enter the lab, so you'll need to be quick to shoot the lock on the first door.
In general you want to walk out of the way of the charging guys instead of dodging, to conserve stamina. In the starting area go up the right stairs, and then go right again to take the shortcut. There are a few places here where you can jump over gaps to regen stamina without losing speed.
When you get the to moving portal, take the portal to the gauntlet area first. Step within range of the crystal, and then take the return portal.

Next, take the downward facing portal that lands on the invisible bridge. Here you will get the Cipher Rod item required to craft the Enigma which will help a lot in Yaesha, Root Earth, and the final boss.

Take the return portal to the small crystal, and go back to Ward 13 for your first shopping trip. Split as you sit down to warp.
Shopping Trip 1
Run to Cass, sell her all of your items except your iron, the enigma item, and the lumenite crystals. Buy all the iron she has. If she has the Deceiver's Band and you have an extra 500 bucks, then consider picking it up.
Run to Reggie to buy the Daredevil's Charm, maybe one ammo box, and if you have the extra 500 bucks but didn't get an extra ring from Cass, get the Dran Scavenger Ring.
Buy the Chilled Steam concoction from Mudtooth and drink it.
Run to McCabe to craft the Enigma, and then buy all the upgrades you can for your AR.
Equip the Enigma, take off all of your clothes for the buff from Daredevil's Charm, and warp back to the Lab next to the gauntlet. Split as you walk into the gauntlet door.
Continuing Lab
The gauntlet is pretty difficult, and it's where most of the potential time loss in this zone is. For the big floating pillar guys, try to stay underneath them to bait their slam attack which damages them and removes their shields. In general try to DPS the stronger guys and let the dog take the little ones, but make sure to clean up the little ones as fast as possible once the big ones are dead. The Enigma does great DPS on groups of little guys. Split as you get the cube, death warp back to the checkpoint, and warp to the big portal at "Fractured Ingress".
The big cube boss is pretty much scripted. I'm not sure of the optimal route, just watch some runs and copy what others are doing. I split as I sit at the crystal to warp back to the lab starting area. Go through the first portal, and activate the crystal, then immediately turn around and take the portal back to the lab. Then run to the second portal to activate the crystal in the other zone.
The portals are randomized so if you're in Yaesha, just continue like normal. If your in Losomn sit at the crystal and warp to Yaesha.
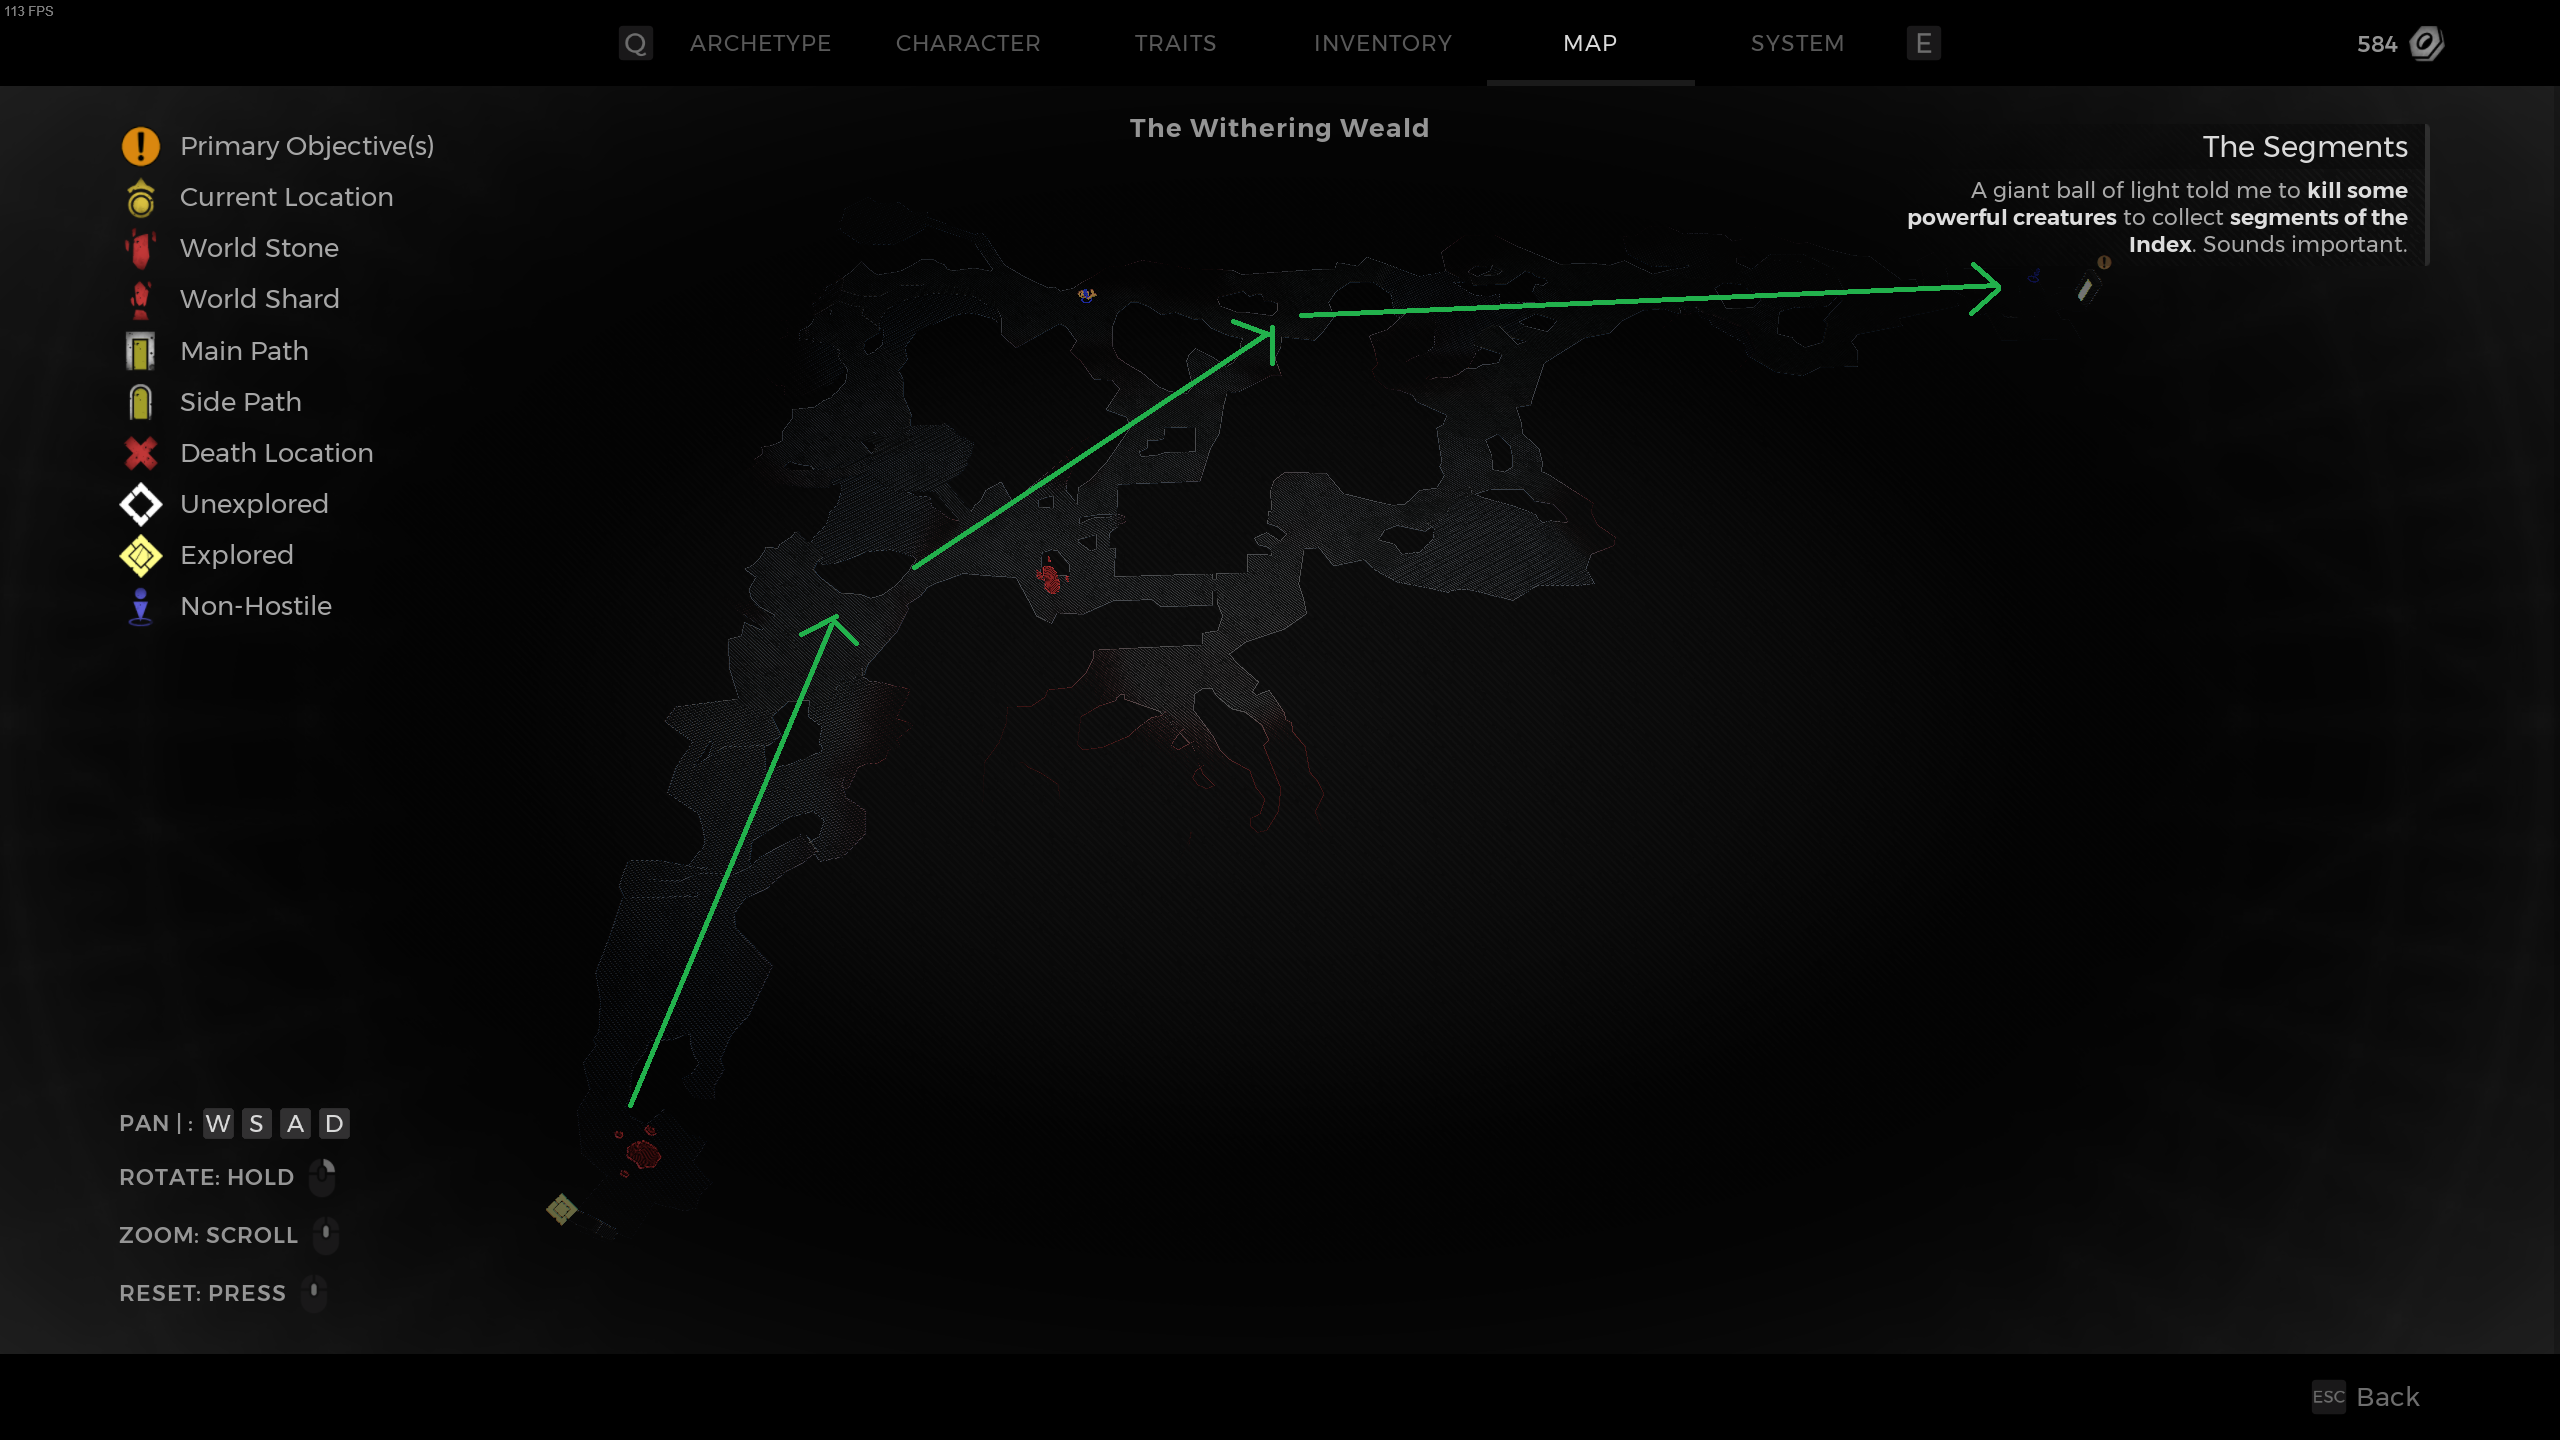
Yaesha
Skip the throne, run straight to the first real zone "Withering Weald". As long as you don't take any hard turns you shouldn't get lost. You can run past all of the enemies here no problem.
If your midboss is Kaeula's Shadow then your path to the boss will be filled with really annoying guys with guns. I have a hard time getting through this area without taking damage and losing ammo, so if that's the case be ready to kill yourself as soon as the boss fight starts to refill, or use your ammo box if you bought one. The boss is pretty straight forward, just focus on DPSing as quickly as you can. If you got luck with iron you may be able to kill him in 2 cycles. If you killed yourself to refill then you'll enter the room on the far side from the exit, so try to walk to the other side during the fight. If you fight him without refilling, then you spawned at the exit and should stay where you started.
If your midboss is Legion then the remaining path to the midboss is also pretty straight forward, just hug the right wall all the way to the boss. If you have the Enigma already make sure it's equipped before you continue, so you can have mod charges built up for the boss. Focus on DPSing the portal for the entire fight, even if it's not turned on. If you have the Enigma use it's mod on the portal while it's active, it'll continue to do damage as if it's active even after it's deactivated. The more damage you deal to the portal the shorted it's attack phases will be, so you will not die to madness.

The Far Woods is long and easy to get lost in, you can lose several minutes to fighting trash mobs or taking the wrong path. If you have the Enigma it will help a lot with the little rollie guys. I break this section down into 3 waypoints:
- Run forward until you get to the Root Nexus (or the other little area boss spawn)
- Run to the hanging bridge.
- Go around the corner in front of you to the right to get to the exit.
You can run right through "Widows Court" to get to the boss. The fastest path involves going up the stairs and dropping down onto a platform, but if you miss the platform you will die from fall damage.
Once you get the boss area sit at the crystal and warp to Losomn. We'll come back for this boss later once we have fully upgraded the weapon.
Losomn

Take the elevator down, and start running past the all the enemies. The Enigma is huge here, it can clear a roomful of the annoying bow and spear guys with just a few shots. The spear guys will not hit you if you run around their right side very close against them. The flying bow guys always need to be dodged. In the main room take the door on the left, and run to the key item. Right before the key item is a scripted chest you can check for iron. Run across the room and up the stairs to get the dungeon area.
The dungeon area can be rough because you won't be able to shoot the guys chasing you when you get to the end. There is an annoying strong guy you'll see once you get to the bottom of the stairs, I recommend using half a magazine with Hot Shot to damage him a lot, and sick the dog on him. Try to kill any guys on your way to the jester with the Enigma. When you get to the jester you'll have to watch him do his whole juggle animation without looking away, or he will stop and you'll have to do it again. Use the clap emote while he's juggling to get the Jester's Bell amulet. Grab the feather and death warp back to the checkpoint.
Run through the main room and enter the secret door on the wall to get to Ironburough. Hug the left wall as you run around and you'll get to the exit. If you see an entrance to the clocktower area then you should be able to tell just by looking at your minimap if there is a path or deadend behind the tower. If there is a path behind the tower it's always the main exit, otherwise don't enter the tower area and keep hugging the left wall.
You may have either the sewers next or the burning town zone depending on what midboss you rolled. They're both pretty straight forward. Before you fight the boss sit at the mini crystal and warp back to Ward 13 for the second shopping trip.
Shopping Trip 2
Run to Cass to buy all of her iron again, and optionally the Ring of Flawed Beauty if its available. This ring is hit or miss for most bosses, so consider unequipping it and only re-equipping it for the final boss.
Run to Reggie and buy ~10 ammo boxes. You'll only use 4 or 5 but it doesn't hurt to have extra.
Run to upgrade your AR as much as you can, before heading back to Losomn. Make sure to warp back using the center "Return to last crystal" option, as you can't warp to mini crystals using the normal area map.
Continuing Losomn
Bloat King doesn't have too many interesting strategies, just keep DPS up.
You can get crits on Gwendel by shooting the bombs out of her hand, which is much much more damage than shooting her body. I think it's worth waiting for her to pull out another bomb before shooting again, as you can stunlock her. Unlike all other bosses you shouldn't just hold down the mouse button, because when you reload she can walk around and maybe throw a bomb. It's useful to stand on under the bridges in the middle of the arena, or on the platforms in the corners.
You won't be going back to shop for the rest of the run, so ignore the chests after the boss fight and all iron/chests for the rest of the run. You'll be killing yourself in a moment so you don't need to sit at the checkpoint after the fight. Do the jester's dumb card game, get the key item, and kill yourself. Warp back to the boss and start the fight.
With good upgrades and good luck it's possible to skip the second phase of the fight by getting enough damage in phase 1, which will save you ~20 seconds. I don't know of a consistent setup to get it, but it's what you should be aiming for. In phase 3 you ideally want to kill him the first time he attacks you, as each invulnerability phase will cost you a lot of time.
After the boss warp back to Yaesha to kill the Corruptor.
He should be EZPZ with your upgrades, as long as you roll forward through the golem's spinning blade attack.
Once the Corruptor is dead, walk off the edge for a quick death warp, and then warp back Lab to head to Root Earth.
Root Earth
You can run right past all of the enemies at the start of root earth, as long as you walk up to this corner you will trigger the next checkpoint. If you use the Enigma on the trash mobs, and have good move speed you may be able to climb the ledge without getting hit. If you get hit, just kill yourself to spawn at the checkpoint ahead of you.
There's a good DPS ring right by the checkpoint, Zania's Malice. This is a huge DPS improvement for the remaining bosses so you should definitely take it and make sure it's equipped.
Head down to the gauntlet. This is all about killing as fast as possible, make good use of the Enigma for small guys, and the scrapshot mod helps a lot with both the big plant guys and the meta-knight looking dude. You can try to end the fight near the exit to save some extra time.
Cancer is a short run away. He's a pretty hard boss, unless you stand right behind him. When he moves you stop shooting and run behind him again. This will get you crits on his weakspot, but also prevent any of his attacks from hitting you. Be careful not to push him into the wall, and try to walk him towards the exit if he gives you the chance.
There will a couple rooms ahead with big enemies, but they're all optional. Run right past all of them until you get to the warehouse. If you are low on heals feel free to sit at a checkpoint, or kill yourself if you can't sit because enemies are near.
Venom is a very hard boss, just remember that scrap shot work on him despite the fact that he flies.
The final boss is also very hard, and there isn't much of a shortcut to it. I recommend grinding him until you how to dodge all of his attacks. The audio cues are very helpful, he always makes a metallic "shing" sounds before attacking. The Enigma is crucial for the orange ball attack, especially in phase 2.
You did it
Good job, you did it! :)