This guide will provide explanations for some of the most important skips in Wario World. This guide is also meant mostly for those who are starting out, or those who would like a simple refresher on certain strategies. Explanations will be in the form of text with pictures to show off key points for each trick. If there are any concerns with this guide, contact the author of this guide, Dip92.
Table of Contents (Use ctrl+F on keyboard to quick-search by chapter#)
Tricks will be shown in order as would be done in an actual speedrun attempt.
- Chapter 1 - Greenhorn Forrest
- Chapter 2 - Greenhorn Ruins
- Chapter 3 - Horror Manor
- Chapter 4 - Wonky Circus
- Chapter 5 - Shivering Mountains
- Chapter 6 - Beanstalk Way
- Chapter 7 - Mirror Manor
- Chapter 8 - Pecan Sands
- Chapter 9 - Closing Remarks
Chapter 1
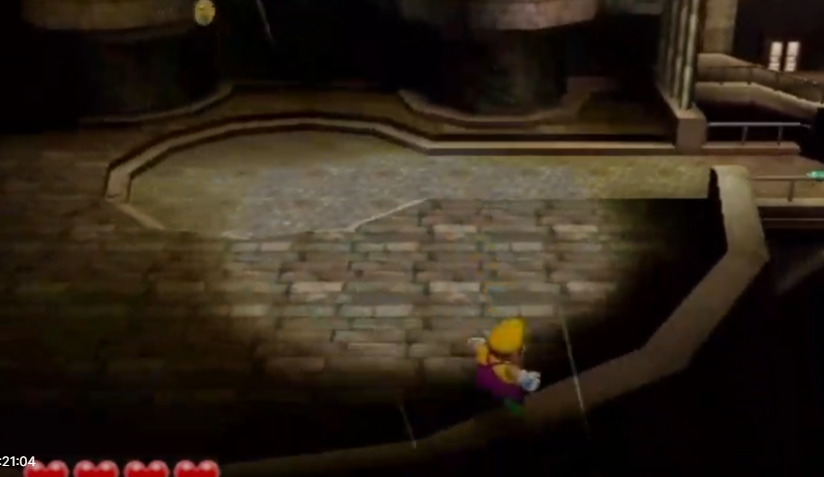
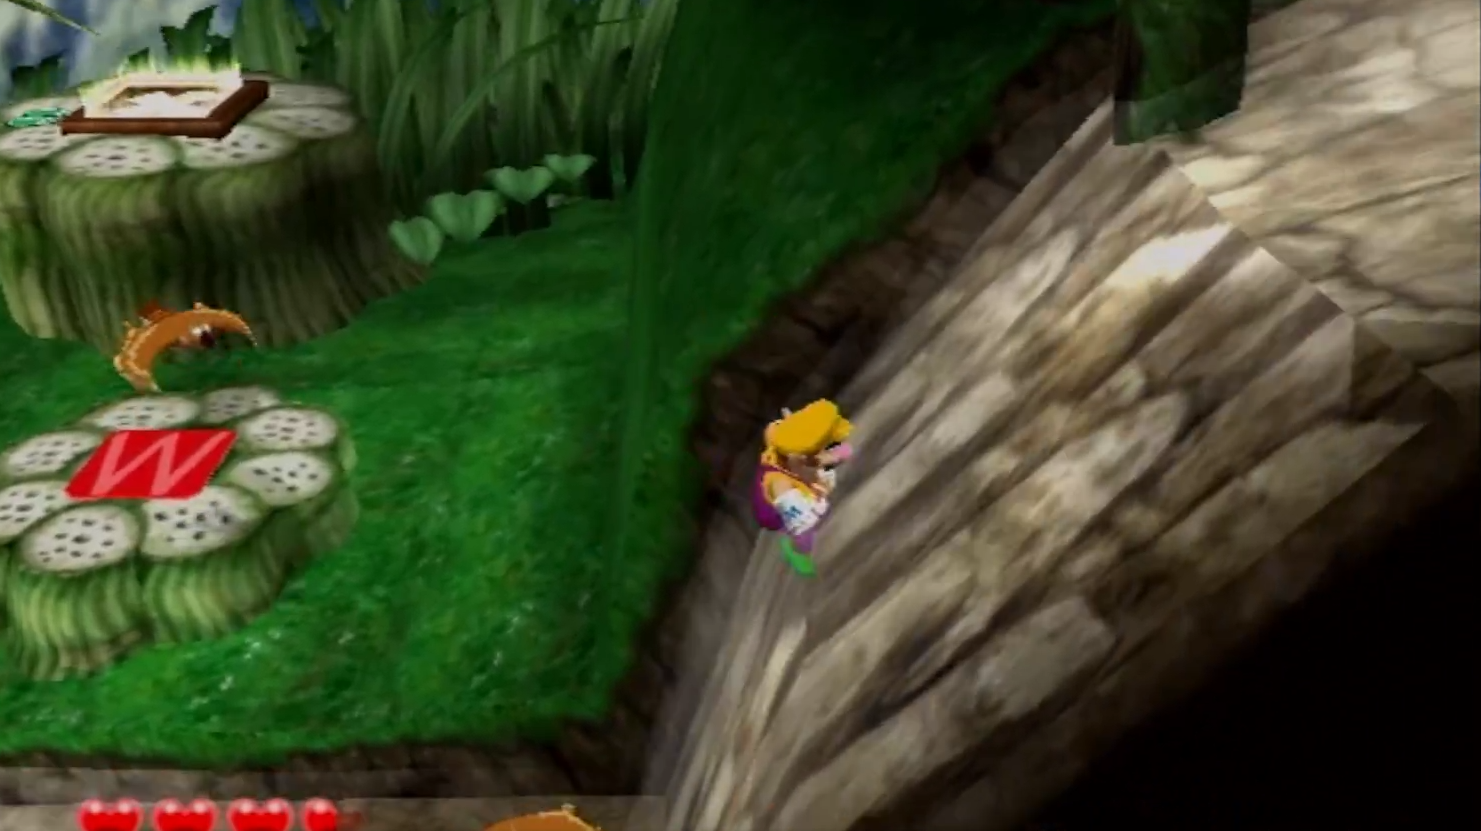
The first trick is very straightforward. In Greenhorn Forest there are two bridges near the end of the level with a "scripted" Unithorn lair below. In order to skip this tutorial, simply perform a dash jump at the center of the bridge just as it's about to collapse as shown below.

Chapter 2
This next trick requires a semi-precise angle. In Greenhorn Ruins after the first wall of Glue Globes, there is a sub-level to the left and more glue globes plus a gap to the right. Once you've completed the sub-level, return to the right and dash against the railing at about a 45 degree angle facing right. If Wario travels along the railing without bumping off, you can jump across the gap if timed perfectly. (The picture shows the angle and spot where you'd need to press jump)
Chapter 3
Horror Manor has two important skips to start off the level. The first trick is one that uses a bit of physics abuse with a hill at the very start. In the picture below, there is a circled part of the hill in question that Wario can stand on.

Once Wario is in position, have him look straight up the wall and perform an immediate dash jump to try and force Wario toward the plateau above. If performed correctly, Wario's jump should look similar to the picture below. (This tree makes it hard to see, but he's there I promise) Performing this trick sets us up to go into our first sub-level in Horror Manor, and also sets up to skip another major roadblock called The Bonehand (more on him later).

Our next skip is directly after the hill jump shown above. In Horror Manor there are two gates that block Wario off from completing the level called Bonehands. This first Bonehand can be skipped with a relatively new, yet simple to perform glitch. Firstly, follow the top of the plateau along the fence after completing the first sub-level. You should hit an invisible barrier around this area.
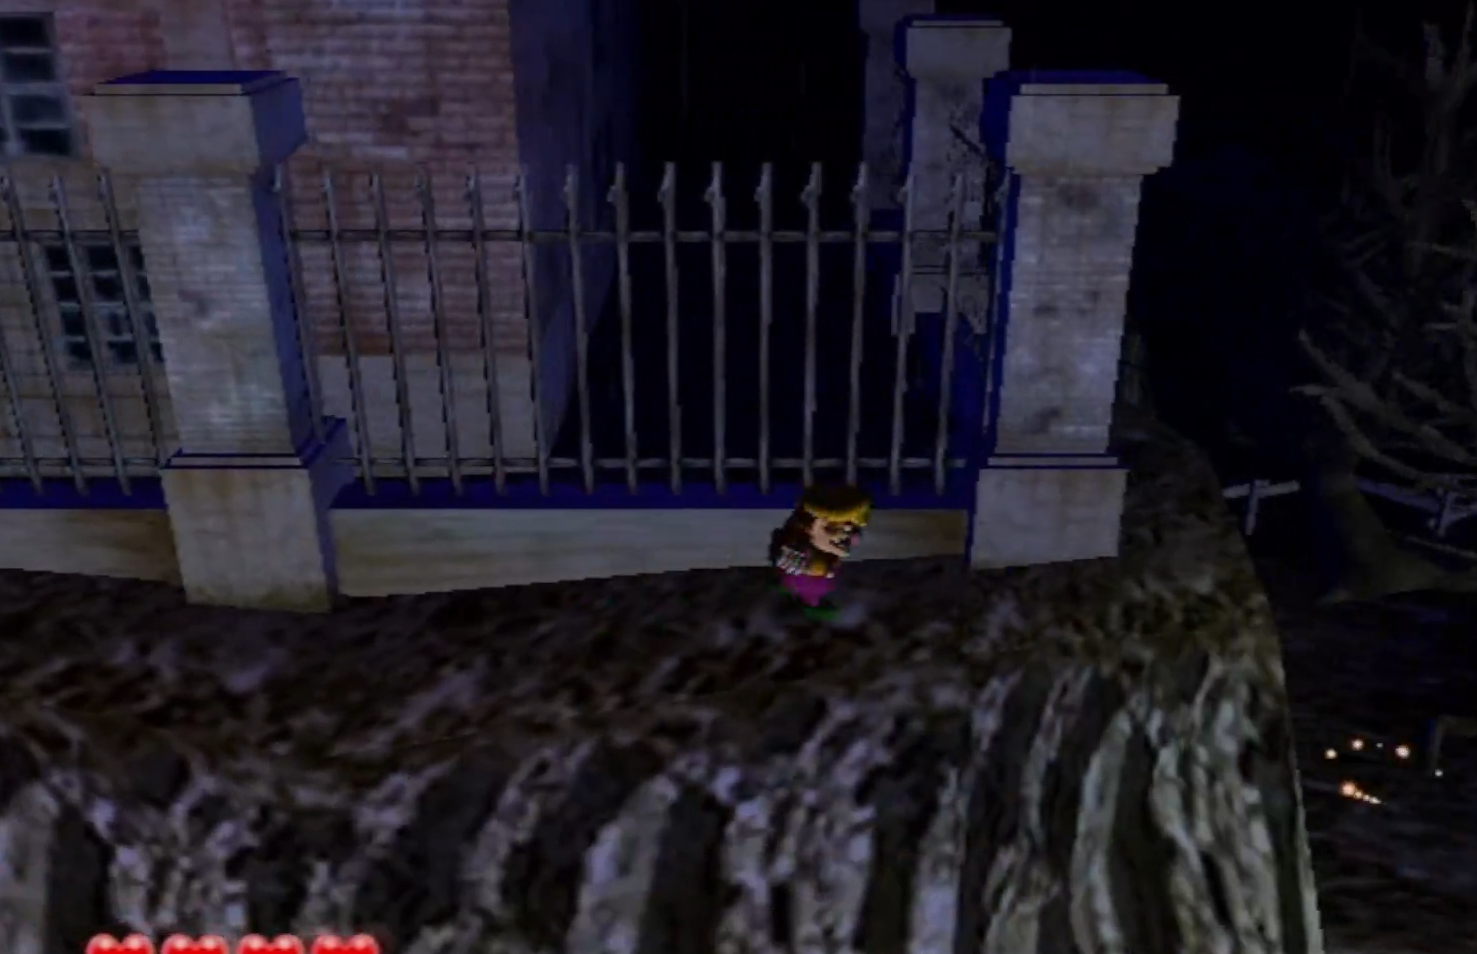
Once in position, you can jump down onto the top of the gate. From here small movements are needed to be safe and precise. Walk slowly to make Wario waddle gently into the invisible barrier. Waddling is needed to position Wario as close as possible, if Wario runs, he will bounce backwards from the barrier and be thrown off of the gate during the attempt of this trick.
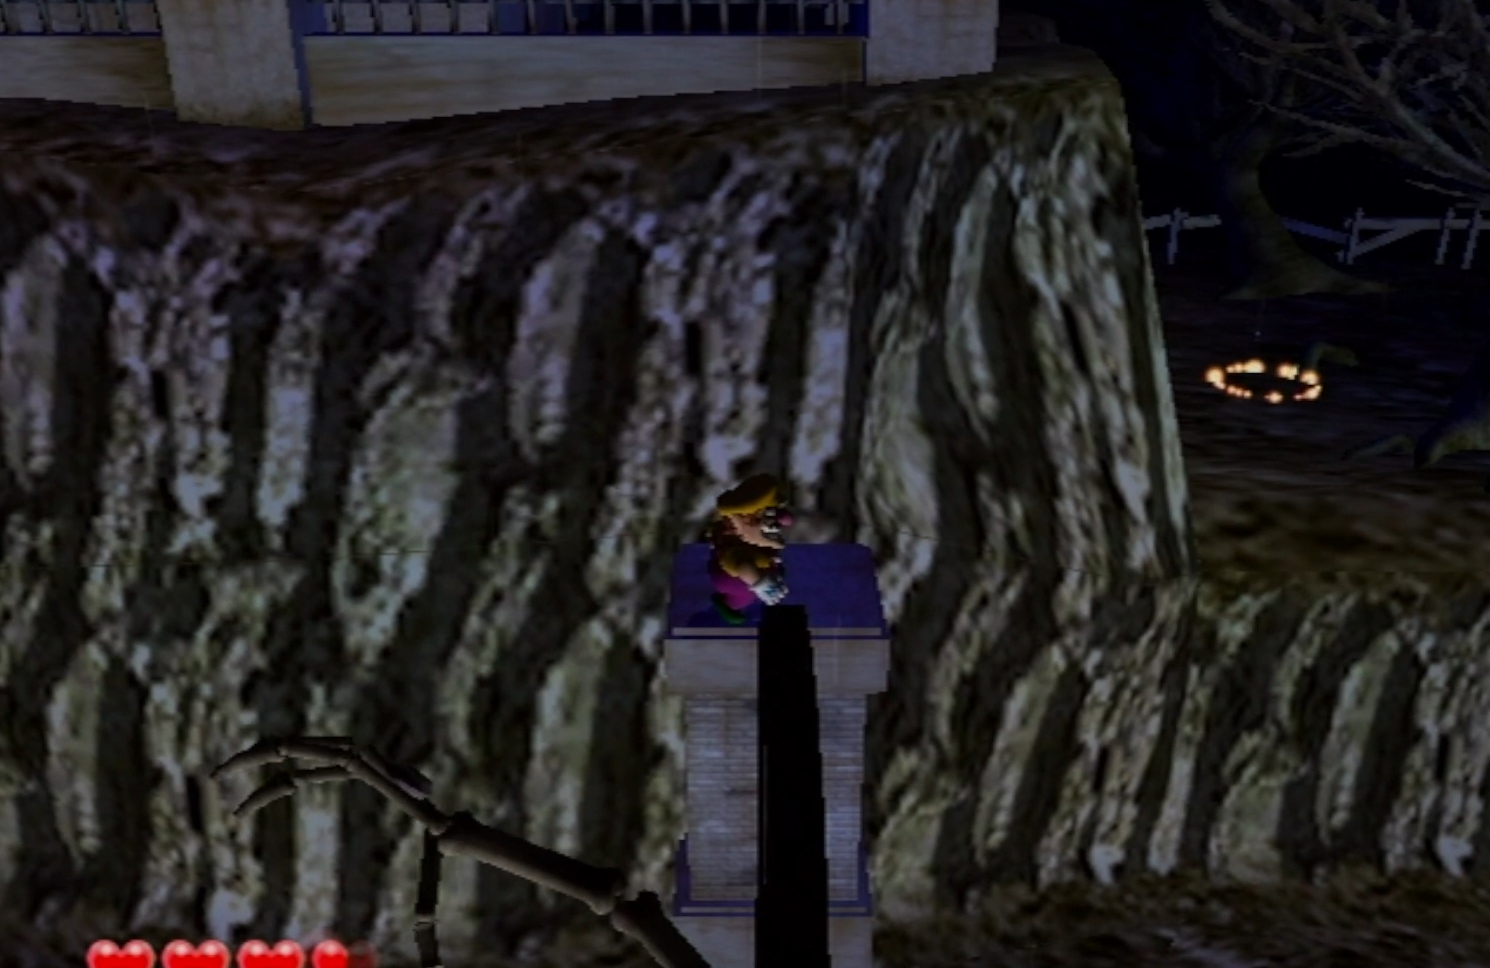
Now that you're waddling, all you have to do is wait. The Bonehand will attempt a slam attack against you. Let this attack hit Wario, then hold the control stick to the right. If done correctly, Wario will pass through the barrier during his getup animation.

After skipping through the first Bonehand you will dash across a narrow path toward two stone pillars. This spot marks a Crystal Entity mini boss fight. To skip it, simply jump north of the white fence seen in the picture below and walk to the right until you reach the graveyard section.

Lastly in Horror Manor is it's arena. You will fight through a house past four doors with Lion heads on them and into a room with a giant hole in the center. Once here, position Wario at the northernmost point of the hole. Look toward the hole directly south and dash, Wario will tumble onto the edge of the arena below without triggering it. If you walk to the right, you should be able to continue the level as intended.

Chapter 4
In our next world Wonky Circus, there are two more gates similar to The Bonehands in Horror Manor called Clown Gates. Skipping both gates in this level is possible without glitches, but takes a lot of practice. Our first gate is located near the first sub-level in the area, and can be skipped by using the tent in the background for more physics abuse. To begin the trick have Wario jump above the trap door that leads to the first sub-level and onto the tent.

After touching the roof of the tent you'll want to jump again as far up the tent as possible. After this second jump, make Wario ground pound on top of the tent just before he lands again. This will stop Wario from sliding anywhere and help to keep control. If done correctly, Wario should be about here.

After Wario gets up from his ground pound he will start sliding down the tent, at this point you must try to execute an immediate dash jump.

Once this jump is done, you will have to perform two more dash jumps consecutively until you reach about halfway around the tent's roof from front to back. At this point the trick is pretty much done. Wario should be past the Clown Gate's barrier by this point and you should be able to jump off the tent toward a sub-level seen in the distance.

Another obstacle in Wonky Circus is a Crystal Entity fight halfway through the level. In order to properly skip it, stand on the edge of the block and perform a ground pound to break it. Wario should only have one foot touching the block as this is attempted.

After the block is broken, Wario should still be standing on the border where the block used to be. At this point you can jump down the hole, this is done to let Wario move freely midair. If Wario keeps grabbing the ledge on his way down, input a punch just as he's about to grab the ledge to prevent it.

As you fall, you will see a circular area below you. The goal is to aim for the very edge of the area to avoid triggering the Crystal Entity. Once you land safely, walk along the edge until you reach the path on the right. Please note that there is some leeway here, you don't have to land on top of this ledge, but at least right next to it for the trick to be a success.
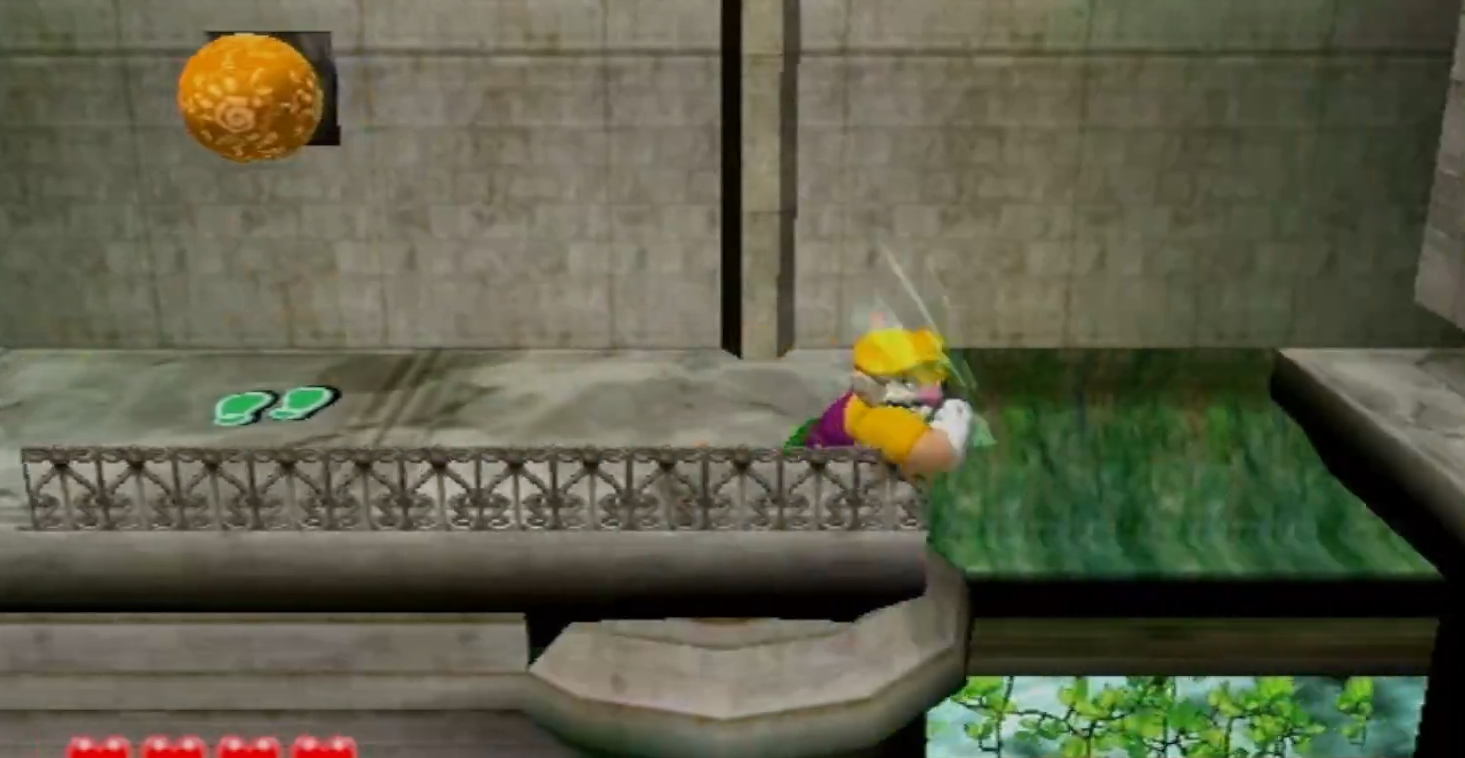
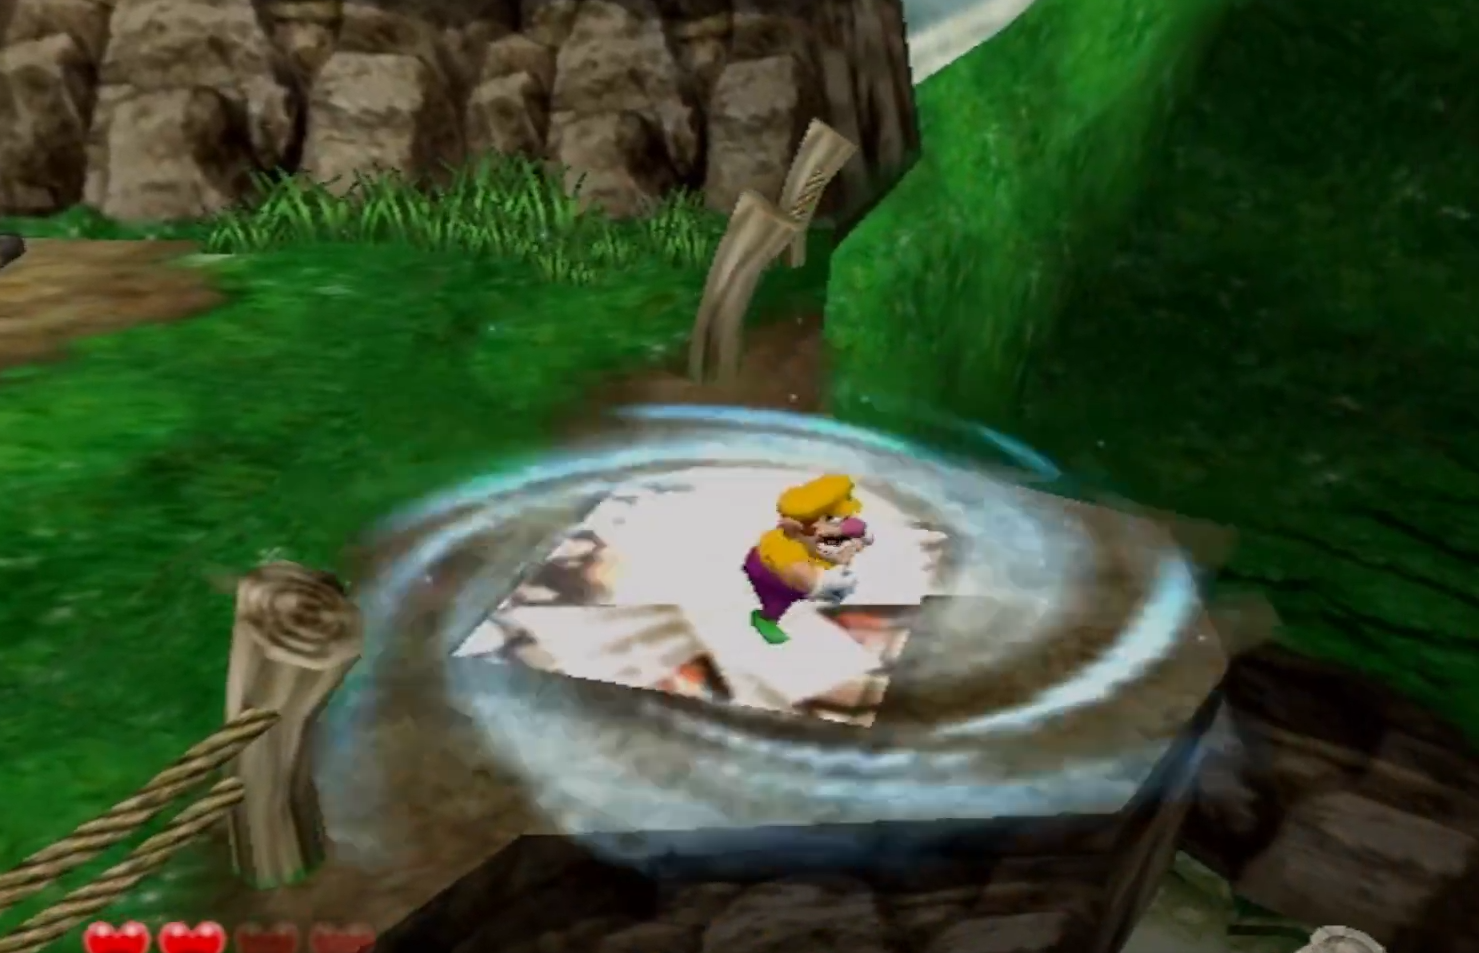
Our next gate is heavily position based. After the arena fight in Wonky Circus, you will come up to a blue treasure platform on a wooden walkway with a small plank leading south. Our jump begins here, have Wario line up with a shadow visible on the platform facing to the right (red line for reference).
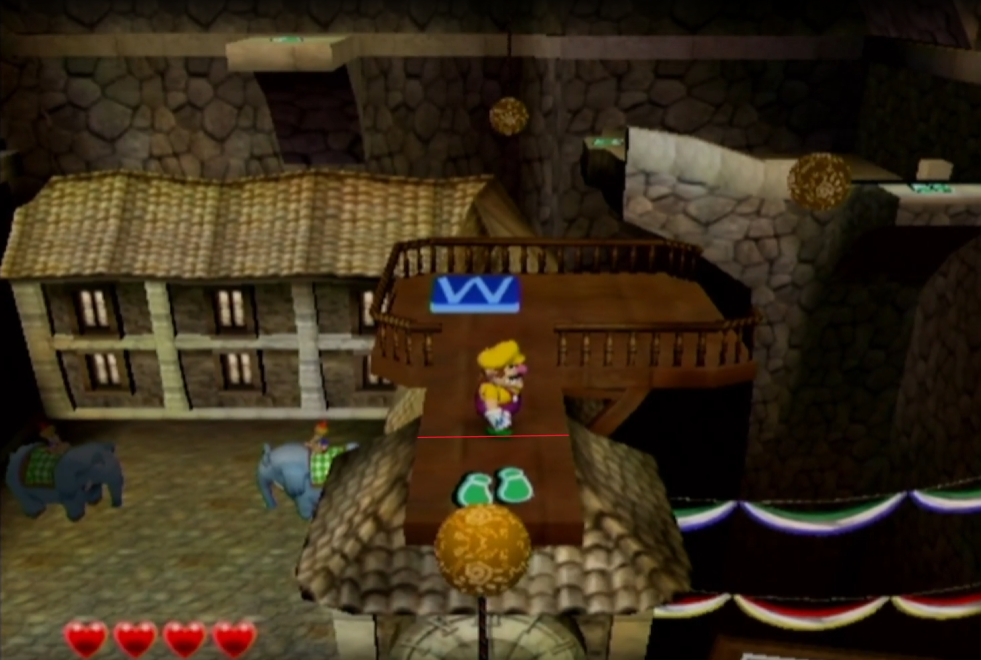
Once in position, perform a dash jump from the very edge of the plank and hold A throughout the entire jump, this helps ensure you get the best height and distance for the trick.

If done correctly, you will land on the column shown below between the Unithorn lair and Clown Gate. Hold the control stick right during this time or else you will slide into the Unithorn lair.
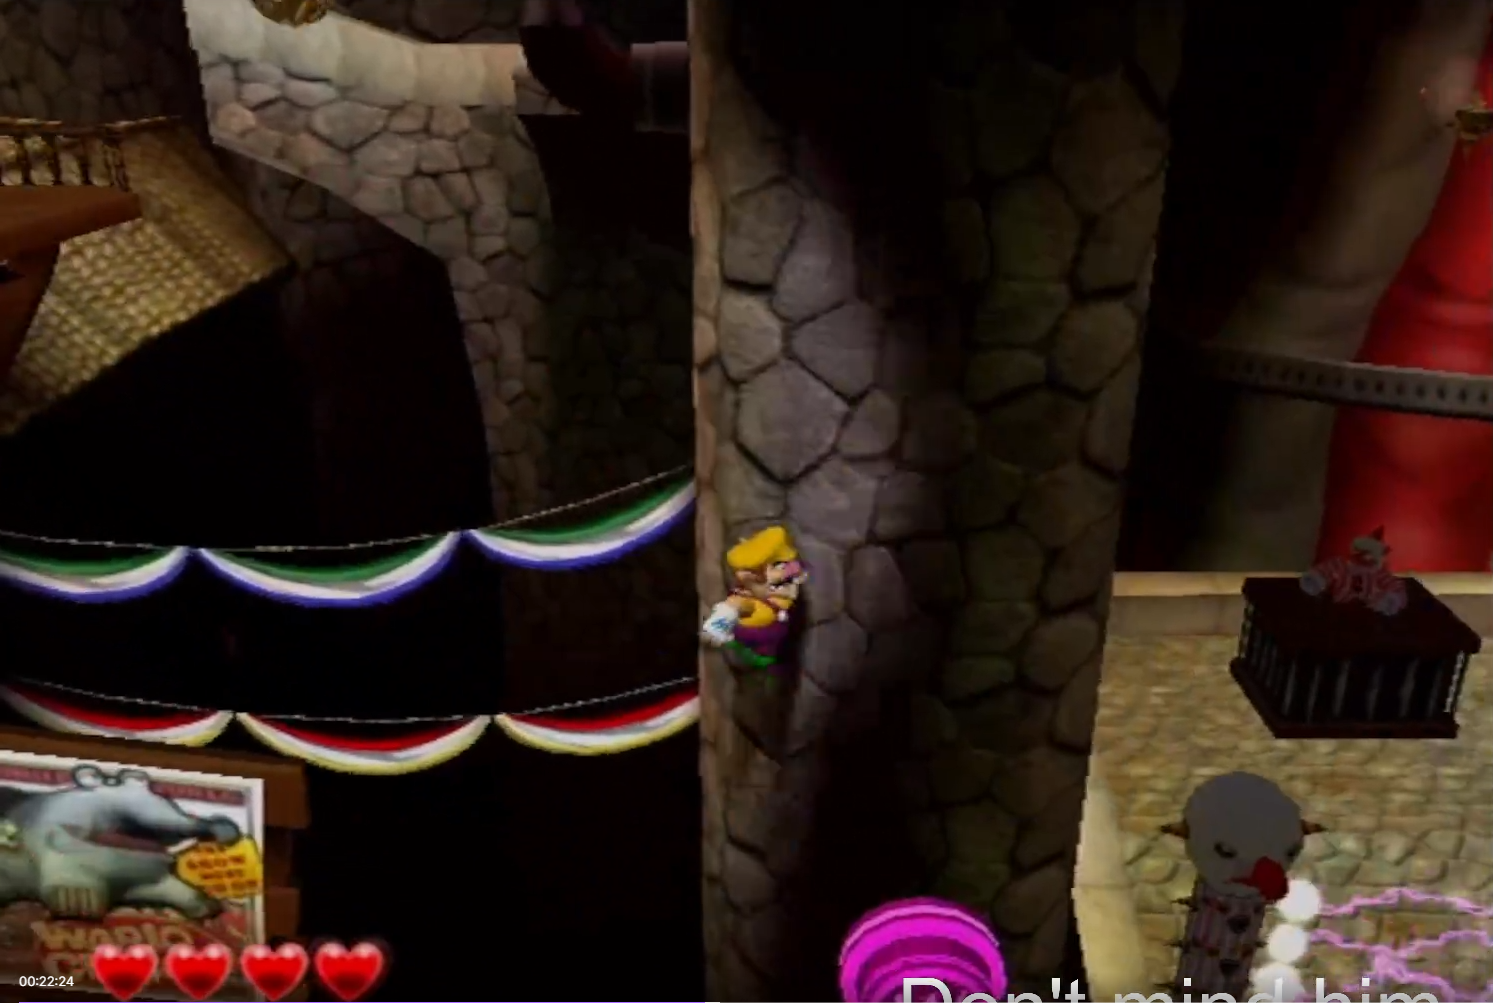
As you hold toward the right while on this column, perform a dash. This will cause Wario to tumble forward and slide between the walls of the column and the gate.

Chapter 5
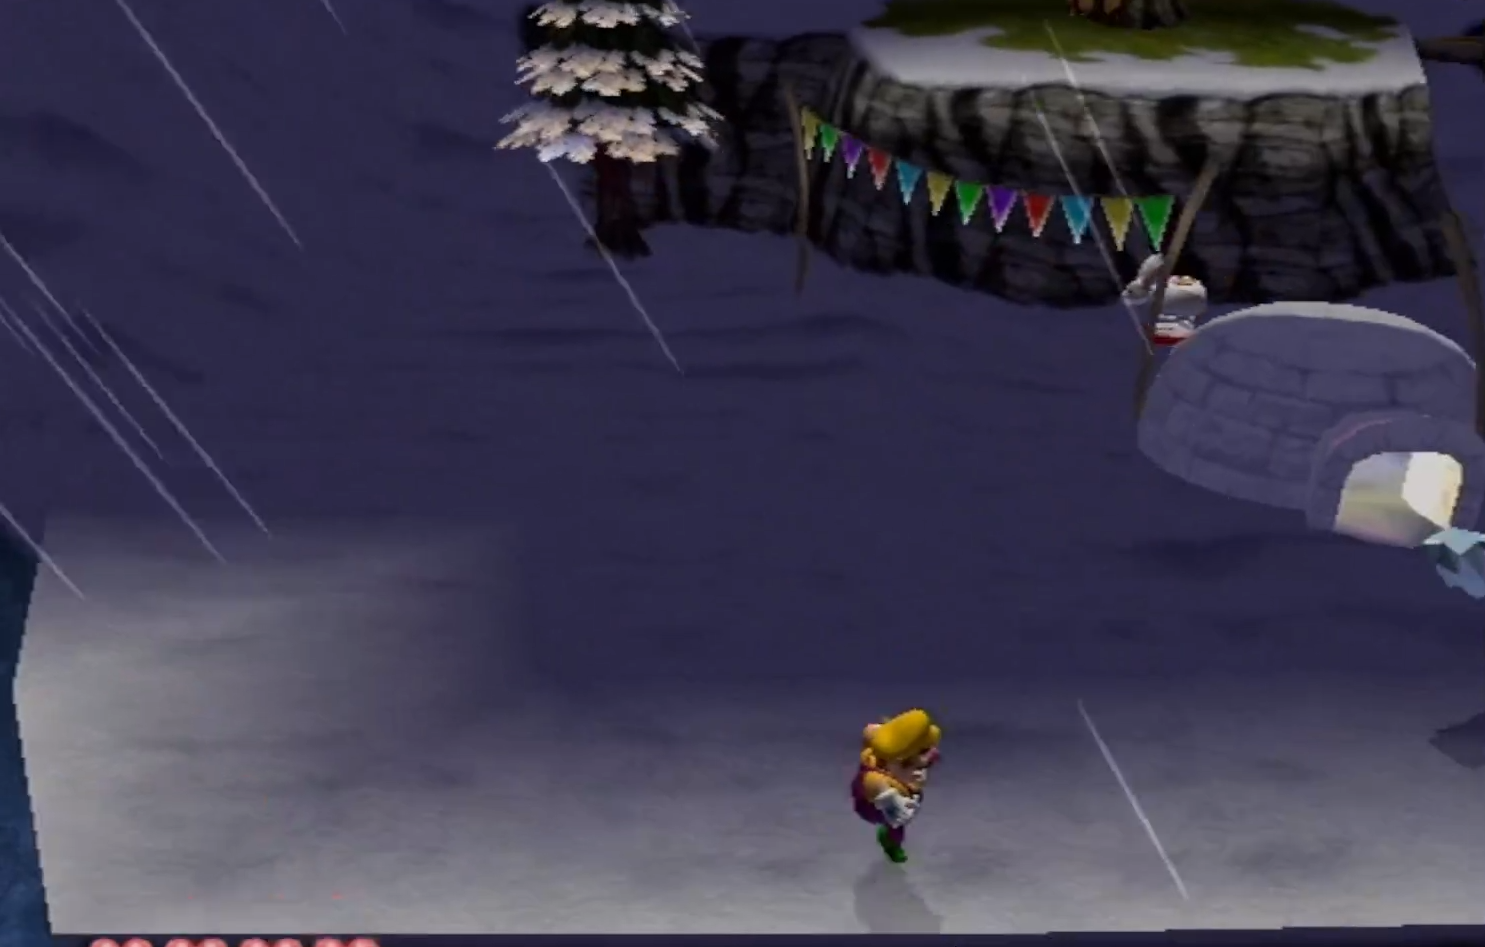
Shivering Mountains is where a lot of runners place their distain for the game with one reason being the difficulty of the first arena skip, and another being the Angler Mangler mini bosses. For the latter of the two, there is a glitch we can perform simply called "3.8". To execute the glitch, grab a Barrel Buster (snowman dude), then walk underneath the Angler Mangler's light as normal. Once in position, perform a pile driver as soon as Wario leaves the ground. With practice, this should get the appropriate height of the piledriver. Please note the measurement of 3.8 is based on height of the piledrive itself and can be seen in the upper right corner after every piledriver. After you successfully do a 3.8 piledrive, the Angler Mangler will take damage the moment he becomes vulnerable again over and over until it is defeated. Do NOT press the B button, or the R trigger during the glitch pressing either input resets the glitch and you'll have to start again. (The height of when you should piledrive is shown below.)

The First arena in Shivering Mountains can be skipped in a number of ways, but we will be going over the most consistent method by author's opinion. After defeating the Angler Mangler mini boss, jump down the middle of the slope until you hit a ramp in the center, jump off of it and land to the southern wall of this plateau.
Once here, travel along the bottom wall until you see an snow bear with a club. pick him up and align with a breakable block to the right and lightly throw him to break the block.

Here's where thing get tricky! By barely touching the control stick, have Wario waddle over to the edge of the hole until he starts teetering. Try to be as close to the camera as possible for the setup. This step sets up to help give Wario maximum left to right movement.

Once Wario is teetering for his life, simply input a punch then hold right on the control stick.

Once you are out from the square hole, start holding slightly down and right on the control stick. This will lead you to the closest wall of the arena below. Just as you are about to touch the outline of the arena, input a ground pound while still holding the previous inputs. Wario should bounce on the outer ring of the arena and fall out.

Note: Sometimes this ground pound isn't enough on it's own, if this is the case, try spamming a jump to force Wario out.
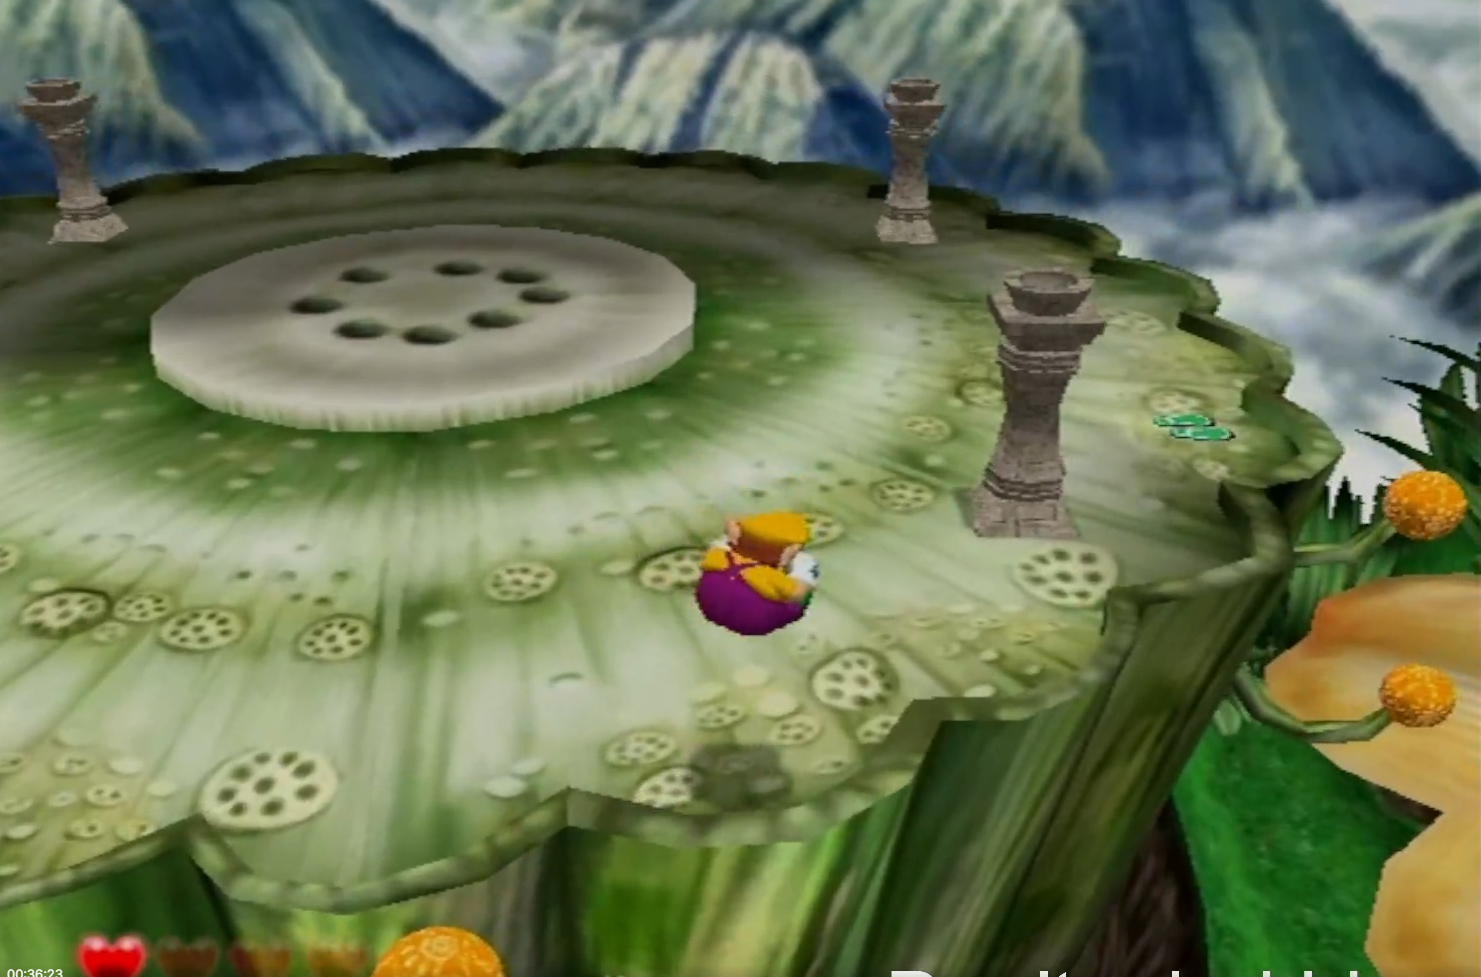
Shivering Mountains has two arenas in it. The second one is extremely easy to skip if you know how. After exiting the cave section of the mountains, you will come across another raised platform with the arena inside. All you need to do is walk to the very top of the arena before stepping into it, then walk along the northern wall to the other side. (In the picture you can see the angle of which you need to walk.)

Chapter 6
Beanstalk Way is notorious for having strangely difficult tricks near the beginning and end of the level. Near the beginning of the level there is a plateau with a sub-level, a red treasure platform, and a few birds (Ideally you would have just completed the mentioned sub-level directly before this trick). Perform a dash toward the small waterfall southeast of where you spawn. Wait here for a moment as the birds try to follow you, and as they are about to reach the water, jump back onto land closest to the wall on the right. At this point the birds should be grouped up next to the waterfall, you will try to jump on top of a bird from here.

If positioned correctly, you can land on a surface near the top of the waterfall and skip fighting a mini boss in the area. This trick also allows us to have access to a sub-level faster than we'd naturally come across.
After completing the previous trick and beating another sub-level, you should notice a dangling ladder in the middle of the area. Wario's jump can barely reach this ladder without enemy help if he stands close to the southern wall.

Once in position, perform a full jump while holding up on the control stick while aimed toward the lowest point on the ladder. This trick allows Wario to get back up to the main route while skipping the wild swing ding.

After completing the free-fall sub-level, there is an arena with a breakable block over top of it. Do NOT break through this block, instead just dash jump to the right as much as you can from the ledge. This skips the arena in its entirety, but there is also a statue part within that arena, so remember to come back for it after defeating the area boss.
Beanstalk Way's second arena is a different story from the first. after traveling past a hill filled with charging rams and defeating a Tree Demon, you will climb some glue globes up toward the second arena. To avoid getting trapped, carefully jump along the pedals of the arena platform to avoid the circle trigger zone (use ground pounds if needed for precision).
Just as you have skipped the second arena, there is a giant yellow flower you must land on to proceed. A Crystal Entity fight will trigger if you walk in the center of this flower. To avoid it, simply walk along the outer parts of the petals until you reach the next flower.

Chapter 7
Mirror Mansion provides a significant increase in difficulty for runners. There are three areas (technically two) in this world that can be skipped and save time. Our first area is roughly 1/3 the way through the level after the first Terrible Portrait fight. Follow the intended path until you fall down a hole, once there, head right until you hit a wall then have Wario stand against the northern wall and wait for an enemy to approach.

Once the enemy is close enough to the northern wall, you can bounce on his head to gain height.

Bouncing on the enemy and holding up on the control stick should allow Wario to grab onto the grate above him. Once he has grabbed ahold of the grate, simply jump to the right and over the first wall.

This next jump is almost just like the previous one. Travel toward the right until you are under an overhang of a walkway with ninja birds littering the area. Lure a bird to the southernmost part of the screen.

Much like the first jump, bounce on the enemy until Wario grabs the edge of the walkway. It's possible to jump on one of these birds as they attack to gain extra height if needed. This time however, once you grab the walkway, jump immediately in order to stay on top of the walkway, then continue as intended.

Once you have fallen down the third hole in this level then beaten the sub-level to the right, a Terrible Portrait boss will be toward the left. This version of the boss can be skipped by simply jumping around his barrier. To perform this safely, stand on the railing close to the left side of the area lined up with the edge of the Terrible Portrarit's leftmost hand.

Once here, jump outward toward the camera and try to strafe around to the other side of the Terrible Portrait wall. If done correctly, Wario should land about here on the other railing and be able to progress.

Chapter 8
Pecan Sands is the last area in the game and with it comes some surprisingly easy tricks and skips. There are four jumps Wario can make in this level that are much faster than the intended route in this level with one being done as soon as we spawn in. For our first jump Wario spawns in a sandy alley of sorts with a column behind him and a ledge northwest of him.

Run toward the sandfall and jump to grab the ledge next to the red button, then jump up next to the red button. This saves time due to the 15 second commute Wario would have to walk around otherwise. It also sets up for you to get two sub-levels, and gets us to our next jump.

Traveling to the left after the previous trick leads past two palm trees toward a gap. Simply dash toward the gap in question and jump at the last possible second to clear it. This skips a very brief climbing section and lands us closer to our next sub-level.
After completing two more sub-levels, you should come across a Glue Globe waterfall of sorts with a light blue treasure platform and a mini boss blocking a ladder to the left. to skip this mini boss, grab ahold of a falling Glue Globe while its at the highest it can be.

Once you grab ahold of the Glue Globe, jump left and strafe upwards toward the treasure platform seen in the picture. Wario should land safely on the walkway setting up for our next trick immediately after. Be careful however, the mini boss has a move that can suction Wario toward itself, so make sure it doesn't drag you back off.
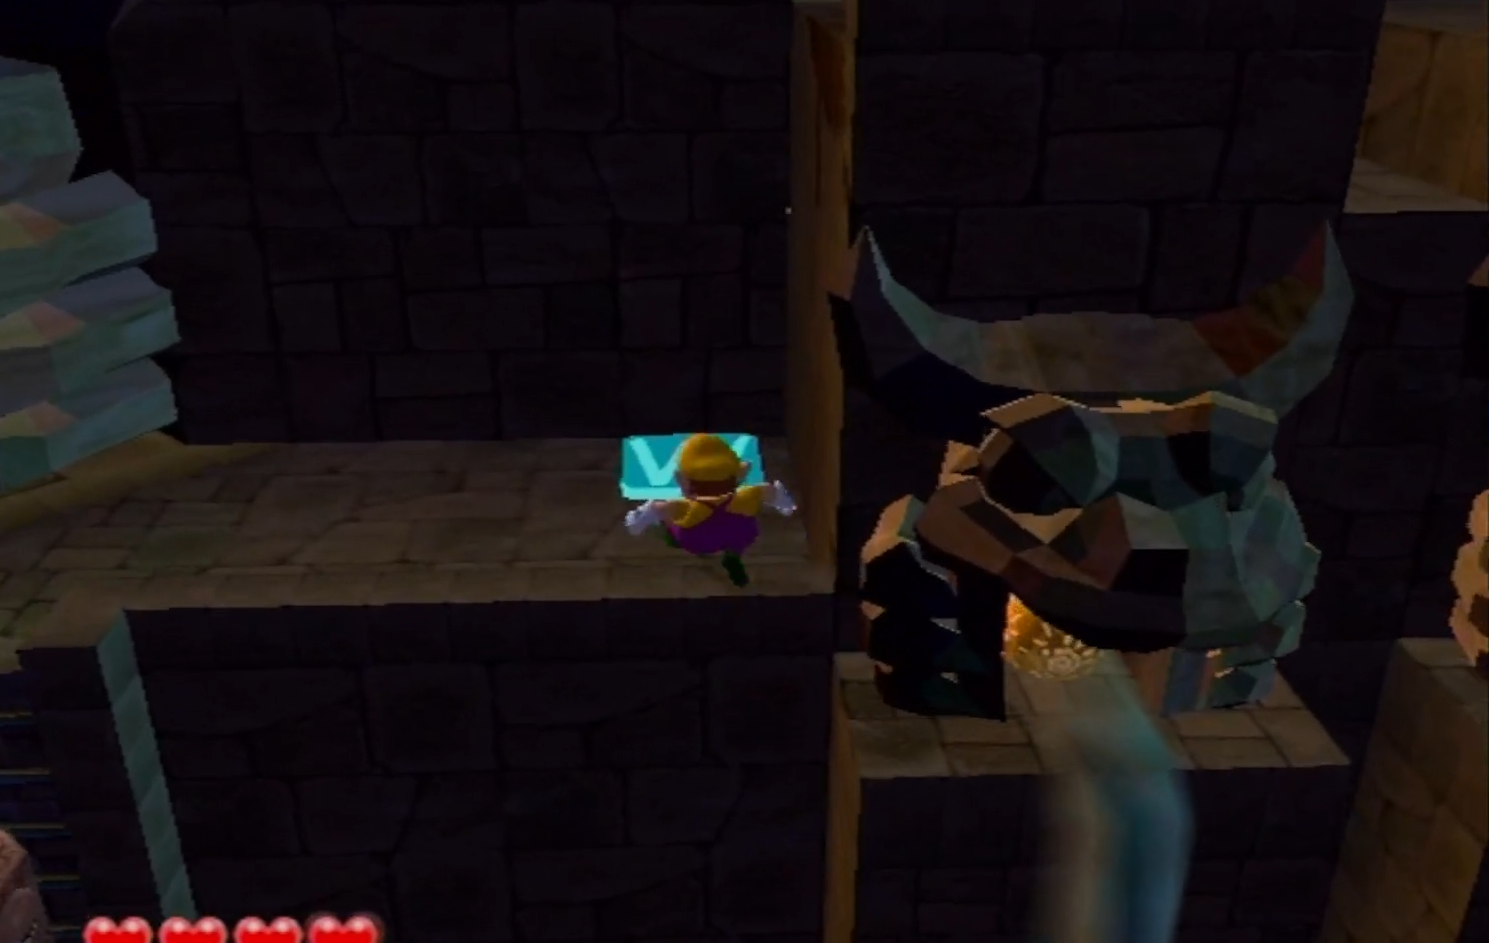
Coming up immediately after the light blue treasure platform is a giant creatrue head that creates a sand slide toward an arena. In order to skip the arena and the sand slide quickly, stand on the ledge next to the leftmost claw of the creature head and aim directly left of the camera. Perform a dash jump while on this ledge and hold the A button throughout the jump. Wario should land next to a pillar that leads him to a Blue Spriteling.

Chapter 9
Once again, this guide is intended to have covered the beginner-friendly tricks in the game. If there are tricks that seem to be missing from this guide, or if you are interested in learning past the beginner level, contact Dip92 or the Wario World Speedrunning Discord. The community is very willing to expand on any question asked about this game and it's history.
Thank you for reading, Dip92