The any% run for NanoApostle is quite difficult, the reason being related with the challenges.
In order to be able to use a good modules loadout, you need to complete quite a few challenges during boss battles to gain enough skill points (SP).
- That's under the assumption you're trying to go for optimal strats; If you just roll with whatever you can get and simply run for the fun of it then that's totally fine
Summerized versions for different "routes" can be found at the end of the guide.
Key Modules
- Extremist Traits Modules
These modules give significant damage boosts at the expanse of something else. Equipping 4 of these modules also transforms the heal into a damage buff to further improve your DPS.
You'll need 20 SP for Execution Thread, Extreme Corrosion, Slash Stabilizer and Frenzied Impulse.
- Insta-Booster (0 SP)
Stacking more light attack damage with the other bonuses is really good.
Complementary Modules
- Energy Discharge (3 SP)
Being available from the very start, it's a nice flat damage increase that you can just add into the loadout without thinking about too much.
It's also a Tactical Assault module, meaning is synergizes with Insta-Booster by giving you more grapple damage.
This is what I use, and the only thing to keep in mind is that the bonus damage applies only to melee hits, so try to avoid hitting destruction points with energy shots if possible.
- Impulse Compressor (4 SP)
This module is a bit expensive, and requires learning to block with the aim shield, but the benefit of applying double the infection stacks instantly is really big, which is why I use it.
- Compression Shot (0 SP)
This is an ok alternative to Impulse Compressor, and is free.
A cool trick with this module is that you can charge a charged attack and a charged shot simultaneously.
- Deconstructive Impact (0 SP)
This is an ok alternative to Energy Discharge, and is free.
It's what I would use if I didn't have enough points for Energy Discharge before Kurozan, since whenever he does enters a parry stance without dashing afterwards, you can build up a charged attack while waiting for him to exit the parry stance which reveals a destruction point.
- Crumbling Corrosion (4 SP)
I honestly haven't tried this in a build myself, but this might be a better alternative to Energy Discharge if you're able to keep a high amount of infection stacks on bosses.
Chapter 0 - Game Start / Berserker
Modules (2 Slots)
- Insta-Booster (0 SP)
The only thing you can equip at this point.
Boss Challenges
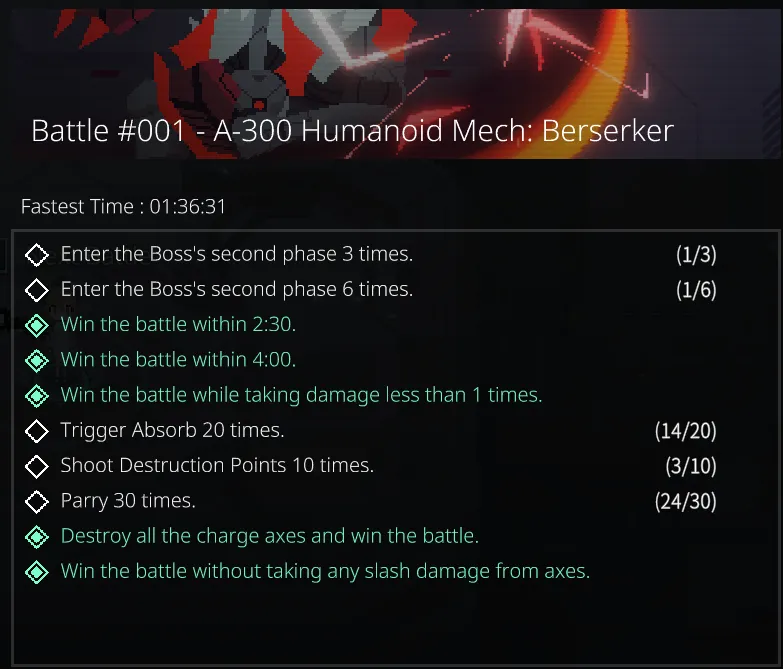
Speedrun-able challenges in increasing efficiency order:
- Speedrunning challenges
- Destroying all the charge axes in 2nd phase is relatively easy with some practice.
- Win without taking slash damage.
- Win without taking damage.
- 30 Parries is technically doable but you'll have to get a lot of slashes.
- 20 absorbs and 10 destruction points are usually unrealistic to complete without intentionally extending the fight.
Chapter 1 - Commander
Modules (3 Slots)
- Insta-Booster (0 SP)
- Execution Thread (6 SP) - After speaking with Wenny, you should have enough points to equip it
- (Optional) Pulse Slicer (0 SP) - Equip for some comfort at the expanse of some attack speed
Boss Challenges

Speedrun-able challenges in increasing efficiency order:
- Speedrunning challenges
- Trigger 6 absorbs
- Destroy 20 cannons, you'll usually complete this without having to think about it
- Win without taking projectile damage
- Win without taking damage
- Win without destroying controlled cannons - This one is pretty annoying because sometimes you'll destroy those right as they appear by accident + The laser cannons will sometimes just hit you even if you're dashing through them so leaving them up is a risk I personally don't like taking.
- Hacking 6 cannons means you're sacrificing absorb damage, which is slow in most cases.
- The 2 cases I would hack cannons are to cancel the bullet hell attack and to get rid of laser cannons quickly if they spawn in a bad spot.
- Hacking cannons doesn't count as destroying them if you're attempting the last challenge in runs.
Chapter 2 - Molter
Modules (4 Slots)
- Insta-Booster (0 SP)
- Execution Thread (6 SP)
- Energy Discharge (3 SP) - Generally good, not many other options at this point of the run
- Compression Shot (0 SP) - Charged shots are decent
You don't really have other options for modules at this point. Modules like Injury Plague or Mass-Energy Converter from my experience bring less value compared to Compression Shot, and Overload Adaptor doesn't work well the light attack build + it's a 5 SP module.
Boss Challenges
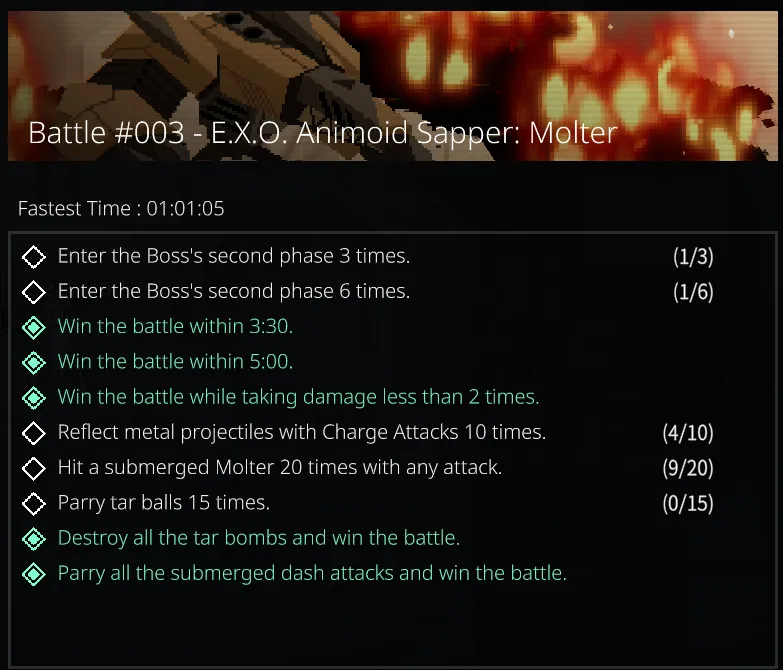
Speedrun-able challenges in increasing efficiency order:
- Speedrunning challenges
- Parry all submerged attacks is usually not a problem if you do it with a charged attack, since the timing lines up pretty well.
- Destroy all tar bombs is usually not a problem, unless Molter decides to spam tar balls, in which case that's just bad rng.
- Win without taking damage 2 times
- Hit submerged Molter 20 times is sometimes possible, but requires good rng.
- Parrying tar balls and metal projectiles is usually unrealistic to complete without intentionally extending the fight.
Chapter 3 - Reaper
Modules (5 Slots)
- Insta-Booster (0 SP)
- Execution Thread (6 SP)
- Crumbling Corrosion (4 SP) - The negative effect actually makes it so you don't lose the Execution Thread buff when triggering absorb if you were missing health
- Energy Discharge (3 SP)
- Impulse Compressor (4 SP) or Compression Shot (0 SP) as an alternative
Boss Challenges

Speedrun-able challenges in increasing efficiency order:
- Speedrunning challenges
- Win without triggering fear.
- Stop death explosions (I honestly am not sure what this means, but it always completes itself in my runs)
- Escape foggy area within 1:00
- Win without taking damage 2 times
- Reflecting flame orbs is usually unrealistic to complete without intentionally extending the fight.
Chapter 4 - Hunter
Modules (6 Slots)
- Insta-Booster (0 SP)
- Execution Thread (6 SP)
- Crumbling Corrosion (4 SP)
- Slash Stabilizer (3 SP)
- Trauma Buffer (6 SP) - This is purely for the Extremist Trait adaptability bonus which transforms heal into a damage buff
Depending on the amount of SP you have left, here are some options:
- Impulse Compressor (4 SP)
- Energy Discharge (3 SP)
- Compression Shot (0 SP)
Boss Challenges

Speedrun-able challenges in increasing efficiency order:
- Speedrunning challenges
- Win without triggering traps, this isn't too difficult if you invest a bit of time to clearing the traps before they become active.
- Win without taking damage 2 times
- Win without taking damage in phase 2
- Destroy 30 traps is sometimes possible with the proper rng if you intentionally clear all the traps.
- Stopping self-repairs is usually unrealistic to complete without intentionally extending the fight.
- Hacking traps is almost never better than just spending the energy on absorb damage, doing it 12 times is a really big amount in general, so it's also unrealistic to complete in 1 fight.
Chapter 5 - Kurozan
Modules (7 Slots)
- Insta-Booster (0 SP)
- Execution Thread (6 SP)
- Crumbling Corrosion (4 SP)
- Slash Stabilizer (3 SP)
- Frenzied Impulse (7 SP) - Replaces Trauma Buffer for the extremist trait, while also providing more damage.
Depending on the amount of SP you have left, here are some options:
- Impulse Compressor (4 SP)
- Energy Discharge (3 SP)
- Compression Shot (0 SP)
- Deconstructive Impact (0 SP)
- Crumbling Corrosion (4 SP)
Boss Challenges
Irrelevant
Route Examples
Excludes Low Hit Challenges - 20 SP Total
- Equip:
- Insta-Booster (0 SP)
- Berserker (+4 SP):
- Win the battle within 2:30
- Win the battle within 4:00
- Destroy all the charge axes and win the battle
- Win the battle without taking any slash damage from axes
+2 SP from Wenny
- Equip:
- Insta-Booster (0 SP)
- Execution Thread (6 SP)
- (Optional) Pulse Slicer (0 SP)
- Commander (+5 SP):
- Win the battle within 2:30
- Win the battle within 4:00
- Destroy 20 hover cannons
- Trigger Absorb 6 times
- Win the battle without taking damage from projectiles
- Equip:
- Insta-Booster (0 SP)
- Execution Thread (6 SP)
- Energy Discharge (3 SP)
- Compression Shot (0 SP)
- Molter (+3 SP):
- Win the battle within 3:30
- Win the battle within 5:00
- Destroy all the tar bombs and win the battle
- Equip:
- Insta-Booster (0 SP)
- Execution Thread (6 SP)
- Crumbling Corrosion (4 SP)
- Energy Discharge (3 SP)
- Compression Shot (0 SP)
- Reaper (+5 SP)
- Win the battle within 4:00
- Win the battle within 5:30
- Escape the foggy area within 1:00
- Stop all of the Reaper's death explosions and win the battle
- Win without triggering Fear
- Equip:
- Insta-Booster (0 SP)
- Execution Thread (6 SP)
- Crumbling Corrosion (4 SP)
- Slash Stabilizer (3 SP)
- Trauma Buffer (6 SP)
- Compression Shot (0 SP)
- Hunter (+2 SP):
- Win the battle within 4:30
- Win the battle within 6:00
- Equip:
- Insta-Booster (0 SP)
- Execution Thread (6 SP)
- Crumbling Corrosion (4 SP)
- Slash Stabilizer (3 SP)
- Frenzied Impulse (7 SP)
- Compression Shot (0 SP)
- Deconstructive Impact (0 SP)
Includes Low Hit Challenges - 27 SP Total
- Equip:
- Insta-Booster (0 SP)
- Berserker (+5 SP):
- Win the battle within 2:30
- Win the battle within 4:00
- Win the battle while taking damage less than 1 times
- Destroy all the charge axes and win the battle
- Win the battle without taking any slash damage from axes
+2 SP from Wenny
- Equip:
- Insta-Booster (0 SP)
- Execution Thread (6 SP)
- (Optional) Pulse Slicer (0 SP)
- Commander (+6 SP):
- Win the battle within 2:30
- Win the battle within 4:00
- Win the battle while taking damage less than 1 times
- Destroy 20 hover cannons
- Trigger Absorb 6 times
- Win the battle without taking damage from projectiles
- Equip:
- Insta-Booster (0 SP)
- Execution Thread (6 SP)
- Energy Discharge (3 SP)
- Compression Shot (0 SP)
- Molter (+5 SP):
- Win the battle within 3:30
- Win the battle within 5:00
- Win the battle while taking damage less than 2 times
- Destroy all the tar bombs and win the battle
- Parry all the submerged dash attacks and win the battle
- Equip:
- Insta-Booster (0 SP)
- Execution Thread (6 SP)
- Crumbling Corrosion (4 SP)
- Energy Discharge (3 SP)
- Impulse Compressor (4 SP)
- Reaper (+6 SP)
- Win the battle within 4:00
- Win the battle within 5:30
- Win the battle while taking damage less than 2 times
- Escape the foggy area within 1:00
- Stop all of the Reaper's death explosions and win the battle
- Win without triggering Fear
- Equip:
- Insta-Booster (0 SP)
- Execution Thread (6 SP)
- Crumbling Corrosion (4 SP)
- Slash Stabilizer (3 SP)
- Trauma Buffer (6 SP)
- Impulse Compressor (4 SP)
- Hunter (+3 SP):
- Win the battle within 4:30
- Win the battle within 6:00
- Win the battle while taking damage less than 2 times
OR
- Win without triggering any traps
OR
- Win without being attack by Hunter while it is invisible
- Equip:
- Insta-Booster (0 SP)
- Execution Thread (6 SP)
- Crumbling Corrosion (4 SP)
- Slash Stabilizer (3 SP)
- Frenzied Impulse (7 SP)
- Impulse Compressor (4 SP)
- Energy Discharge (3 SP)