Firstly, thanks @SteveOfWarr for setting up the leaderboard. I've wanted to run this game for a while but never got around to it until now.
After some testing with different settings on DuckStation, I've noticed that FPS timing is not consistent between games. Using the NTSC release, DH1 appears to render at 30 FPS as expected, but DH2 and DH3 render at 60 FPS. The menus and FMVs all render at about 30 FPS.
I've been trying different settings to get DuckStation to render DH2 at 30 FPS, but it always renders at 60 FPS. There is a list of 60 FPS PS1 games; however, DHT isn't mentioned. I tested a few games from the list, and they render at 60 FPS as expected, while most other games are 30 FPS. This leads me to believe that DH2 and DH3 maybe 60 FPS games.
Can anyone else with DuckStation confirm if they are seeing 60 FPS on DH2 and DH3 during gameplay? You can display FPS in DuckStation from Settings > Graphics > OSD > Show FPS. You can see the settings I've used here: https://postimg.cc/gallery/XWgbW7q (note: "Preload Image to RAM" should be disabled).
Any help here would be appreciated, as it will help clarify the rules, given that it's currently not possible to meet the "25/30 FPS" requirement for DH2 or DH3 on an emulator.
Hey, no problem submitting another run with the 'preload image to RAM' setting disabled. I'm not sure why I even enabled it. From my understanding, it's meant to help remove stuttering if your ISOs are stored on a shared network drive or slow media (like an SD card). I can't see it having much of an effect on FPS. Is there a post or some documentation that mentions this? Either way, it should be disabled because of the possible effect it could have on loading times.
I've just done some tests with 'preload image to RAM' disabled, and no matter what settings are set in DuckStation, DH2 and DH3 gameplay render at 60FPS, and DH1 renders at 30FPS. The main menu (where you select the games) and FMVs all render at 30FPS. Other runners should be able to confirm this if they use the exact settings from my screenshots (actually, it wouldn't matter, as long as emulation speed is set to 100%).
I know there were a few 60FPS games on PS1, but I've never heard of DHT being one of them. However, it is very possible DH2 and DH3 actually render at 60FPS, while DH1 renders at 30FPS, on console as well. I think a deeper look is required here.
There is only one other DH2 emulated run right now, and we don't have screenshots of the settings used to compare against. So while I'm happy to resubmit the run, it would be helpful to have someone else confirm if they also get 60FPS when playing DH2 or DH3 on an emulator. If that's the case, then the rules may need some more adjusting :).
Thank you! Would really like to see how this plays with mouse on offical hardware.
I discovered the short cut about a year ago completely by accident. Basically, you shoot the box in front of the entrance within 2-3 seconds of starting. Not sure if anyone else has found it, couldn’t find any posts or videos that mention it.
Auto Splitter is now avaliable in LiveSplit.
LRT has been added to the Auto Splitter. The Auto Splitter will pause whenever the IGT pauses.
To enable the LRT, right click on the main window, select Compare Against > Game Time.

Incase you need a break while running the IGT pauses for the following events:
- During cut scenes
- During loading screens
- Room transitions
- In the ESC/game options menu
- Paused screen
For clarity, IGT does not pause:
- In the inventory/shop screens
- When dialog/text boxes are active
- When reading files
We are currently working on an autosplitter. Right now it is very bare bones and supports autostart when you take control of the player, this is very close to the time that the IGT starts. It will also split at the end of flashbacks and end game.
IGT is not supported yet, we're having a difficult time tracking down a stable pointer to the IGT (thanks to the way GameMaker does things). If anyone has any experience developing autosplitters for GameMaker we would welcome any help :).
Auto Splitter source code: https://github.com/kapdap/conscript-autosplitter/
Nice job to @TheDementedSalad and anyone else who worked on the load remover.
These changes have been merged into the main autosplitter and should be avaliable directly through LiveSplit. To enable load remover, Edit Splits, goto Settings and under "Timing Methods" check "Load Remover Time".

Finally added Dreamcast codes for RetroArch/Flycast and Action Replay/Gameshark
https://github.com/kapdap/re-cvx-patches/blob/master/doorskip/DC.md
Hi @kurukuru4263 you might need to update the Door Skip patch file.
Download imported_patch.yml and save it to RPCS3\patches\imported_patch.yml.
New CFW and HFW+HEN are available for PS3 firmware 4.87. You can now update and continue using door skip on PS3 console. https://www.psx-place.com/threads/4-87-ofw-released-cfw-homebrew-exploits-updates-for-4-87.31957/
Also, the most recent RPCS3 updates have fixed the texture and lighting issues mentioned above.
Have you tried running the SRTHost32.exe as Administrator?
There are two different SRT windows. The non-interactable one is the Game Overlay Window and sits above the game window. This gives you the ability the see the SRT on one monitor while running the game in full screen. The Main SRT Window is interactable and should work as you would expect. Streamers can also use this window on their stream overlays.
If you want to disable one of the SRT windows you have to remove the appropriate window plugin folder from the SRT Host/plugins folder. For example if you want to disable the Game Overlay Window remove the folder called SRTPluginUIMGUDirectXOverlay, or SRTPluginUIMGUWPF to disable the Main SRT Window.
@ResiDrache you probably need the .NET Core v5.0 x86 runtime. I've added a note to the original post.
We now have a door skip for RE CVX on PS3, PS2 and GCN!
GitHub: https://github.com/kapdap/re-cvx-doorskip
#PlayStation 3
##RPCS3
- Download imported_patch.yml and save it to RPCS3\patches\imported_patch.yml.
- Open RPCS3 then Right Click Game, select Configure Game Patches and enable the patch.
- Run the game!
##Console
FIRMWARE 4.87 OR OLDER REQUIRED!
Install Artemis PS3 onto your PS3 (see guides below).
- Run Artemis, select Online DB and choose your release from the list:
- Biohazard Code Veronica X NPJB00135 01.01
- Resident Evil Code Veronica X NPUB30467 01.00
- Resident Evil Code Veronica X NPEB00553 01.00
- Enable Remove Door Animations code.
- Read the Using Artemis guide for more info on running the game.
Installing codes onto a USB drive (optional):
*Note: Your web browser may add .txt to the file name when saving these patch files. Remove .txt and make sure the file name ends with .ncl. *
- On a USB drive create a folder called USERLIST.
- Download the patch file for your release and save it to USERLIST:
- Insert the USB drive into your PS3 and run Artemis.
- Select Cheats and choose your release from the list.
- Enable Remove Door Animations code.
- Read the Using Artemis guide for more info on running the game.
#PlayStation 2
##PCSX2
*Note: Your web browser may add .txt to the file name when saving these patch files. Remove .txt and make sure the file name ends with .pnach. * (thanks @MattRPD )
- Download the patch file for your release and save it to PCSX2\cheats:
- [SLPM-650.22] [JP] Biohazard: Code: Veronica Kanzenban
- [SLUS-201.84] [US] Resident Evil: Code: Veronica X
- [SLES-503.06] [EU] Resident Evil: Code: Veronica X
- Open PCSX2, select System and check Enable Cheats.
- Run the game!
##Console
Codes for Action Replay/GameShark/CodeBreaker etc...
[SLPM-650.22] [JP] Biohazard: Code: Veronica Kanzenban
2013393C 00000000 20133944 00000000
[SLUS-201.84] [US] Resident Evil: Code: Veronica X
20133D4C 00000000 20133D54 00000000
[SLES-503.06] [EU] Resident Evil: Code: Veronica X
20133FCC 00000000 20133FD4 00000000
*Note: Your web browser may add .txt to the file name when saving these patch files. Remove .txt and make sure the file name ends with .ini. *
- Download the patch file for your release:
- Save the patch file to the GameSettings folder under Dolphins User Directory:
- Windows: Documents/Dolphin Emulator/GameSettings
- MacOS: ~/.dolphin-emu/GameSettings
- Linux: ~/.dolphin-emu/GameSettings
- Open Dolphin and run the game!
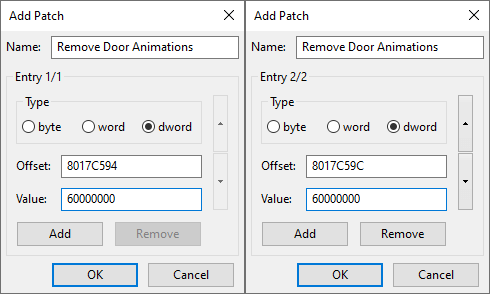
Adding patch manually (optional):
- Open Dolphin then Right Click Game, select Properties then select Patches tab.
- Press the Add button (near bottom of the dialog) to open the Add Patch dialog.
- In the Name field enter Remove Door Animations.
- Find the Offsets and Values for your game release from the tables below.
[GCDJ08] [JP] Biohazard: Code: Veronica Kanzenban
Offset Value 8017C594 60000000 8017C59C 60000000
[GCDE08] [US] Resident Evil: Code: Veronica X
Offset Value 80169FAC 60000000 80169FB4 60000000
[GCDP08] [EU] Resident Evil: Code: Veronica X
Offset Value 8016A948 60000000 8016A950 60000000
- Entry 1:
- Select dword.
- Fill in Offset and Value.
- Press the Add button to create another entry.
- Entry 2:
- Select dword.
- Fill in Offset and Value.
- Press OK to save the patch then Close the properties dialog.
- Run the game!
Example screenshots showing patch offsets for JP CVX release:
Codes for Gecko and Action Replay. (thanks @Anderson for testing)
[GCDJ08] [JP] Biohazard: Code: Veronica Kanzenban
Remove Door Animations 0417C594 60000000 0417C59C 60000000
[GCDE08] [US] Resident Evil: Code: Veronica X
Remove Door Animations 04169FAC 60000000 04169FB4 60000000
[GCDP08] [EU] Resident Evil: Code: Veronica X
Remove Door Animations 0416A948 60000000 0416A950 60000000
RE: CVX Auto Splitter updated at 2020-10-25T17:55:00+1200
- Added support for GameCube releases using Dolphin emulator.
Update will automatically appear in LiveSplit.
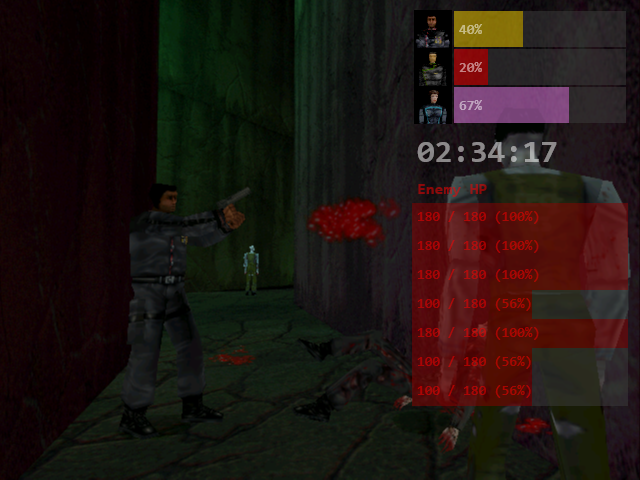
A Martian Gothic SRT (Speedrun Tool) is now available. This tool allows you to view character health and poison status, enemy health and in game timer.
Thanks to @Squirrelies for creating SRT Host and his assistance with developing this tool.
Official Release Site: https://kapdap.github.io/mgu-srt/
GitHub (Source Code): https://github.com/kapdap/mgu-srt-provider https://github.com/kapdap/mgu-srt-ui-wpf https://github.com/kapdap/mgu-srt-ui-directx-overlay
Screenshot:
SRT Doesn't Open: Install .NET Core Runtime 3.1 x86.
OBS/Streaming Software Doesn't Capture SRT: Right click the SRT window, select Options and make sure Transparent is not checked.
- Download and run XInput Plus Ver4.15.2
- Change language from option menu on the top right side if needed.
- Select martian gothic.exe as Target Program.
- Check DirectInput > Enable DirectInput Ouput.
If you want D-Pad and Joystick control:
-
Check Key Assign > Left Stick > Multiple Key > Left Sick and DPAD.
-
Check Key Assign > Right Stick > Multiple Key > Right Sick and DPAD.
-
Click Apply and run the game.
Note: When mapping keys in game you can not set a button to an action that is already set to another action.
Hey, I've started working on an Auto Splitter for the PC release. Current it only splits when starting and new game, and pulling the final switch at the end of the game.