Hi, this is a basic guide for anyone looking to run Peglin any%, specifically about playing as Peglin on the 1.0.6 version (although it works basically the same for any of the other 3). It is written assuming a baseline level of knowledge about how Peglin works, and won't cover many specific in-combat strategies - it is primarily focused on optimal routing decisions and builds. I'll go over a usual run from start to finish, describing optimal strategies and routes for basically the whole experience.
In general, when playing Peglin, you should make decisions quickly (obviously). A large part of the run is being able to take in the presented information and making correct snap decisions - relic choices, shop menus, orb choices. You want to balance becoming strong enough to not lose time in fights with making fast decisions. While Molten Mantle is usually enough to beat any fight, you still need to actually put together a strong foundation to base it on.
When picking the starting relic, look for one of these: Bomb Baton, Refilibuster, Refresh Perspective, and Improved Catalyst. There are others (which will be discussed later), but these 4 relics specifically can significantly improve your early game in one or multiple ways, allowing for much faster forest splits. Pick quickly, and don't worry too much about it.
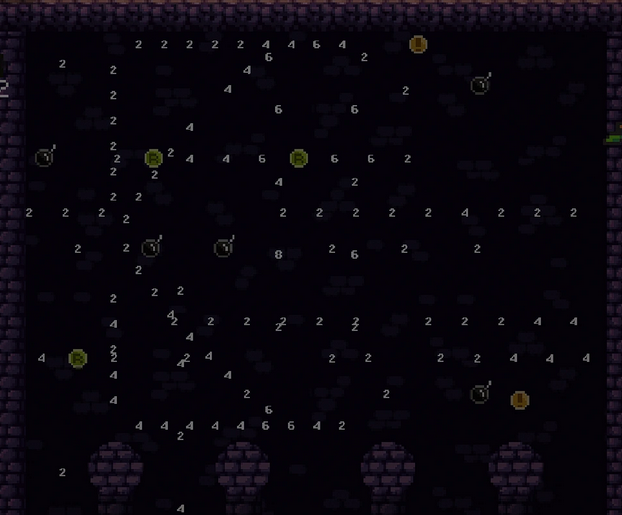
When starting a run, look at the map as it scrolls up. When looking at the map to determine if you want to reset or not, always look at the left and the right - don't focus on the middle. The sides will always require you to hit less nodes, allowing for timesaves and reducing event RNG. It's possible to make out basically the entire route from the intial scroll up, but usually you'll only be able to focus on identifying one specific thing, and will need to look at the map in game to actually plan your route. On the initial scroll up to the top, focus on identifying the amount of fights and elites (skulls and skull and crossbones) - these are your guaranteed timelosses which you want to avoid. Fights will always take longer than events, no matter what - reducing these is your primary goal. Events (the question marks) are the most common node you will go to - these are better than fights, but still not ideal, as you have decent odds of running into a fight. Chests and shops are the most ideal, as they are 100% guaranteed not fights, and that is the only thing that matters. Take shops even if you have 0 money to spend.

event odds, in case you were curious. thanks to gravellipse in the red nexus discord for this
(i'm pretty sure he's right lol)
You will be able to easily make out the top and the bottom of the map at the very start, as the game slows down on these two parts - if you see an abundance of fights between the top and bottom combined on both sides (usually around 3 or 4 minimum on the top + bottom), you can safely restart the run without having to worry about going into the first fight to check your map.
You will always begin with a fight. When starting the fight, immediately fire a shot and press M to open your map - the shot will bounce down the board while you can scroll around the map to figure out which route is best. Once you've completed your routing, ideally before the shot has finished bouncing, you can then proceed with the fight. The initial fight can be any from the basic fight pool for the forest - the most optimal fight to get, in my experience, is one of the two spider fights. This fight can be identified by the cobweb pattern and, in this case, by having around 6 or 7 bombs - as well, the only enemy still in the queue and not already in play will be a single green slime. The harder spider fight, in comparison, has more enemies in the queue and will only have 3 bombs on the board. This fight can usually be beaten in only 1 or two shots, and will save you around 10 to 20 seconds compared to the usual first fight. The best fights in the forest pool are almost always the ones with the most easily accessible bombs, as bombs are easily the most efficient way to get spread damage in forest (without going into ballestra, which you won't have in the first fight anyway.)
After the first fight, you're going to encounter your first post-battle rewards. Your main goal here is to try to find an orb to spec into - this will be your main damage for the rest of forest, and ideally for the rest of the run (although its always possible to pivot later.) If you don't find something good, don't worry - you'll almost definitely have other fights through the rest of forest where you can try to find something good. You'll definitely have at least enough gold after this fight to be able to purchase any orb you want. I suggest always having at least 30 gold in forest, as the two strongest orbs for your run are both 30 gold in haglin shops due to being rare orbs. Speaking of orbs...

The 100% official, never wrong orb tierlist for Peglin speedruns. Completely infallible in every way.
The top tier contains both Summoning Circle and Matryorbshka. Summoning Circle is probably the most optimal orb in the game for getting a fast run - the perfect balance between multiball and damage to ensure that it's good at every stage of the run. It's the one I used in the current world record, and it performed excellently at all stages of the run. However, it's also the hardest to set up for - setting up for Summoning Circle requires removing all orbs except your daggorb and/or a fully upgraded pebball, as well as duplicating the summoning circle itself around 2 or 3 times to ensure you can chain it for good damage. Matryorbshka is also great to get, although you'll lose some time from the sheer abundance of orbs bouncing around on some fights, and it can struggle with damage in the early game, even with the power of Molten Mantle.
(edit: since the creation of this guide, I've realized that collatorball damage is also really, really, really good, and is definitely in the top tier alongside summoning circle and matryorbshka. take it whenever you see it! its really good!)
After that are the good substitutes - these are orbs that you aren't praying to get, but will take almost every time you see them. Rubborb is the best of these - as a common orb, it shows up a lot after the first fight, and will be some of the best damage you can get for the early game (although it does require multiple upgrades to unlock its full potential, and should always be upgraded immediately if you have the money on hand.) Electrorbmagnet is good damage early and late, and puts you in less upgrade debt. Ballestra is one of the best spread options if you didn't pick up Bomb Baton or Refilibuster early on, although it also needs multiple upgrades to do any significant damage. Ballanx is the worst of these - it can do some spread damage, and is strong with only a single upgrade, but generally feels like it doesn't have the x-factor some of the other substitutes provide, and is only ok at best.
The free orbs are orbs you'll either always have at the start (like daggorb) or can be found through events. Bramball is a relatively strong early game option found through the tree event that, when fully upgraded, gains overflow, making it a solid option to kill multiple enemies. Ball Lightning has two main purposes - it pops bombs, and it hits the mole boss, and those are good enough applications to make it solid. Daggorb is given to you for free at the start of the game, and is one of your few solid damage options against the bosses if you haven't picked up much else (especially slime boss.) Finally, Infernorb is an ok option to take from the fire event if you're about to enter a boss and you have no other options left to get damage - it's not good for much else.
Next are the ok orbs - these are orbs that you can take early to get stronger, but will almost certainly not be the focus of stronger runs. Circae is a solid multiball solution that, when upgraded to level 3, will do decent damage to forest enemies, but isn't ideal for much beyond that. Splatorb is similar - ok forest damage, but should be discounted the moment you reach castle. Finally, Ohmygorb! is an ok spread damage option that actually can be sustained through castle, making it seem like the best out of the 3 - however, it can cause massive issues for some bosses, where it destroys too many pegs and significantly slows you down. As the forest boss is a massive place where time can be gained or lost, it's important to find a solution that actually deals solid damage to it.
Finally, there are the niche orbs. I won't spend much time on these - I only include these because these are orbs I have used for runs in the past which have proven to have some niche usage. They can be ok in the right positions, like having Sprouting Spinvestment for Spinterest Payment or when you desperately need spread like with Echorb. I'll also make special mention of Orboros - this can be a backup strategy that can let you achieve runs that go as high as around the 11 to 10 minute mark. If you want to initially push for a time around there, consider taking the remove all orbs event often.
As for relics...

The probably slightly less accurate, significantly more dodgy, 50% fallible Peglin relic tier list for speedruns.
This isn't perfect, but it's a reasonable ranking of about how good relics are compared to where you can get them. Some relics that might not be objectively as strong (for example, bomb baton or improved catalyst) are ranked highly because you can get them as your starting relic, or can consistently get them for many runs, whereas rare relics need to be especially powerful to be ranked highly. Generally, take this as a basic overview, but be willing to use your own judgement to determine which you think is better, especially based on context!
Now, for a slightly more objective list...

Molten Mantle and Sapper Sack + friends.
Yes, I have taken constricting chains before (a lot) in runs. No, it was not a good decision, and I very much regret it.
Overall, Molten Mantle is the goat. Getting Molten Mantle at some point is an absolute requirement for a run to be playable. Sapper Sack is also great, although it's really only takeable after forest boss, as the main benefit with it is that it's absolutely incredible for almost all the castle fights. Everything else is basically a stopgap for Molten Mantle. The second tier is not ordered - if I had to say one, Spheridae's Fate is probably the best out of that tier, but basically any of them can be ok so long as you have molten mantle at that point. Wand of Skulltimate Greed is a little different from the others, though - it's basically only takeable after beating the castle boss if you have molten mantle, as it can absolutely supercharge a build and speed up some fights even more.
Everything else sucks ass. Don't take them.
Coming back to the run itself, once you've navigated through forest (hopefully with only two or three fights) and completed the first boss, you'll be moving on to castle. Castle, as a split, absolutely requires some form of spread damage or pierce - the shielded enemies you'll be encountering take absurdly long to beat otherwise. Navigating castle is extremely simple, as there's not even a middle as a possibility - it's very simple to determine which route lets you take less fights. Just make sure not to screw up the navigation in the very middle of the map when you're going to the chests, and you should be good.
Finally, you're going to be going to mines. Mines WILL fuck up your run. It is evil. If you have a good pace going into mines, prepare to encounter 5 fights in a row, all of which come from random chance events. Thankfully, if you have Molten Mantle, you should be able to do enough damage to enemies to the point where fights finish in around 5 to 6 seconds. However, within the mines' elite pool lies Peglin's most evil trick...
The invisible elite.
If you have Sapper Sack, feel free to take as many elites as you want - it beats this fight relatively easily. However, this fight is designed to destroy anyone relying on Molten Mantle who doesn't have sufficient pierce or spread damage. You cannot target the invisible enemies present in this fight, so Molten Mantle does nothing. As such, when routing the mines, make sure to avoid elites wherever possible, to the point of taking 1 or 2 extra fights so long as it dodges the elite.
In general with Peglin any%, once you've gotten past about the middle of castle, you probably know whether or not the run you've got going is good enough. After that point, the game is out of your hands. Your shot selection no longer matters - all that is left is to find the optimal route, and pray that you don't get screwed by RNG. Once you get into that position of knowing whether or not your route is strong enough, stop thinking about the decisions presented beyond the very basic, and just click as fast as possible - making your build any stronger beyond the lowest possible amount you need to be fast won't save as much time as making many fast decisions that each save around a half a second or so.
And, with all of that discussed, that should basically be it. Apologies if this is a bit rambly near the end. If anyone reading this has any questions about running Peglin optimally, DM me on discord at f_airplay and I'll (hopefully) see your message request and respond.