[center]Guide by yote and Dedew[/center]
This is a very optimized category where competitive runners will take run-ending risks to save fractions of seconds. Seconds are a significant margin, but not every strat is recommended from the start. This guide contains everything you need to know to start speedrunning Light Fall - Normal Any%.
If you have questions, join our community discord at https://discord.gg/lightfall
Note: There are a ton of different setups for every trick, you don't have to copy everything you see in this guide, do whatever feels the most comfortable to you!
Also note: Reading this guide is not enough to start running this category. Individual level practice is highly recommended! It also helps to watch videos of different runners to see different setups and what skips they might opt out of.
[section=Input Methods]
"Controller or keyboard, which should I use?"
It's down to personal preference, both input methods can be competitive: Dedew uses controller and yote keyboard. The game can be ran at a high level with default keyboard bindings.
It is worth noting that fatfingering is a lot less common on keyboard due to the fact that you can't cancel your shield blocks by pressing jump too early. Therefore keyboard is the input method we recommend if you're planning on getting close to WR.
If you do decide to play on controller, it is easier to bind some buttons twice. Dedew has attack bound to LB and the side block to LT, allowing him to skip the elevators in 2-1 and buffer attack for pickups in 100%. This is an example, always use what you are comfortable with. Note that there is no in-game rebinding functionality so you have to use a third party program.
We recommend trying out both to see the differences and help decide what you want to use.
[section=Setting Up LiveSplit]
LiveSplit has technology that can remove loads and split automatically. If you choose you use LiveSplit in addition to the in-game timer. (Recommended) Simply set your game to Light Fall, click “Edit Splits” and then the “Activate” button and the autosplitter should work as intended. Make sure you have the game selected otherwise the option won’t appear. You can find splits under resources on the left. Make sure you set the comparison to Game Time if you want to have the in-game time in LiveSplit.

[section=Basics Techniques]
Slopes
When you run up or down slopes, the terrain slows you down as the game moves you in two directions at once. Therefore you want to avoid running on slopes as much as you can.

Lasers
When you summon your shadow core, it will move with you until you make contact with it. This is used a lot in the run, usually to skip lasers or rely on less precise inputs.
Here you can see it used to jump over lasers coming from the ground and to fall past horizontal lasers.
This can also be used to climb up walls with a shadow core protecting you, allowing you to skip certain slow elevators.
Cycles
Moving obstacles in each level operate on a cycle, which is consistent on each level. Once you start a level, a cycle begins on real time. We can manipulate these cycles by dying in a level. The dying animation pauses the in game timer but every cycle in the level keeps going, that means that we lose close to no time. The fastest way to do this is selecting "Last Checkpoint" when right next to a checkpoint. You still want to avoid doing it during a level because you will lose all your momentum, that's why it is almost always done at the start a level before you start running.
In the GIF below you can see how the spinner and the orb stop moving when you pause but keep going after destroying yourself.

[section=I-1 Welcome to Numbra]
This level is very straightforward and is all about horizontal movement and avoiding slopes. Our goal is to move right as much as possible to clear the level as quickly as possible. To make it over the very first pit, make sure to get max height jumps by pressing the jump button for longer.
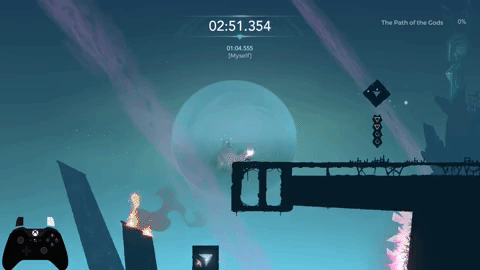
[section=I-2 Path of the Gods]
I-2 is a very difficult level, especially to new runners. This level introduces vertical movement and several difficult skips. Here there are two major skips. To begin this level, place a block below you as soon as possible to gain control of Nox faster. You should do this for all levels except Welcome to Numbra. Simply run and go over the first laser area until you reach an elevator. This is an autoscroller than can be skipped by climbing onto the top of the overhanging ledge on the left. Then use your shield block to navigate to where you would be dropped off.
Elevator Skip https://streamable.com/h76g6
Directly after this elevator is the biggest skip in the game which saves over 15 seconds. Reset your shadow core on the bottom ledge of that structure on the right. Then, proceed to climb up to where you can jump off to the left without bonking the top of the wall (usually 2 full walljumps). Once you've jumped, wall climb to the top where you must reset your shadow core and run across the top until you reach safe ground.
Right at the end of the level, you have to use the remote block for the first time, you can place it without stopping by jumping and placing it at the right time, this is very easy to do.
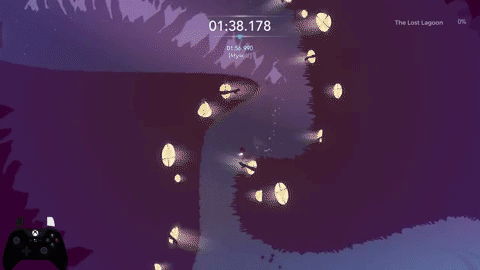
[section=I-3 Lost Lagoon]
I-3 is the first of many cycle-based levels and can be tricky to master. It is important to note that you should not use the boat on this level. The boat is slow and unnecessary. The level is difficult to explain via text, so I suggest following the video at the end of this section.
Once we enter Animus's Temple, we see our first cycle manipulation. This mechanic also functions as a cutscene skip. When you die on the boss, the wave always restarts at a certain point. Upon entering the temple, the wave will reset on death. If you self destroy after unlocking the elevator checkpoint, the wave will start in the same position everytime, no matter how fast or slow you were leading up to that point. IMPORTANT! You have to self-destroy [big]before[/big] touching the platform!
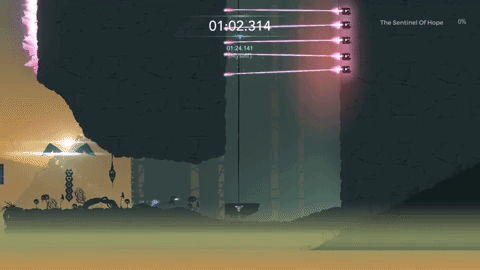
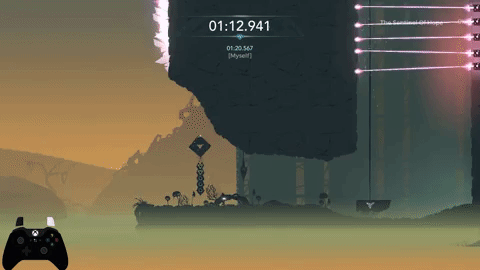
[section=II-1 Sentinel of Hope]
The first skip in II-1 involves fairly precise movement, jumping at the apex of your jump to skip the first mountain. You need to get max height jumps for this to work. If you can't get this to work, you can place one side block to get the height you're missing.
Branch Skip https://streamable.com/9wfwz
After this section, the level becomes a mess of slime and sprout cycles. The cycles usually line up pretty well unless you die or lose a big chunk of time somewhere.
On the latter half of the level, taking the upper path past the collectible is faster than the lower route.
The final part of this level includes the first major application of momentum as detailed in the beginning of this guide. The first two elevators can be skipped consistently and are shown below.
Here you can see an easier setup to skip the first two elevators.
The same cannot be said for the third elevator, unfortunately, and many runners opt out of this trick due to the inconsistency and difficulty. It involves precise movements to setup your shield block on the proper side of you and then wiggling around all the lasers as you climb. If you do go for this skip in runs, touch the elevator before you ascend as extra safety.
Third Laser Skip https://streamable.com/pdvo4
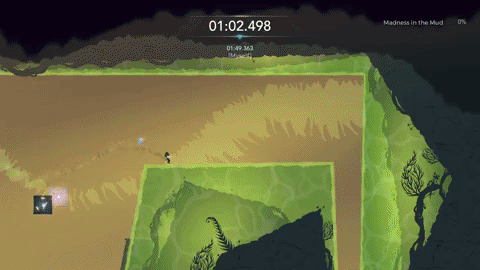
[section=II-2 Madness in the Mud]
Not the Bees! NotLikeThis
Bees are the most confusing mechanic, especially for new players.They operate on a random cycle and home in on your character in a seemingly random direction.
As of Season 3, the bees can be destroyed with your punch block, making them a lot more manageable
As far as playing this level, the developers included some high platforms we can use to skip most of the level's core platforming. Simply stay above the core gameplay. This same idea applies inside of the passageway. Upon dropping into the oasis, stay near the ceiling and you will have seconds climbing out of the area.
[section=II-3 Temple of Mictlan]
II-3 has a lot of traps. Most of your movement should involve blocking or avoiding the dozens of projectiles you will encounter. The bottom route is the fastest once you get to the split pathways.
This level includes the first deathwarp. After the second diverging paths meet. The checkpoint extends much lower on the right side, so we pause and select "Last Checkpoint" rather than climbing to save time.
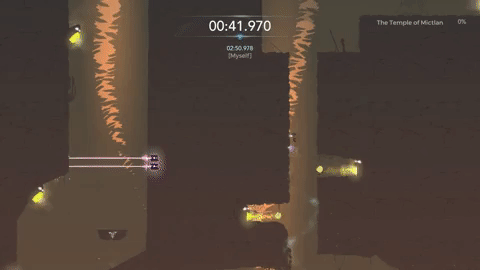
We can also do another difficult laser skip. This one is much harder than Third Laser Skip in II-1.
Mictlan Laser Skip https://streamable.com/irulw
This level also includes the second boss... which is an autoscroller. Try to get a feel for the timing on the crystals. I measure when they appear by the number of past platforms since the last crystal appeared. On Normal Mode: Bottom: 0 MidBot: 4 MidTop: 4.5 Top: 6
[section=III-1 Ravoria’s Remnants]
Contrary to the story mode, speedrun mode skips III-0 (The Ghostfields), which is a story level with little gameplay.
I like to think of this level as a nice reward for completing Act II. The run calms down for a minute and a half or so with no excessively difficult tricks, plus the beautiful background visuals and music.
The video below is a great resource for learning the movement of this level, since none of it is too complicated
[section=III-2 Viperas Forest]
III-2 is the fastest level in this category when done optimally. The first section is home to a difficult obstacle where two birds sit waiting with no easy way through.
(Image)
You have several options. You can either shoot the birds to clear a safe path through or wait for the top one to pass. Both of these are great beginner strategies. Alternatively, you can do a difficult jump between the birds that also sets you up for a very fast cycle called Bird Skip.
Bird Skip Cycle https://streamable.com/czod8
The latter of half of this level is a trick called Forest Out of Bounds. The name is a misnomer, since we don’t actually go outside of the games boundaries, but we go above the intended gameplay. This trick is made possible by an oversight by the devs where the tree leaves have no hitbox, allowing us to climb through them.
This section is not blind movement as the little blue light is where Nox’s head would be if your vision was not obscured. Once above the tree, climb around the wall on the first canopy. Note that the wall is impossible so scale without use of your blocks. Continue across the gap between canopies but be cautious of the thorns that are on the rightmost side of the wall you descend from.
Forest Out of Bounds https://streamable.com/2wvah

[section=III-3 Sylveon]
III-3 is the climax of a high level run. It is the longest level in Any% and many mistakes can cause a death, which may seem minor, but will lose around 40-60 seconds, making this level a very high reset point for many runners.
Your goal is to collect 5 keys locked behind 5 trials, some harder than others. Dying with these keys will reset them to their original position, but they can be stashed at the large door in the middle for safety.
The level begins with a simple running and jumping segment where you’ll come across a large elevator. By self-destructing on the elevator, you can skip the ending part of the cutscene and start closer to the first key room.
Sylveon Cutscene Skip https://streamable.com/ny0oe
You can grab these keys in any order, but with the cutscene skip, it fastest and recommended that you do Bottom-Right (Time), Top-Right (Lasers), Top (Climbing), Top-Left (Flashing Lights), Bottom-Left (Riddle).
Bottom-Right is fairly straightforward and is about learning the timing of the cycle. Fetch the key and climb up to Top-Right. Safety Strategy: Stash the blue key in the door before ascending to Top-Right
Top-Right is where most mistakes happen in this level. It’s easy to get nervous waiting for the lasers and jump to early or mess up the cycle, die and lose 40-60 seconds. Below is the most consistent laser cycle.
(SLC)
After obtaining the key, exit the room and head to the top of the level. The climbing section here is straightforwards, despite no runner knowing the most optimal way to climb up to the key. Each runner has their own methods and I’d suggest trying all of them and decided on which one feels most comfortable to you.
Drop down into the Top-Left room and ascend on the right side of the room to the first lift. Then climb the room in a seemingly normal way. Get used to the temporary seconds of blind movement and grab the key at the top. Fall down and exit the room before dropping down into the final room.
(SFLC)
The Bottom-Left room houses a riddle that has the same answer everytime in the speedrun mode. The order is (platforms mentioned from left to right) 2, 5, 1, 3, 4 and the key appears.
Stash the keys in the door and congratulations on getting through Sylveon!
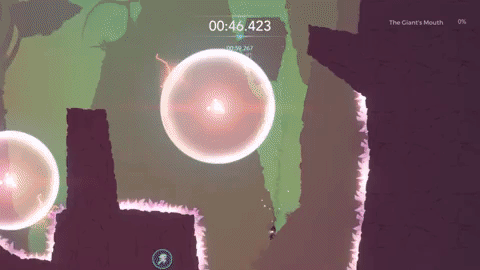
[section=IV-1 Giant’s Mouth]
Like III-1, this level is fairly simple, however this level has much more room for optimization and should not be treated as lightly as III-1.
IV-1 is all about optimizing downward movement, which is almost exclusive to this level, and learning how to avoid the red and blue orbs.
Make sure to take advantage of the two dev intended shortcuts shown in the video below.
At the end of this level is a simple horizontal laser sections.
(GML)
[section=IV-2 Hidden Grotto]
This level has a fairly tricky cycle that is consistent when learned. Doing a cycle manip here (detailed above) has the potential to save you roughly four seconds, assuming that you use the fastest route through the level and abuse the developer intended shortcuts.
[Cycle Manip]
The route starts with a tight jump between a blue orb and a curved spike pit, almost like the hull of a boat. Continue until you reach the fog and two diverging paths.
If the mushroom blue orb is shrinking went you reach it, congrats; you've done the first part successfully! You're clear to take the bottom route between two orbs, provided you go through it as fast as you can, recklessly. Backup: If you missed the timing for the blue orb shrinking, you can go on the top path to avoid dying Take the dev intended short cut after this.
Once you reach the third section of fog with the red orbs, simply go as fast as you can like you did with the orbs earlier. After this, the cycle is nothing to worry about.
[section=IV-3 Numbra’s Core]
You've made it! It's time for the most challenging level in the game; one that has killed many runs, many of which were on WR pace, and a level that is very fun when mastered. To complete IV-3, we must destroy three generators, one in the top left, one on the bottom, and one the right. The most optimal order is Top-Left, Bottom, Right.
When entering the main room, climb to the top-left, ideally without triggering the checkpoint. Climb and destroy it.
The bottom chamber is a little more difficult, since it involves falling down and climbing back up. At the top though, we can self-destruct upon destroying the generator to abuse in game time as shown below.
[cutscene skip]
Why don't we do this on either of the other generators, you may be asking? For the first one, it is faster to skip the checkpoint, since the deathwarp would reset you back to the start of the level. For the third one, dying as you finish a level softlocks you.
The last generator is the most challenging part of the run as the final climb in the fog is not only difficult, but very punishing. Deaths here lose at least 40 seconds, since it takes quite some time to get back to the room itself. The rotating platforms are on a cycle and we can use some shenanigans to skip a cycle.
[cycle skip]
[section=IV-4 Celestial Palace]
This is it! The hard part is over, now it's making it through the final sprint!
This level is very straightforward. It's a two part boss fight, part one being a chase sequence and two an autoscroller similar to the Forest boss of Super Meat Boy. You can't lose time in the autoscroller apart from dying, so feel free to play it safe, especially if you feel under a lot of pressure to finish.
The timer stops when you kill the final boss! Congrats! You've finished Normal Any%!
[section=Further Optimization]
This guide was designed to be for anyone running this game for the first time. Remember that many of these skips are optional, but many are highly recommended like Mazeless and Forest OoB. I'll release an Advance Optimization Tutorial on YouTube soon, designed to help runners learn more difficult tricks, like GCS 2, Third Laser Skip, more difficult cycles, and the most optimal movement, in order to hopefully break the barrier between a 23 minute time and a 22 minute time or even down to a 21 minute time!
Thanks for reading this guide. I hope this has helped you learn the basics of speedrunning this category. If you have further questions, ask away in the Light Fall discord! Everyone there is super kind and helpful. https://discord.gg/lightfall