For a simplified representation of Dimensionhole that is easier to read and follow, click here: https://www.speedrun.com/yugiohdotr/guides/tj6ai
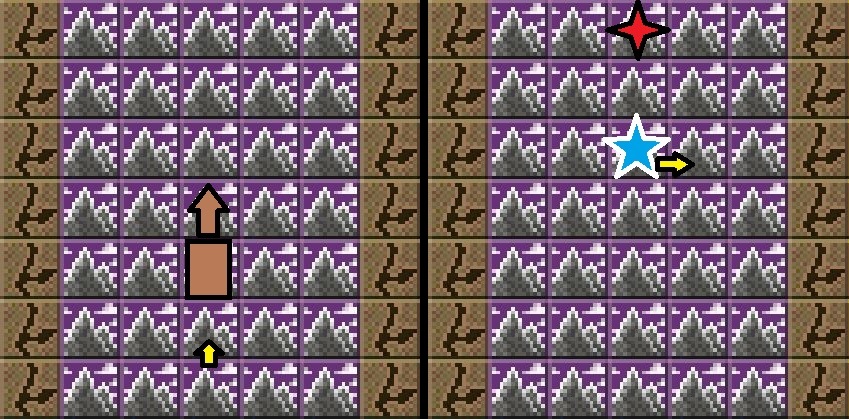
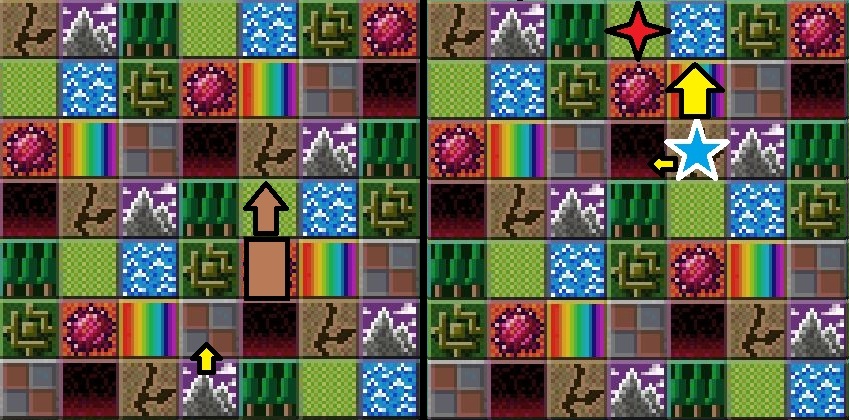
Dimensionhole positioning/activation is crucial knowledge to a run as it is generally the fastest or one of the fastest most reliable ways to win every duel in the game. This extended learning guide will also cover more details of playing duels with dimensionhole. The purpose of this guide is to break down the details and intricacies of actually playing the duels with Dimensionhole, as Dimensionhole doesnt innately guarantee a successful and fast duel on its own.The basic concept of use is to start your turn by moving your deck leader forward, then playing Dimensionhole face down on a tile infront of you, and moving that Dimensionhole forward one tile and leaving it face down.
 Then, when you start your second turn, you flip the Dimensionhole up, move it one tile forward, then activate it. From that position, you can now play a monster and attack your opponent directly and still move your deck leader if needed.
 On turn three, you can play another monster and attack directly to win the duel (provided you have the damage). That covers the basic idea of winning a duel in three turns after opening with Dimensionhole.
Universally, you must consider combinations that result in killing your opponent by turn 3. Activating Dimensionhole, then dealing 4000+ damage (4100 for Bakura) across the next two turns is the gist. Some very basic examples you see in any% are: Dimensionhole, turn 2 Zombie, turn 3 follow up attack with same Zombie Dimensionhole + 1800+ Attack Zombie, turn 3 activate field spell to attack with zombie again for 2300+ Dimensionhole + Slate Warrior (2400 after boost) + Dragon Zombie (or anything 1600+) And anything else.
Any% gives you the option to password in some cards such as Muka Muka/Greenkappa to help achieve large amounts of damage. No passwords, you will be relying on other combinations a lot. Some examples of 3 turn kill combos that you will likely not see in regular Any% are: Dimensionhole, turn 2 Skullbird (1900), turn 3 move Skullbird and fuse Warrior over it to attack with Punished Eagle (2100) Dimensionhole, turn 2 Fiend+Plant = Rose Specre of Dunn (2000), turn 3 move RSoD and fuse Rock over it to attack with Mystical Sand (2100) Dimensionhole, turn 2 Plant+Zombie [one must be 1000+ atk] = Pumpking (1800), turn 3 move and fuse Mammoth Graveyard over it to attack with Great Mammoth of Goldfine (2200) - also common in regular any%
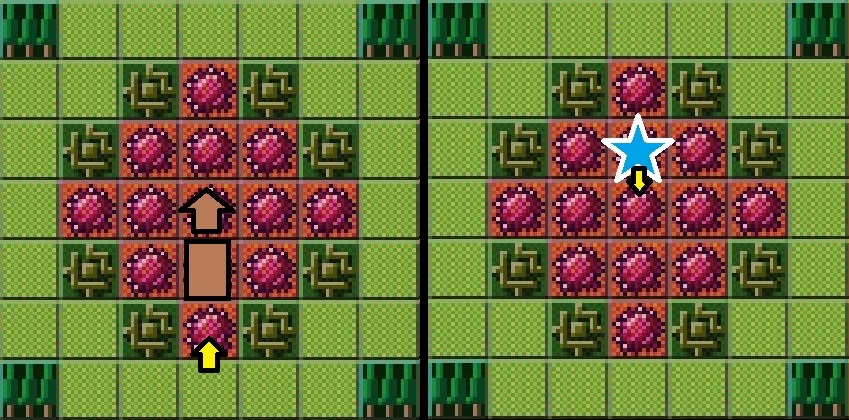
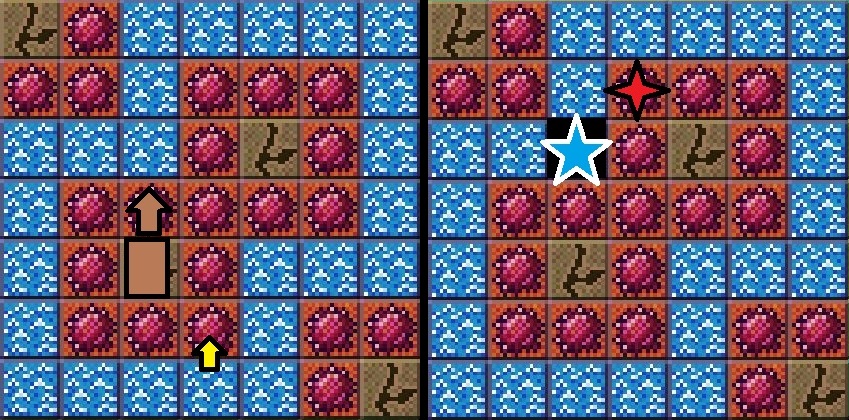
This extended learning segment will cover the details about concerns with completing a 3 turn. USE CTRL+F TO FIND SPECIFIC DUELIST ON THIS GUIDE.-For 1/3 of the Duelists in the game, playing Dimensionhole up the middle column is the best play.
Bakura:  Bakura is one of the simplest - activate it on the 2nd turn as normal, then direct attack from the front. NOTE: If you open with a Terrain spell and any 1600+ attack zombie, play that strategy instead of dhole - it is faster.If you have Slate Warrior, play it on the Crush tile top left of your deck leader, then flip up and attack him directly from your left side/his right side (this will allow you to follow up attack after he moves away from it).Most likely you will not have Slate Warrior, and you are forced to attack on a Forest tile, so consider using monsters boosted by Forest terrain. Strong forest fusions will kill him in two hits. If you are short on damage, you can always follow up attack. You do NOT have to play a forest fusion, so long as you can deal 4100 damage to him across 2 attacks as he regenerates 50LP per turn. A Forest Fusion gains 500 attack on the first direct attack, then will be able to follow up attack him without you needing to summon another monster.Forest Fusions possible with the starter deck:
Fiend + Plant = Rose Spectre of Dunn (2000atk)
Fiend + Lisark = Chimera the Flying Mythical Beast (2100atk)
Beast + Plant = Flower Wolf (1800atk)
Warrior + Plant = Bean Soldier (1400atk)
Forest Fusions more likely in no passwords with drop loot:
Female + Plant = Queen of Autumn Leaves (1800atk)
Female + Beast = Nekogal #2 (1900atk)NOTE: There is a non-zero chance that he will set a Rain of Mercy infront of him and block your path. You may never actually see this, but if he does this, activate Dimensionole OVER his first card then move your DL back a tile and attack him like normal.
Bakura is one of the simplest - activate it on the 2nd turn as normal, then direct attack from the front. NOTE: If you open with a Terrain spell and any 1600+ attack zombie, play that strategy instead of dhole - it is faster.If you have Slate Warrior, play it on the Crush tile top left of your deck leader, then flip up and attack him directly from your left side/his right side (this will allow you to follow up attack after he moves away from it).Most likely you will not have Slate Warrior, and you are forced to attack on a Forest tile, so consider using monsters boosted by Forest terrain. Strong forest fusions will kill him in two hits. If you are short on damage, you can always follow up attack. You do NOT have to play a forest fusion, so long as you can deal 4100 damage to him across 2 attacks as he regenerates 50LP per turn. A Forest Fusion gains 500 attack on the first direct attack, then will be able to follow up attack him without you needing to summon another monster.Forest Fusions possible with the starter deck:
Fiend + Plant = Rose Spectre of Dunn (2000atk)
Fiend + Lisark = Chimera the Flying Mythical Beast (2100atk)
Beast + Plant = Flower Wolf (1800atk)
Warrior + Plant = Bean Soldier (1400atk)
Forest Fusions more likely in no passwords with drop loot:
Female + Plant = Queen of Autumn Leaves (1800atk)
Female + Beast = Nekogal #2 (1900atk)NOTE: There is a non-zero chance that he will set a Rain of Mercy infront of him and block your path. You may never actually see this, but if he does this, activate Dimensionole OVER his first card then move your DL back a tile and attack him like normal.
Joey:
 After activating Dimensionhole on turn two, there are different positions to attack him.Most likely, you will have cards strong on Wasteland. If the strongest monsters you can play are strong on Wasteland, play a monster on the Wasteland tile, flip it up then attack moving it up and then to the left. This will leave the monster to Joey's left side, which will make his AI move forward. Turn 3, you can attack a second time with the first monster you played, then play another monster and attack directly a 3rd time if damage is needed. Get used to defaulting to this if you have a card strong on Wasteland turn 2.When would you attack him from the Forest tile or Mountain tile? Attack from those tiles if you do NOT have anything strong on Wasteland. Here are some examples:If you have Lisark and a fiend and can make Chimera the Flying Mythical Beast, attack him from the Forest tile as you can follow up with it for lethal after he moves a tile away. If you really don't have much damage at all, something as simple as Lisark itself or even Gokibore can get two attacks into him, dealing 2600/2400 damage respectively across two attacks, then you can land a third attack on the Wasteland to finish him off.In a similar manner, attack from the Mountain tile if you have something boosted on Mountain and nothing on Wasteland. This is very rare, but in no passwords if you have Skullbird, using dimensionhole then attacking with skullbird on turn 2 and turn 3 is one of, if not, the fastest way to kill Joey in natural speedrun play.
Mai:
 Due to Mai's difficulty, unfortunately Dimensionhole isn't even close to guaranteeing a win, so its worth it to learn more about the Mai duel when playing it.After you pass end of turn 1 with dimensionhole, Mai will do one of three things:1. Play to her right side, then move it forward. This is a monster.
- Play to her right side, then defend. This is a trap card (Invisible Wire, Acid Trap Hole, Mesmeric Control or Shadow of Eyes.)
- Play to her top left side, then defend. This is a spell. (If she plays top left but leaves it in attack, this is Cursebreaker which is actually useful to know)If she plays a monster, you are free to attack directly on your second turn. But then you have the option of staying on that spot, or moving to the right. While you should default to moving to the right to avoid a direct attack, you can stay on that spot to force her to attack you directly in order to protect your monster, so that on your third turn you can move that monster, move your deck leader, fuse OVER your 1st turn monster, and attack directly a second time. For example. if on turn two you attack her with Skullbird, and you have a warrior or beast, keep your Deck Leader in the attacking range of her first monster so that you tank the hit and your Skullbird stays alive. Now on your third turn, you can move Skullbird on a tile next to her Deck Leader, then play a Warrior OR Beast over the Skullbird to attack her directly for lethal (provided she did not play a trap turn 2).If she plays a trap, well, this is very unfortunate. An option for you is to flip Dimensionhole up in face up def to verify if she has Shadow of Eyes or not. If she does not, you can not perform a direct attack, and your best option is leaving a monster on the tile infront of her and NOT attacking her, to force her to move away from the trap, and allow you to likely attack her directly on your 3rd turn and play from there.If she plays a magic, this is generally good news for you, but consider that if you attack her on turn 2 with a card that is NOT boosted by Mountain, she will move that spell away from your monster on her 2nd turn (unless it is Cursebreaker).
- Seto:
 The positioning and activation of this strategy is based around Seto's Deck Leader movement and how the map is constructed. After attacking him directly on your second turn, he will move back to his original spot and you can attempt to attack him directly a second time on your third turn.With Dimensionhole (or literally any card) face down in the middle on turn 1, it is possible Seto will move forward anyways like the normal strat. If Seto actually moves forward when you play Dimensionhole strategy, simply move the Dimensionhole to the right (face down), then play a monster and attack him directly. If he moves back to his starting spot on his second turn, you now have the option to activate Dimensionhole forward and you will be in a position to attack directly a second time.
 - Shadi:
 Dimensionhole is not ultra consistent on Shadi (unless you have Slate Warrior, then 100% you play them), and I generally only play it if I also have 2k+ Wasteland monster. It is not much faster than the standard strategy, and it is possible he plays things that disrupt your ability to follow up attack him with a large monster on Crush. If you have Dhole+Slate Warrior, simply attack him from the front with Slate Warrior.If you have an opening hand such as Dimensionhole + Great Mammoth or Dimensionhole + Stone D. fusion, play according to the images and then play your monster top right of your Deck Leader, and attack him up+left so that you are attacking him from his left side. This should cause him to move forward, and you should be able to follow up attack with your first monster and/or attack with a second monster.
 - Skull Knight:
 The important thing to know about Dimensionhole on Skull Knight is that you should ALWAYS attempt the Dimensionhole play. As he is most likely to play infront of him, you want to remove his first card from the field immediately and continue to play from there.NOTE: If you don't have Slate Warrior, reserve SP so you can play it if you draw into it. Dhole Slate Warrior is extremely fast and reliable. Whether Dimensionhole activation is successful or not, clearing his first card with the Dimensionhole will allow you to attack directly with Slate Warrior on turn 2.There are more intricacies to how he plays, but here are the simple details:If he plays behind him and to the right, you have free reign to activate Dimensionhole and attack him. In this case, activate Dhole on the middle tile. (If you activate it on the spot suggested in the picture accidentally, just move your Deck Leader back a tile to attack him).If he plays a card infront of him, regardless of of if he moves his DL or not, you should ALWAYS attempt to activate your Dimensionhole over that card ALL THE TIME. You need to remove his first card on crush off the field asap, regardless of if Dimensionhole resolves or not. Whether he moves his DL or not on turn 1, do the same thing.(If, AND ONLY IF, you're 100% sure his opening card is a monster on crush, you can't get it out of the way. Just move the Dimensionhole to the right, then try playing as high atk monster as possible on crush to destroy his first monster. This is extremely rare.
 - Tea:
 If you do not open with Dimensionhole, do not play any cards on your first turn. Seriously, even activating an Ookazi will trigger her to flip up a Tenderness if she has one on the field, which will grief your own duel.If you DO open with Dimensionhole, play it according to the picture, but consider leaving your monster face down instead of attacking directly. This will cause her to attack your monster with the first card she played (unless she did not play a monster turn 1), dealing extra damage to her unless her first monster destroys yours. Then on turn three, you can attack once with your first monster you played on turn two, then play another monster to attack her directly.If you believe her first monster will destroy your first monster, just attack her. Her first monster will be:
A monster up to 1200 attackOR one of two fusions:Dancing Elf/Wing Egg Elf + <800 Light Fairy = Mystical Elf (1600 atk when including her flip effect buff)
Any fusion she does not involving Dancing Elf/Wing Egg Elf OR If she double fuses = Dark Witch (1800 atk)
If you do not open with Dimensionhole, do not play any cards on your first turn. Seriously, even activating an Ookazi will trigger her to flip up a Tenderness if she has one on the field, which will grief your own duel.If you DO open with Dimensionhole, play it according to the picture, but consider leaving your monster face down instead of attacking directly. This will cause her to attack your monster with the first card she played (unless she did not play a monster turn 1), dealing extra damage to her unless her first monster destroys yours. Then on turn three, you can attack once with your first monster you played on turn two, then play another monster to attack her directly.If you believe her first monster will destroy your first monster, just attack her. Her first monster will be:
A monster up to 1200 attackOR one of two fusions:Dancing Elf/Wing Egg Elf + <800 Light Fairy = Mystical Elf (1600 atk when including her flip effect buff)
Any fusion she does not involving Dancing Elf/Wing Egg Elf OR If she double fuses = Dark Witch (1800 atk)
- either 500atk or +0atk each powerup used in her first hand on the monster.YOU CAN ALWAYS CHECK THE GRAVEYARD TO VERIFY THE ATTACK OF HER MONSTER IF YOU NEED TO. This is far better than throwing a run.NOTE: General advice for runs starting on Yorkist campaign (eg No Passwords), you will not draw Dimensionhole 87.5% of the time, so if you wish, you can just move forward turn one and pass, then turn two move your DL forward again, play a monster infront of you then move that monster forward - this is the standard setup for a 4 turn strategy on Tea.
- Tristan:
 Tristan is the simplest and most straight forward, the details are in optimizing this. Ideally, you want a 2000+ Attack Zombie for turn two. If so, activating Dimensionhole on the Water and attacking him directly with that Zombie, allows a clean follow up on turn 3 for a fast kill. The idea behind activating Dhole in the Sea terrain row rather than the Wasteland, is simply to avoid losing time to him attacking your DL directly.However, if you do NOT have a 2000+ Attack Zombie, then you will just want to move your Deck Leader onto the Wasteland to attack him directly and be in a position to move forward and follow up attack again on turn 3. He is very likely to attack you directly, but guaranteeing a 3 turn kill on him is more important than attempting to avoid direct attacks in this context.-Now for all the duelists where you do NOT play Dimensionhole up the middle.
 - Chakra:
 Dimensionhole is ALWAYS activated turn one to dodge Dark Hole turn 1 play from Chakra. It is played OUT of the way so that his DL will move forward onto the Yami, meaning you gain +500 attack against him with your zombies, OR if you dont have anything strong on Yami, you can attack him directly even without needing movement boost.You should only move your DL away if you will die as a result of being hit by his first monster - this is only the case if he opened with a Riryoku-equipped monster. If he Riryoku-equipped a Gate Deeg, it is 2700, and you just need to avoid being attacked directly.If it was a Riryoku equipped Kinetic Soldier, he will kill you anyways if he attacks your <2400 attack monster. Because of this, you can try to play as if he opened with Gate Deeg (this is more common anyways) and assume his face down card is 2700.If he played a monster but did NOT power it up with Riryoku:If your first monster is lower than 2350, you want to tank the hit, to avoid your first monster dying to Kinetic Soldier.If your first monster is ABOVE 2350 attack, move your DL to the left as he will not be able to destroy your first monster with an unequipped turn 1 monster of his own. This will avoid you being attacked directly as if he attacks you with Gate Deeg, it will flip up and he will max out his SP, and will likely kill your first monster when he retaliates turn 2. If that situation occurs, your best option after this is to try lethal damage on the 700atk Gate Deeg.
 - Necromancer:
 Necromancer turn one Dimensionhole activation is MANDATORY to dodge potential turn 1 Dark Hole from Necromancer. As Necromancer rushes to his right side, it is crucial for you to have something that will move two tiles on Wasteland in order to attack him on turn two, so as you play dimensionhole, prime your hand for something such as a 2000atk+ Zombie (or Dinosaur/Rock/Machine) to get the job done. You will tank a hit, but unless he plays a pumpking on his 2nd turn, he will move his 2nd card out of the way and open the door for you to follow up attack a 2nd time with your first monster on turn 3. If he dark holes you on turn 2, the field is open for you to move, play a card and attack him again.
 - Ishtar:
 Playing out of the middle column will prompt Ishtar to move forward and allow you to close the gap. Like all crush duels, try to reserve SP to potentially draw into Slate Warrior. Turn two you can also check your hand before activating Dimensionhole in case you draw Slate Warrior. If you do, just forget about Dhole and attack with Slate Warrior, pass, then attack again with Slate Warrior for lethal.If she opened playing back left, this can be either Mirror Wall, Shadow of Eyes, or much less likely, Turtle Oath. If it is Mirror Wall, there is no way around this duel being bad. You must assess your two options if she plays back left:You can flip Dimensionhole face up to check if it is Shadow of Eyes or not, but if you do this and it is NOT Shadow of Eyes, you no longer have a good option of dealing with it.
SO
You can activate Dimensionhole in the spot shown in the image, move your DL to your right, then play a monster top right and attack her - if this triggers Mirror Wall, you can destroy the Mirror Wall next turn with that monster to get it off the field, and play from there (it will still suck probably).
Playing out of the middle column will prompt Ishtar to move forward and allow you to close the gap. Like all crush duels, try to reserve SP to potentially draw into Slate Warrior. Turn two you can also check your hand before activating Dimensionhole in case you draw Slate Warrior. If you do, just forget about Dhole and attack with Slate Warrior, pass, then attack again with Slate Warrior for lethal.If she opened playing back left, this can be either Mirror Wall, Shadow of Eyes, or much less likely, Turtle Oath. If it is Mirror Wall, there is no way around this duel being bad. You must assess your two options if she plays back left:You can flip Dimensionhole face up to check if it is Shadow of Eyes or not, but if you do this and it is NOT Shadow of Eyes, you no longer have a good option of dealing with it.
SO
You can activate Dimensionhole in the spot shown in the image, move your DL to your right, then play a monster top right and attack her - if this triggers Mirror Wall, you can destroy the Mirror Wall next turn with that monster to get it off the field, and play from there (it will still suck probably). - Keith:
 You simply play out of the middle column due to the Labyrinth obstructing you. Default to this left-of-middle column - if he plays a monster turn one, he will play it to his right and move it to the right. Then turn two, you can move and attack him. Keep moving your DL towards him, as on his second turn, he will move to his right and defend to the left. Use your first monster to destroy his second card, then move your DL and play another monster to attack him directly for lethal (if it is not lethal, just do the same thing on the next turn).
 - Mako:
 While playing Mako up the middle column is possible, due to Mako's deck composition, he has a very realistic chance of punishing this with a straight up OTK with his first two monsters. So, we play it to the left, then after launching, attack him from his right side (on the Meadow tile) turn two. After this, he should move to his left and play a monster OUT OF THE WAY to his left, so you can follow up attack.Consider using a Warrior on the Meadow so you can attack twice if you need to. It is punished heavily if Mako opens with a monster that changes the terrain, but it is worth trying if you are not confident in achieving a two hit kill. If you can't kill him in two hits, he will move forward after your second hit and you can kill him next turn so long as he has not killed you with his first monster's two hits on you.Only play a monster on the Sea terrain if you have Gruesome Goo (and no other guaranteed two hit kill) - play that on the Sea terrain so you can potentially follow up attack to deal 3600 across two hits, to make an easy finish.
 - Richard:
 Playing Dimensionhole up the middle will be completely punished if he opens with a monster (which is extremely likely). Due to him being on a row of Mountain terrain, consider options outside of Zombies in order to try achieve a 3 hit kill.Remember, if he opens by playing a card to his top left and moving it back a tile, this is 100% Acid Trap Hole, and you will have to remove it. If he does NOT play ATH turn one: Attack him from his left side on the Mountain.
If he DOES play ATH turn one: You can play a terrain spell over it to clear it and neutralize his field, and play from there OR Leave a monster face down infront of the ATH - he will play out of the way to his right - then you can use that first face down monster you played to remove the ATH, then attack him directly and play from there.
Weevil:
 Weevil has a WarnHideLvl of 0, meaning that if you play Dimensionhole in a position where he can attack it, he will always attack it if he opens with a monster. So the priority is making sure he does NOT attack your Dimensionhole. Without a forest boosted monster, you will have to move your DL forward to attack him directly on turn two. This runs the risk of you being OTK'ed by him on his 2nd turn if he has enough damage, so if you can possibly play 2k+ attack on forest, you can try keep a distance with your DL to be safe.
Yugi:
 Being forced to play outside the middle column, our best bet is to play it to the right of the middle. After activating it on Wasteland, we have two options:If you have Slate Warrior, ALWAYS move your DL to Yami and play Slate Warrior infront for a direct attack (then follow up lethal with it on turn 3).
OR
If you do NOT have Slate Warrior, move your deck leader forward onto Toon and attack from Sea terrain as you will be able to play a monster over 1500 attack (or if you have a monster strong on water such as Gruesome Goo, you can play it here so you can hopefully attack twice for a total of 2600 damage across the two hits). After this, he should move FORWARD onto Crush and you can follow up attack, hopefully for lethal.
Being forced to play outside the middle column, our best bet is to play it to the right of the middle. After activating it on Wasteland, we have two options:If you have Slate Warrior, ALWAYS move your DL to Yami and play Slate Warrior infront for a direct attack (then follow up lethal with it on turn 3).
OR
If you do NOT have Slate Warrior, move your deck leader forward onto Toon and attack from Sea terrain as you will be able to play a monster over 1500 attack (or if you have a monster strong on water such as Gruesome Goo, you can play it here so you can hopefully attack twice for a total of 2600 damage across the two hits). After this, he should move FORWARD onto Crush and you can follow up attack, hopefully for lethal.
Rex:
 Due to the composition of the map, moving your DL turn one does not give you any tile advantage when playing Dimensionhole, so just set and move Dhole according to the picture, making sure you are priming your hand for a monster that has movement boost on Wasteland. You can NOT attack him directly on turn two unless your monster has bonus movement. After your first direct attack, use your first monster on turn three to clear any obstructions, then move your DL forward again, play a monster over your first to attack him directly again to win.If he happens to open by playing a card in the same column as Dimensionhole (its a non monster), your best bet is to play your highest attack card face down and move it over this card.-Some maps force you to travel very wide. These are arguably the most important to commit to memory, but also are some of the easier ones to remember and are not punished by the opponent (with the exception of Grandpa opening with Magic Jammer).
For Lab-ruler and Pegasus, the fastest Lab-breaker can actually be faster than Dimensionhole.
For Grandpa, Lab-breaker is far superior to Dimensionhole - I personally recommend to avoid playing Dimensionhole on Grandpa unless you are playing No Passwords and open with it.
Due to the composition of the map, moving your DL turn one does not give you any tile advantage when playing Dimensionhole, so just set and move Dhole according to the picture, making sure you are priming your hand for a monster that has movement boost on Wasteland. You can NOT attack him directly on turn two unless your monster has bonus movement. After your first direct attack, use your first monster on turn three to clear any obstructions, then move your DL forward again, play a monster over your first to attack him directly again to win.If he happens to open by playing a card in the same column as Dimensionhole (its a non monster), your best bet is to play your highest attack card face down and move it over this card.-Some maps force you to travel very wide. These are arguably the most important to commit to memory, but also are some of the easier ones to remember and are not punished by the opponent (with the exception of Grandpa opening with Magic Jammer).
For Lab-ruler and Pegasus, the fastest Lab-breaker can actually be faster than Dimensionhole.
For Grandpa, Lab-breaker is far superior to Dimensionhole - I personally recommend to avoid playing Dimensionhole on Grandpa unless you are playing No Passwords and open with it.
Grandpa:
 IMPORTANT: In any% with passwords, ignore Dimensionhole and simpy keep dumping for a Lab breaker.
Speed wise: Fast Lab Breaker > Fast Shadow Ghoul > Slow Lab Breaker > Good Dhole > Medium Shadow Ghoul > Slow Dhole > Bottom Deck Lab Breakers > Bad Shadow GhoulNO PASSWORD ADVICE:If you open with dimensionhole, try playing it up your left side. This side of the map he will only play non-monsters. The other side of the map will be ONLY non-exodia piece Monsters that usually have spellbinding flip effects. If he plays down the same column you play Dimensionhole (based on the picture), check your hand and try to play any spell other than Dimensionhole incase he opened with a Magic Jammer, to protect the activation of your Dimensionhole. If Dimensionhole gets nullified, move back and try the Shadow Ghoul strat.After using Dimensionhole, inch towards him, and be patient. While crawling towards him, try to prepare your hand to set up for an OTK (collective 4k+ damage across two monsters). You want to move to the back row, and have a high attack monster face down where his starting position is. Then let him move over his own card behind him onto the tile next to your monster so that when he passes, you can attack him directly. If you attack him without finishing the job, it may become impossible to finish the duel, so you SPECIFICALLY want to set up a strong monster on his starting point, then wait for him to move back over his own card adjacent to your monster. The turn after that, you attack him with the monster, and play another monster over that to attack him directly a 2nd time in one turn and OTK him without giving him a chance to punish/block your play. Yes this is all hard to visualize and optimize, so try practicing.NOTE: Attempting to transition to attacking with Wall Shadow from the side of the map here can create BIG problems - keep that card for a potential play up the back instead.
IMPORTANT: In any% with passwords, ignore Dimensionhole and simpy keep dumping for a Lab breaker.
Speed wise: Fast Lab Breaker > Fast Shadow Ghoul > Slow Lab Breaker > Good Dhole > Medium Shadow Ghoul > Slow Dhole > Bottom Deck Lab Breakers > Bad Shadow GhoulNO PASSWORD ADVICE:If you open with dimensionhole, try playing it up your left side. This side of the map he will only play non-monsters. The other side of the map will be ONLY non-exodia piece Monsters that usually have spellbinding flip effects. If he plays down the same column you play Dimensionhole (based on the picture), check your hand and try to play any spell other than Dimensionhole incase he opened with a Magic Jammer, to protect the activation of your Dimensionhole. If Dimensionhole gets nullified, move back and try the Shadow Ghoul strat.After using Dimensionhole, inch towards him, and be patient. While crawling towards him, try to prepare your hand to set up for an OTK (collective 4k+ damage across two monsters). You want to move to the back row, and have a high attack monster face down where his starting position is. Then let him move over his own card behind him onto the tile next to your monster so that when he passes, you can attack him directly. If you attack him without finishing the job, it may become impossible to finish the duel, so you SPECIFICALLY want to set up a strong monster on his starting point, then wait for him to move back over his own card adjacent to your monster. The turn after that, you attack him with the monster, and play another monster over that to attack him directly a 2nd time in one turn and OTK him without giving him a chance to punish/block your play. Yes this is all hard to visualize and optimize, so try practicing.NOTE: Attempting to transition to attacking with Wall Shadow from the side of the map here can create BIG problems - keep that card for a potential play up the back instead.
Labyrinth-ruler:
 NOTE: Check for turn 1 lab breaker before moving your DL.This is another duel you should commit to practicing, as his play will vary independent of your actions. The activation of Dimensionhole is the simple part, the part after that is tricky. If you are not in a position to attack him, especially if you cant follow up lethal, consider playing a high attack Zombie face down on the highest Yami tile and allow him a chance to keep moving into the corner and/or have his DL adjacent to the corner, he can play a monster to attack your face down monster and lose that battle. Then you can attack him directly after that, move your DL and follow up attack hopefully for lethal.
Pegasus:
 NOTE: Check for turn 1 lab breaker before moving your DL. (Lab breaker+terrain spell > dimensionhole and no terrain spell)Pegasus has a lot of intricacies to him, but your Dimensionhole play should always be the same on turn one. That is the simple part, the follow up part is more complex.If you do not have Saggi/King Tiger Wanghu to attack him directly on turn two, your next best option is to activate a terrain spell (Wasteland if possible) top right of the Normal tile your DL is standing on.If you do not have a terrain spell, play any card (Preferably non-monster) to your RIGHT and leave it there face down - this should force him to play out of your way to his left, and you can play from there. You can do this with a monster which is fine, but he may Change of Heart/Brain Control it and attack you.NOTE: If Pegasus plays a card to his top left and moves it to the right, THIS IS A TRAP CARD. It is possible that this will interfere with activating Dimensionhole, so you might want to play around it, OR you can yolo it as you can still activate Dimensionhole next to an Invisible Wire if you want to take a chance.
Finally, Panik is the one duel you should never play Dimensionhole on. Instead, you want to set up damage for a potential 2 turn kill (if possible) or just set up for a 3 turn.