

Since placing the marine landing zone can be tricky for some maps, and reading through text notes is also not as natural, I got the idea to make images to show the route I use. I'll give a brief explanation of some of my choices with each image as needed.
- GAEA
Select AT-POD first, and place it first as shown by the green numbers. This marine can be controlled immediately to skip attacking the pod, and the closer marine has NORMAL weapon, which will cause it to attack the base first.

- COUGAR
Note the top left image shows what I'm building at the start of the mission. By selecting the marines in this order, and then placing them 1-2-3 again per the green numbers, the north base will be completely taken care of. All you have to do is keep the south marine from getting close to the second pod.

- EAGLE
No building here, and both marines can keep NORMAL weapons. Control marine #1 so it stops walking once reaching the pod, and release control after it shoots four times. This way, the enemy marine will attack marine #2, which is not damaged.

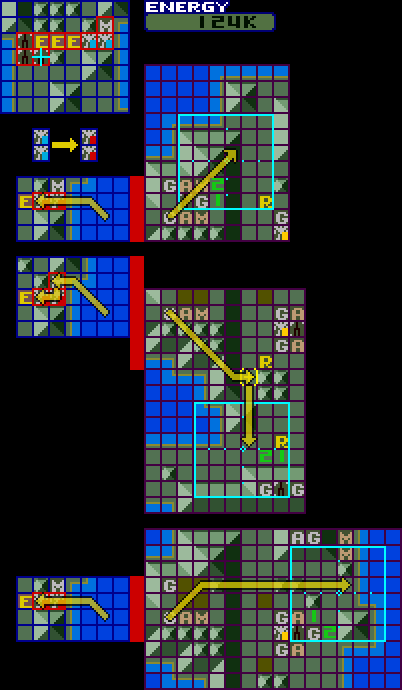
- BISON
The first complicated mission. By saving to 120K energy, a triple marine attack can be launched at the front radar. This increases the safety of the second attack greatly. The middle and south base can be attacked together.

- GRAMPUS
By placing the NORMAL marine a bit further away from the enemy marine, I ensure the enemy attacks my AT-MMR marine first.
Also, notice the position of what I build. The energy needs to be built right away to save time, but then I take the time to build the marines exactly where the cursor will be in the attack menu. This way, when selecting units to attack with, the cursor barely needs to move. There is thus no reason to use the pre-existing marine on this mission.

- ICEBERG
Since there are two marines already available, I upgrade both of them. This pair of gold marines can easily go all the way through three gun pods and reach the center base from the northeast. This mission is 100% guaranteed to be successful.

- EUROSTORM I
I liked your idea to attack the northwest base with missiles. The pattern of building missiles and marines here is to make the cursor movement in the attack menu as short as possible. It's a shame, all of the enemy bases are barely too far apart to attack together!

- EUROSTORM II
The missiles and marines are built as close to the water as I can to save cursor movement. These marine attacks are placed to be as safe as possible without having to attack the front AA peninsula. The risk here is very small.
- EUROSTORM III
Of course the east bases are undefended. This is again as close as I could get the marines to the start of the attack menu cursor. Sometimes the southeast base has extra units built near it, so watch the landing zone and place a marine near a far unit to save walking time, especially if it's up the hill.

- ARTEMIS
I used to attack the front AAs with a marine, you can see me do that in my speedrun... but then I realized the chances are about the same if I just try to attack the mountain, and have a second marine if the first one gets shot down. If that happens, you can send one marine to the last base in the northeast, instead of two, and still be fine.

- POSEIDON
It was a good idea of yours to attack the south radar with a double missile instead, this saves a good amount of time. It's a huge risk to attack without knocking out at least one radar.

- KINGDOM
Decent risk to skip attacking the northwest AAs, but this mission is still early enough to be worth it, I think. The northeast base does need to be uncovered for marine landing, but make sure to send the missile separately from the marine, or the marine may be wasted. It's possible to retry the missile if necessary, since there is enough money to build two upgraded missiles.

- SANDSTORM
The south base can easily be attacked by a single marine, but as there's no way to place the landing zone to make it convenient to clear the whole zone, it's best to let the marine die to the second pod. Then the north bases can be cleared in a way similar to ICEBERG, a march uphill with two gold marines.

- ZIHARD
What I thought would be a terribly complicated mission turns out to be very straightforward. There is no opportunity to clear radar or extra AAs, so just go for the bases. Clearing the northwest base uncovers the northeast one, and also note that the marines are staggered, so they take turns attacking the pod each time. With correct controlling, they should both survive the pod in the third attack.

- KIWI
I had been attacking the northwest defenses, but like with other missions, you can just take the risk and go for the center. This is also the only use of Leveling in the entire run. Building two marines directly on the attack map cursor means you have to bulldoze one spot, but there is extra money for it, and gaining energy is what determines when you can attack here, not when you build the marines.

- SNARLSHARK
By ordering the attacks like this, we'll have to destroy as little as possible. Attacking the center base before either of the other ones means you have to either get marines killed, or clear several more enemy units. It's only slightly less safe.

- MARLION
This enemy base has a glaring weak spot - the only radar is almost totally exposed to a marine strike, positioned just south enough to avoid all the center AAs. By giving the marine AT-MMR, it will die to the enemy pod faster, saving time.

- CHINGLONG
I had been doing this in four attacks, but I realized I can do the south radar and base at the same time, sacrificing two marines. This is easily the most likely mission to kill the run, but there is no practical way to make it any safer, and there are no backups if you lose the last attack. It's probably just a reset, and will happen about one in four attempts.

- SAKURA
Just like a Death Star trench run, we take one precise shot and it doesn't matter that Schwaltz has a million marines. This has a very tiny chance to fail.

- SUNRISE
This is the best way I could find to get to the ICBM quickly. The first two attacks have 7.5% chance to fail, if you get both of them, then the ICBM is a guarantee. Don't forget in the second attack, you need to shoot a double missile at that remaining AA in the front, or the chance will be much worse.
For the third attack, you need to land the marine between the center of the ICBM platform and the edge of the landing zone, control it immediately, make sure not to shoot the center, and wait for the enemy marine to get stuck. Then you can carefully kill the base in the back safely.
The north base is sadly behind just enough AA cover to be risky, and I haven't found any way to make this safer. Just one last chance for the run to fail at the very end!


