Languages
Language Testing/Comparison Sheet: https://docs.google.com/spreadsheets/d/1ydqdicb4FdjIvyptavJTgQDQmmC2j_qMWOt7XrJwY_Q/edit?usp=sharing
- The fastest language for any% (on PC) is Japanese.
- Portuguese would be the fastest language if not for the bug in By Any Means Necessary (A3M6). It's the fastest for Acts 1 & 2.
Vehicle Stats in this Game
The fastest vehicles (with the highest top speeds) in this game are the performance vehicles. The motorcycles do have much top speed, but their handling and acceleration make them just as good, if not better, than the fastest vehicles. See all vehicle stats in the link below:
https://watchdogs.fandom.com/wiki/Vehicles_in_Watch_Dogs
Car on Demand App
This app can be used to spawn any vehicle in the game if you have them unlocked. There are some vehicles automatically unlocked at the start of the game like the Kodachi or Stealth Papavero (Uplay/Ubisoft Connect). To unlock more vehicles, you have to drive them at least once and pay enough money to buy them. This app cannot be used during missions, but you can use it before a mission and it will stay there during the mission if you don't restart it. The best vehicle that's unlocked in the run is the Sayonara bike (costs $10000).
Places Used in Any%:
- Before A1M7 (Not the Pizza Guy) to spawn Kodachi/Sayonara if you don't find one on the road.
- After fast traveling to Brandon Docks (Act 2) for the first time, you can spawn the Kodachi/Sayonara to drive to Brandon Docks ctOS and Breakable Things (A2M2).
- After completing A Blank Spot There-ish (A2M5), you can spawn a Kodachi/Sayonara to drive to Wards ctOS and Jury-Rigged (A2M6).
- After completing Grandma's Bulldog (A2M7), you can spawn a Kodachi/Sayonara to drive to Not a Job for Tyrone (A2M8), but this is not necessary to save time. It's only for helping you get to the mission start quicker.
- After completing Stare Into the Abyss (A2M11) and using a cash run to teleport to Brandon Docks, you can spawn a Kodachi/Sayonara to drive to A2M12 (Risky Bid). This only saves time if you made the closer cash run to the spawn point.
- Before starting Way Off the Grid (A2M15) and during the Bedbug call, spawn a Kodachi/Sayonara to do dialogue skips and drive to the mission location.
- After completing Way Off the Grid (A2M15) and using the cash run to teleport closer to Pawnee, you can spawn a Kodachi/Sayonara if you don't find one in the parking lot.
- Before starting Sometimes You Still Lose (A5M1), you can spawn a Sayonara if you want to use it for the drive during this mission and to get to the boat quicker.
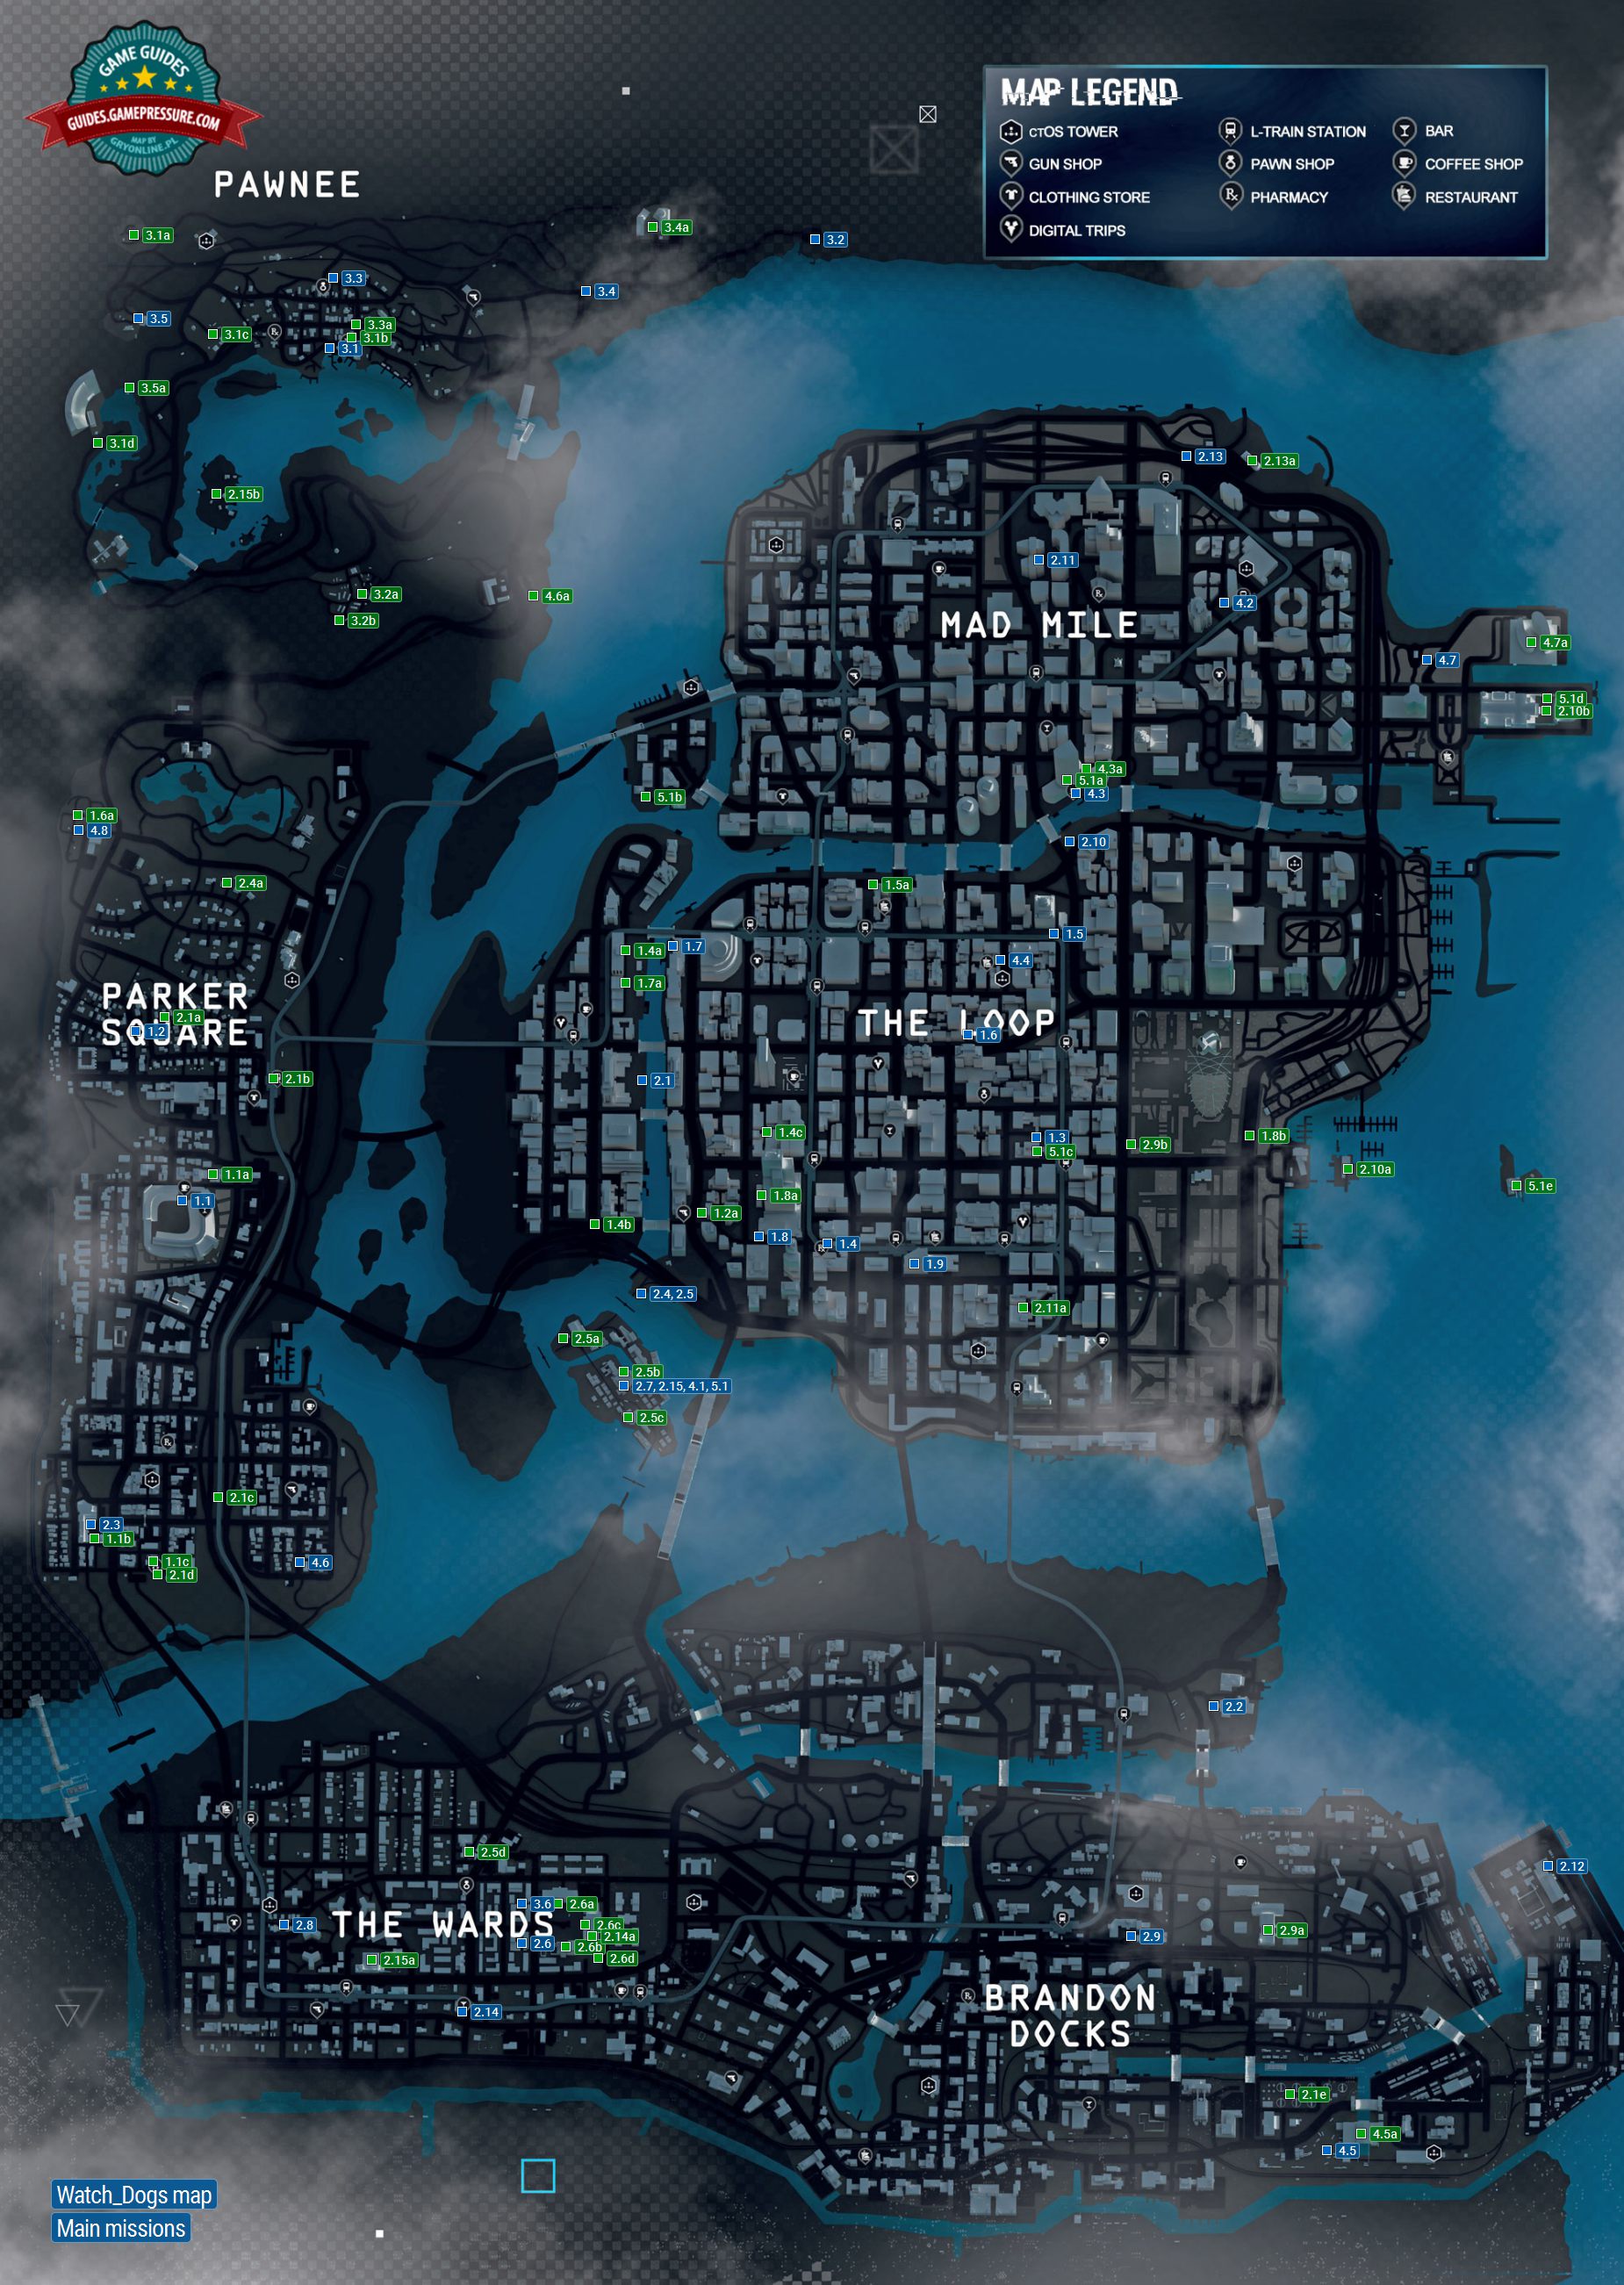
Map Fast Travel
This is an intended mechanic in the game. By accessing the map, you can teleport to hideouts throughout Chicago.
You can also teleport to train stations around Chicago by accessing the maps at each train station. See train station and mission locations map below:
Using Sprint to Reload Your Gun Instantly
When pressing the sprint button, press the reload button. This works with shotguns, assault rifles, and snipers.
For sniper rifles, you first press sprint and wait maybe half a second and then press reload.
Cover Mechanics on Foot
You can use the cover mechanics in this game to move faster in places where you cannot run. Pressing the cover button can make your character slide. There are only a couple of places this is used.
Examples:
- A1M1 (Bottom of the Eighth - At Bar)
- A2M4 (One Foot in the Grave - At Poker Game Basement)
- A4M7 (No Turning Back Pt. I - When entering room w/ Lucky Quinn)
Walking/Jogging/Sprinting with Different or No Weapons
Walking; best is a rifle Jogging; best is a rifle Sprinting; best is unarmed
It's useful in missions in which you are forced into a walk or a jog such as:
- Bottom of the Eighth - A1M1 (in the bar)
- Risky Bid - A2M12 (after gaining your weapons back)
- No Turning Back pt1 - A4M7 (when finding Lucky)
It also just generally saves time anywhere you can do this.
Hacking Puzzles
Doing these fast requires practice. When you do them enough times, you can figure out a pattern to memorize and complete them quickly. For most hacking puzzles in this game, you can exit and enter again to retry them. The puzzles can be simplified to memorizing how many times you press the button at each node. The nodes normally rotate in a clockwise motion.
Tutorial: https://docs.google.com/document/d/1etGW6md8X3buJa0XZINauZIcs3tRgDQL3BTtEBqN6DI/edit?usp=sharing
Restart Mission
You can skip the opening cutscene of every mission in the game that has one. When you start a mission, simply go into the menu, and restart the mission to skip the opening cutscene. This also gives you full ammo for every gun that you have.
Examples:
- Side Missions – Gang Hideouts, Fixer Contracts, etc.
- A1M2 – Big Brother
- A1M4 – Backseat Driver
- A1M5 – Open Your World
- A1M6 – Thanks for the Tip
- A1M8 – A Wrench in the Works
- A1M9 – Dressed in Peels
- A2M2 – Breakable Things
- A2M3 – Collateral
- A2M4 – One Foot in the Grave
- A2M5 – A Blank Spot There-ish
- A2M6 – Jury-Rigged
- A2M8 – Not a Job for Tyrone
- A2M10 – Breadcrumbs
- A2M11 – Stare into the Abyss
- A2M12 – A Risky Bid
- A2M13 – Role Model
- A2M14 – Planting a Bug
- A3M1 – Hope is a Sad Thing
- A3M2 – Pit of Paranoia
- A3M3 – Unstoppable Force
- A3M4 – The Future is in Blume
- A3M6 – By any Means Necessary
- A4M2 – In Plain Sight
- A4M3 – The Rat’s Lair
- A4M4 – The Defalt Condition
- A4M5 – Little Sister
- A4M6 – Ghosts of the Past
- A4M7 – No Turning Back
Reload Autosave (During Missions)
This is like the restart mission strat, but you use this one in the middle of a mission instead. Reloading autosaves can teleport you and/or skip things in the run. Be sure to wait for the save icon to pop up before reloading the autosave. This also gives you full ammo for every gun that you have.
Examples:
- A1M1 (Bottom of the Eighth): After escaping cops to teleport to hideout
- A1M5 (Open Your World) – Skips some of the phone conversation with Clara if you are able to hack the computer quickly
- A1M9 (Dressed in Peels) – Short teleport from elevator to the lobby area
- A2M4 (One Foot in the Grave) - Used after Tobias flips the poker table if you have fast loading. Teleports you outside to near the bike spawn.
- A2M5 (A Blank Spot-There-ish) – Teleports you to center of island (used after each generator is enabled)
- A2M9 (Uninvited) – Lowers timer to 1 minute; you also use it after killing everyone to skip some waiting
- A2M11 (Stare into the Abyss) - If you use the cameras to hack the terminal at the start of the mission, you can reload autosave to teleport yourself across the street after the hacking puzzle is completed.
- A3M1/Hope is a Sad Thing (After Hacking marina computer) – Only saves time if you’re on PC/have fast loading: skips phone text
- A3M1/Hope is a Sad Thing (Abandoned ctOS Station for phone conversation between bar/T-bone) – This prevents a Pawnee hideout from being unlocked but saves at least 40 seconds
- A3M4/The Future is in Blume - Used to teleport closer to the Blume facility near the start of the mission. You can also reload autosaves at the facility to skip some running after you unlock each ctOS box.
- A3M5/For the Portfolio - Can be used to teleport to T-bone faster if you kill the first enemies in the junkyard quickly and are far away from him. Also used after you are told to get to the boat with T-bone; teleports you closer and skips some running
- A4M3 (The Rat's Lair) – Skips phone dialogue with T-bone after he gets inside his car
- A4M5 (Little Sister) – Used at the start of guiding Nicky. This does not teleport you or skip anything. It only makes the strat for this mission doable/consistent
- A4M7 (No Turning Back) – This is only used to remove the effects of the blackout so that you can hack the blinders sooner (In the room where you kill Lucky Quinn)
Reload Autosave (Outside of Mission)
There may be some times where you can reload an autosave outside of a mission to save time.
- After Pawnee ctOS - Here, you can reload an autosave in the water to spawn you on land, skipping the need to jump off the boat.
Blackout Strats
The blackout skill needs to be unlocked in the crafted items skill tree. Requires two system keys and one electronic part to craft.
This tool is one of the most powerful in the game. It allows you to run past enemies without detection and makes escaping enemies (cops/fixers) easier/faster, but these only work at nighttime. For the best results, only use the blackout (to escape enemies) after they have detected you. Do not use it at the same time as when the enemies spawn because that can cause a softlock.
Examples:
- A1M6 (Thanks for the Tip) - Use to escape from the fixers. Best time to use it is right after the enemies detect you if you're skipping the SVD sniper rifle.
- A1M7 (Not the Pizza Guy) - Use to escape from the fixers. Best time to use it is on the stairs leaving the area if you're driving on the bike.
- A2M12 (A Risky Bid) - Use to run past enemies when trying to escape the area.
- A3M6 (By Any Means Necessary) - Use to run past enemies outside of Rossi-Fremont and inside another time.
- A4M2 (In Plain Sight) - Use to escape from the police. Best time to use it is a couple of seconds after the police have spawned.
- A4M7 (No Turning Back Pt. I) - Use it once to run past enemies on the roof. Then use it another time on the roof to escape the police.
- A5M1 (Sometimes You Still Lose) - This is only used to prevent Damien from hacking the city infrastructure.
Fixed Item Pickups in Any%
- A1M1 Hideout (Bottom of the Eighth) – System Key, Electronic Part, Unstable Chemical Component, Chemical Component
- Potential Crime Intro (They Can’t Hide) – At least 1 System Key
- A1M5 (Open Your World) – Unstable Chemical Component, 3 Electronic Parts, System Key, 3 Jam Coms (Given, 1 used)
- A1M6 (Thanks for the Tip) – Unstable Chemical Component (Optional), SVD (sniper rifle for Racine skip/optional)
- A1M7 (Not the Pizza Guy) - AK-47, System Key
- A1M9 (Dressed in Peels) – System Key (Upstairs), SG-90, System Key (Before elevator to corrupt cops), M1014, OCP-11, Jam Coms (Optional)
- A2M2 (Breakable Things) – 2 Unstable Chemical Components, Electronic Part, Proximity IED, Electronic Part, chemical component, grenade
- A2M3 (Collateral) – Electronic Part (Roof), SVD Sniper Rifle (Roof); these are skipped if you are doing the grenade launcher strats
- A2M4 (One Foot in the Grave) – Unstable Chemical Component, Chemical Component, System Key, Electronic Part
- A2M5 (A Blank Spot There-ish) - Unstable Chemical Component (Optional), Electronic Part (Optional), Jam Coms (Optional), Blackout (when exiting bunker)
- A2M6 (Jury-Rigged) – Electronic Parts (Optional - near first terminal on left)
- A2M7 (Grandma's Bulldog) – System Key (Sometimes) from guys to elevator
- A2M8 (Not a Job for Tyrone) – System Key from guy outside of Bedbug's house, System Key in red area
- A2M9 (Uninvited) – IEDs, electronic part
- A2M9 to A2M10 – Can go to pawn shop and buy electronic parts/unstable chemical components
- A2M10 (Breadcrumbs) – System Keys from profiling (sometimes), Unstable Chemical Component, Proximity IED, System Key (Optional at marina)
- A2M11 (Stare into the Abyss) – Unstable Chemical Component, System Key (Optional), Electronic Part
- A2M12 (A Risky Bid) – 2 System Keys (1 from guy at entrance and another from upstairs near where you meet Iraq/Lucky) - Both are optional, U100 from enforcer at end of the mission if you do the focus-CR strat
- A2M13 (Role Model) – Unstable Chemical Component
- A2M15 (Way off the Grid) – Grenade Launcher (if you didn't buy it earlier), IED, Proximity IED, Unstable Chemical Component
- Act 3 Pawnee ctOS – System Key (Optional)
- A3M1 (Hope is a Sad Thing) – System Key (next to marina computer), System Key (abandoned ctOS place), System Key (T-bone scrapyard), Electronic Parts (T-bone scrapyard), Proximity IEDs (T-bone scrapyard), AC-AR (T-bone scrapyard)
- A3M2 (A Pit of Paranoia)– 2 System Keys (Trailer Park)
- A3M5 (For the Portfolio) – 2 Unstable Chemical Components
- A3M6 (By any Means Necessary) – 2 Blackouts (Given, 1 Used), ATSG-12 (Optional), Electronic Part, U100, IEDs
- A4M4 (The Defalt Condition) – Blackout
- A4M7 (No Turning Back) – Blackout
Skills Unlocked in Any%
The Steady Aim skill can be obtained instead of the Bridges/Blockers in Act 1 if you have trouble aiming without it. Then you can obtain the Bridges/Blocker skills when you get the IED skills during Act 2.
- During Skills Intro (End of A1M1 – Bottom of Eighth) - Gates & Garages, Bridges, Car Unlock, Frag Grenades, and Focus
- During Beginning of A1M5 (Open Your World) - Blackout, Improved Focus (optional, but makes Racine Skip easier if you do the sniper strat), Blockers and Disable Helicopter
- Before/During A2M9 (Uninvited) – IED, proximity IED: these will be needed for A2M9 to spawn kill the enemies.
- During A2M11 (Stare Into the Abyss) – Demolitionist (if you want to carry more explosives for Act 3 missions), Bullet Resistance, Explosion Resistance: useful for dialogue skips later, but it is optional if you don’t do them.
Cash Run Challenges App Teleports
The cash run challenges app can be used to teleport to mission locations. Access it by going to the cash run challenges app on your phone. Create a new challenge. You can either place down one coin or two coins, but one coin is generally faster. If you are doing two coins, make sure to turn off the auto-drop before you place the second coin because that makes it a lot easier. Place two coins down while going towards your location. The first coin can be placed anywhere, but the second one is dropped where you want to teleport to. After placing the two coins, go save your challenge. Naming them is not necessary if you're able to remember the order in which they are created: newest challenges are at the top of the list and to the left. To teleport, go to My Challenges in the app and select the one you want to teleport to by testing it.
A downside of this is that you must actually go to the location that you want to teleport to. It is required for you to be at the location to set up the custom Cash Run challenge. You also cannot create Cash Run challenges during missions, phone conversations, or news reports. But you can create them while driving. Unfortunately, the vehicle does not teleport along with you if you do the warp. Obviously, you cannot use the Cash Run Challenges app during missions either.
Here is my method of exiting the app quickly: When the challenge is done saving or you have teleported, go to publish and options (middle mouse button for mouse but different for controllers). Then delete all coins and confirm (two left clicks for mouse). That should leave you at exit editor. Confirm again and close the phone menu.
Examples:
- After A1M2 (Big Brother) – Create teleport point for A2M4 (One Foot in the Grave) and A2M5 (A Blank Spot There-ish) after call with Badboy is finished.
- Driving to Act 1 Hacking Contract (After A1M3) - Create teleport point near prison for A1M9 (Dressed in Peels).
- Before Act 1 Cemetery (Remember) - Create teleport point at the train station before driving off.
- Before Act 1 Cemetery (Remember) - Create teleport point for Act 3 start near the parking lot (with the fixed bike spawn) when driving to the cemetery.
- Before Act 1 Cemetery (Remember) - Create teleport point for A4M8 (No Turning Back Pt. II) when driving to the cemetery near the fixed SUV/truck spawn on the grass.
- After Act 1 Cemetery (Remember) - teleport to train station and use the fast travel there to teleport to A1M7 (Not the Pizza Guy) start.
- After A1M8 (Wrench in the Works) - teleport to Dressed in Peels start.
- After Act 2 Crafting Store Mission (Tools of the Trade) - On the way back to the train station, make a teleport point for A4M6 (Ghosts of the Past) near the fixed bike spawn. But don’t make it too close; otherwise the bike won’t spawn.
- Before Brandon Docks ctOS - After you reach Brandon Docks, open up the cash run challenges app. You don’t have to make a teleport point for A2M9 (Uninvited), but you have to open up the app to prevent the news announcements. The A2M9 warp is for safety. Create a teleport point right outside Brandon Docks ctOS for A2M12 (A Risky Bid), but don’t go inside the mission area before you’re done using the app (create it closer to the Car on Demand app spawn point if you are going for that strat before Risky Bid). If the cash run challenges app is open when you enter the mission area, you’ll have to go to another area to trigger the mission.
- Before A2M2 (Breakable Things) – No teleport is used here. The app is just used to skip a cutscene that shows you the location of A2M2 start:
- A2M4 (One Foot in the Grave) – Teleport to mission start. Can go into the CR menu quickly after the previous mission ends.
- A2M5 (A Blank Spot There-ish)– Teleport to mission start using first CR that you created.
- Before A2M6 (Jury-Rigged) - Make a teleport point before the A2M6 start location. This one will be for A3M6 (By Any Means Necessary).
- After A2M6 (Jury-Rigged) - Make a teleport point near the A2M14 (Planting a Bug) start location to use it to teleport to that location.
- Before A2M11 (Stare into the Abyss) - On the way to A2M11, make a teleport point for A4M7 (No Turning Back Pt. I). You have to slow down a bit and wait for the MM ctOS mission to end before you can make the teleport point. Make another teleport point near the train station for A4M2 (In Plain Sight).
- A2M12 (A Risky Bid) – Teleport closer to mission start using CR that you created before Brandon Docks ctOS.
- A2M14 (Planting a Bug) – Teleport closer to mission start using CR that you created after Jury-Rigged (A2M6).
- After A2M15 (Way off the Grid) - If you got the firetruck skip/quick-kill, use the teleport you created after Act 1 cemetery (Remember) to teleport closer to Pawnee.
- Before A3M1 (Hope is a Sad Thing) - Create a teleport point for A3M3 (Unstoppable Force) after you have reached land after finishing Pawnee ctOS.
- After A3M1 (Hope is a Sad Thing) - If you did the news broadcast skip, take a slight detour to make a cash run near the wooden fence that separates the road and the end of the For the Portfolio (A3M5) area.
- After A3M1 (Hope is a Sad Thing) - If you did the news broadcast skip, when driving to Pit of Paranoia (A3M2), create a teleport point for A3M4 (The Future is in Blume).
- A3M3 (Unstoppable Force) – Teleport closer to mission start. Can go into the CR menu quickly after the previous mission ends.
- A3M4 (The Future is in Blume) – Teleport to mission start if you created the cash run earlier (because of the news broadcast skip).
- A3M4 (The Future is in Blume) – At the end of the mission, go into the cash run menu early before you reach the bike. Then fast travel to For the Portfolio. If you don't get into the CR menu quickly enough, you could be directed back to the start of the bike trail.
- A3M6 (By Any Means Necessary) – Teleport to mission start.
- A4M2 (In Plain Sight) – Teleport to mission start.
- A4M6 (Ghosts of the Past) – Teleport closer to mission start. Can go into the CR menu quickly after the previous mission ends.
- A4M7 (No Turning Back Pt.I)– Teleport closer to mission start. Can go into the CR menu quickly after the previous mission ends.
- A4M8 (No Turning Back Pt.II) – Teleport closer to mission start.
How to Use Other Players' Cash Runs (PC Only)
Method 1 You need to have your own/old cash runs (ugc files) for this to work.
1. Before going into the game, copy and paste the cash runs (ugc files) that are related to the 1.save you're going to paste. You need to either match or exceed (have them in the ugc folder/in-game) the number of ugc files you are adding for this to work. The ugc files are located in Documents\My Games\Watch Dogs
2. Paste afterward the 1.save into the save folder.
3. Get into the game normally and you should obtain all the cash runs!
If you want to go back to your old cash runs, you can just remove the new cash runs that you added from before. Do this outside of the game.
Method 2 Go into My Documents\My games\Watch_Dogs and delete ugc files in ugc folder and WATCH_DOGS_UGCData
Just paste the new WATCH_DOGS_UGCData and the ugc files that go together.
Missions Where You Can Go Into Phone Menu Early Before Mission Has Completed Without Losing Time
- Act I Graveyard (Remember)
- A1M8 (A Wrench in the Works) - Not before mission has been completed, but after. You need to wait a few seconds before being able to use the cash run app.
- A2M3 (Collateral)
- A3M2 (A Pit of Paranoia)
- A4M1 (Someone's Knocking) - Not before mission has been completed, but after. You need to wait for dialogue from Aiden before being able to use the cash run app.
- A4M5 (Little Sister)
- A4M7 (No Turning Back Pt. I)
Skipping the UIs of Cash Runs being Saved (Console Only)
This console only strat allows you to skip the UI of the cash Run being saved, which saves 4 seconds for each cash run. It's only useful for certain missions where creating a cash run as fast as possible is important. To do it, you just pause when the cash run is being saved.
Using Focus to Prevent Dialogue from Interrupting Cash Runs
Using the focus allows you to delay in-game events, including dialogue. This buys you enough time to go into the cash run menu.
- Post-A2M12 (Risky Bid) Cash Run
- Post-A3M5 (For the Portfolio) Cash Run
Using Cash Runs to Cancel Police Calls from People
If people try to call the cops on you, their call can be canceled (if the scans haven't started yet) if you use a cash run to teleport.
Smartphone Menu Strat (Breaking the Game)
The smartphone menu in this game allows you to normally do things that you normally wouldn't be able to if you have it up. It basically prevents some triggers/things from happening if you have it up.
Examples:
- Beginning of A2M14 (Planting a Bug) - If you have the phone menu up prior to entering the checkpoint where you speak with Bedbug in the small room, you can still move around and do some dialogue skips.
- End of A3M5 (For the Portfolio) – For some reason, if you have the phone menu up prior to entering the boat, you can just exit/enter the boat or other vehicles as many times as you want. This allows for the Aiden/T-bone dialogue skips on this mission.
- Beginning of A3M6 (By Any Means Necessary) – If you have the phone menu up prior to entering the first checkpoint inside the building (it normally freezes you for a sec), you can just run past it.
Dialogue Skips (Jumping out of Vehicles/Blowing Yourself Up)
You can skip dialogue of your character (Aiden/T-bone) by jumping out of vehicles or blowing yourself up (requires explosion resistance) so that your character is on the ground. Your character must be talking to another character for this to work (on phone or in person). This strat is not extremely easy to get consistently and does require some timing.
Examples:
- End of A1M2 (Big Brother) - Aiden phonecall with Badboy
- End of Hacking Contract - If you were able to kill the hacker, quickly, you can skip the line when Aiden says, "Well someone's taken an interest in me..."
- End of A1M4 (Backseat Driver) – Aiden phonecall with Jordi
- A1M5 (Open Your World) – Aiden phonecall with Clara after hacking computer and reloading autosave
- A2M2 (Breakable Things) – After killing Racine, you can skip some dialogue for phonecall with Damien.
- A2M3 (Collateral) – Call with Clara after she reaches her car.
- A2M6 (Jury-Rigged) – Call with Clara at end of mission.
- A2M9 (Uninvited) – Call with Bedbug at end of mission.
- Before A2M10 (Breadcrumbs) – Call with Bedbug.
- End of A2M10 (Breadcrumbs) – Call with Clara.
- A2M11 (Stare into the Abyss) – Call with Clara at end of mission.
- Before A2M13 (Role Model) – Call with Yolanada. This can be done if you reach the area very quickly.
- A2M14 (Planting a Bug) – Call with Bedbug inside the small room if you do the phone strat. Also calls with Clara at end of mission and Bedbug after the mission.
- A2M15 (Way off the Grid) – Call with Clara.
- A3M5 (For the Portfolio) - Aiden's talk with T-bone on the boat if you use the phone trick to exit and don't do the T-bone dialogue skips instead.
- A3M6 (By Any Means Necessary) – Call with Clara/T-bone at beginning and dialogue with Iraq on roof. Also, you can skip Aiden's monologue after Iraq is killed (because Aiden's mouth moves when talking here).
- A4M2 (In Plain Sight) – Call with Damien after killing fixer in van (do not use if you do the early cops strat)
- A4M4 (Defalt Condition) – Call with T-bone.
- Before A4M5 (Little Sister) – Call with Jordi & T-bone.
- Before A4M6 (Ghosts of the Past) – Call with Damien.
- A4M8 (No Turning Back Pt.II) – Call with Damien. Can skip both of Aiden's lines if you make a CR close to the cemetery.
Timings (with English) I find that a good speed for these dialogue skips is about the slowest speed that you can bail out of the vehicle.
-
A1M2 (Big Brother) After Badboy17 says, “so it won’t be easy”
-
A1M4 (Backseat Driver)
- After Jordi says “Hey, how’d it go?” :do a slow spin
- After Jordi says” better
-
A1M5 (Open your World) ASAP after reloading autosave
-
A2M2 (Breakable Things)
- Slow turn: After Damien says “Don’t fuck with me Aiden.”
- Slow: After Damien says: “But you go”
- A2M3 (Collateral)
- Half second after hearing phone rings a couple of times or 2. When Clara starts saying “Who are you?”
- A2M6 (Jury-Rigged)
- When Phone starts ringing
- When Clara starts saying “We’re done”
- ASAP for the last line of dialogue.
-
A2M9 (Uninvited) When Bedbug starts to say “Man, who are you?”
-
After A2M9 (Uninvited)/Before A2M10 (Breadcrumbs) When Bedbug starts to say “Who do you think I am?”
-
End of A2M10 (Breadcrumbs)
- After Aiden finishes saying “Will anyone miss him?”
- ASAP because of recovery from last one.
- End of A2M11 (Stare into the Abyss)
- IED as soon as you reach checkpoint up stairs
- After Clara finishes saying “this girl”, bail out of the car
- End of A2M14 (Planting a Bug) Clara call:
- When phone starts ringing
- With car, When Clara starts to say “ctOS breaches”, with bike: When she says “breaches”
- If you have bike, can do after she says “Yes” Bedbug Call: 1. After he says “Hey, hey”
- Half a second After he says “You and me…” or when he starts to say “Are we done?”
-
A2M15 (Way off the Grid) Start pressing button to explode IED when the phone starts ringing or half a second after to be safe.
-
A3M6 (By Any Means Necessary) Outside Building: Start pressing button to explode IED when T-bone says “for about half a second.” On Roof: 1. Throw grenade after Aiden says “A” for “A wannabe king in a tiny castle.”
- Throw grenade after Iraq starts to say “Think we’re having a chat?”
- A4M4 (Defalt Condition)
- If fast enough. Jump out when T-bone starts to say “I’ll track his signal”
- A couple of seconds after killing Defalt
- When T-bone starts to say “You sure it was on Iraq’s server?”
- Before A4M5 (Little Sister) Jordi Call:
- When he starts saying “They want you bad, pal.”
- After he finishes saying “The fixers will catch up to you.” T-bone call: When he starts saying “as that public address”
- Before A4M6 (Ghosts of the Past)
- When Damien starts saying, “You think this is all over?”
- Probably ASAP because you are still recovering from first one.
- When Damien starts saying, “Ambition?”
-
A4M7 (No Turning Back Pt.I) When Lucky starts to say “right now”, start pressing explode with IED
-
A4M8 (No Turning Back Pt.II) When Damien starts saying “could you”
Dialogue Skips (Killing Enemies)
If an NPC has dialogue with another NPC, you can kill the other unimportant NPCs to skip their dialogue. This only works if the mission doesn’t fail when you kill the NPCs. Only example of this is the old dialogue skip used in Uninvited (A2M9).
Dialogue Skips (Interrupting)
On A1M9 (Dressed in Peels), there is a dialogue skip with the two guards in the room with the elevator that will go up. By running close to the wall before you enter the next room, the guards will stop talking.
Dialogue Skips (Going Far Away)
You can skip the dialogue of an NPC that is talking by going far away from them. You also cannot be talking to that other character through the phone. It must be an in-person conversation. Examples of this include the first mission of Act 3 at T-Bone’s hideout (Hope is a Sad Thing) and Uninvited (A2M9)
Dialogue Skips (Knocking NPCs to the ground)
Just like for Aiden, you can knock NPCs to the ground to skip their dialogue. You can do this with explosives or by running them over with a vehicle, but they need to have enough health to survive that.
The only use of this is in For the Portfolio (A3M5) where you knock T-bone to the ground to skip his boat dialogue. He has "infinite health" during that part, so you can just keep knocking to the ground with the grenade launcher.
Intercepted Audio Dialogue Skips
You can skip the dialogue of any call that has "Intercepted Audio" if you are able to hack people, car alarms, audio logs, explosion boxes (at 100 fps), throwable items (lures, IEDs), and etc. It will not work if you hack traffic lights or billboards.
Examples:
- A1M2 (Big Brother) - Nicky's call with the crank caller inside house.
- A1M2 (Big Brother) - Crank caller's call with Damien.
- A1M8 (A Wrench in the Works) - Helena Tucci's call with Angelo (her uncle).
- A2M4 (One Foot in the Grave) - Tobias call with his friend.
Using Damage to Skip Animations/Actions
- A2M10 (Breadcrumbs) - You can skip the animation when Aiden interacts with the briefcase by getting shot.
- A2M15 (Way Off the Grid) - You can skip the animation when Aiden interacts with the PC after the download finishes by shooting the gas canister nearby. This allows you to gain control of Aiden much earlier than intended and makes the firetruck chase skip possible.
Camera Manipulation/Camera Angle Strats
You can angle/tilt your camera angle to hack cameras in places where you shouldn't be able to. This leads to a few skips in the game:
- A1M3 (Backstage Pass)
- A2M5 (A Blank Spot There-ish)
- A4M4 (Defalt Condition)
Obtaining the Sayonara (Where to Get Money)
In any%, we want to get enough money to obtain the Sayonara bike that costs $10000, saving 10+ seconds in the run. See pictures of the news stands that can be robbed here. Robbing news stands might give you $400-$800. You can also obtain money from hacking random people (ATM required to obtain this money), bodies of dead enemies, and looting glove boxes of random vehicles. Warning: Robberies can sometimes cause people to call the cops if they see you have your gun out.
Fixed Locations For Obtaining Money Optimally:
- A1M2 (Big Brother) - There is a news stand at the end of this mission near the gun shop/stairs that you can rob without losing time, but only if you get an early bike (Sayonara preferably). This news stand is not needed at all and should not be done if you do the "audio intercepted" skip earlier in the mission.
- A1M2 to A1M3 (Foresight) - You are given $1000 to buy the gun here, but the gun shop robbery skips buying the gun and might give you another $700-$1200.
- A1M3 to A1M4 (Hacking Contract) - Two news stands after killing the hacker (one near where he spawns and another near the parking lot.
- A1M4 (Backseat Driver) - One news stand near the Open Your World mission start.
- A1M5 (Open Your World) - Rob 2 of the news stands in this area if you get good scans or 3 (up to 5 if you get a good bike) if you get bad scans, and 2-3 if you get hybrid scans. An ATM can also be used here instead if you got good money from scans earlier.
- A1M6 (Thanks for the Tip) - Rob the news stand next to the train station stairs at the end of the mission.
- A1M7 (Not the Pizza Guy) - Rob the news stand near the start of Wrench in the Works (A1M8) start at the end of this mission after escaping the fixers.
- A2M1 (Hold On, Kiddo) - You can rob the news stand next to the mission start location before the mission if you are quick to this location and got a bike within the escape circle.
- Act 2 Pawn Shop (Tools of the Trade) - $700-$1200 from robbing the pawn shop.
If you still haven't gotten the bike at this point, you have more options:
- After Act 2 Pawn Shop (Tools of the Trade) - if you are going for grenade launcher strats, you can rob the gun store as well for $700-$1200.
- End of A2M6 (Jury-Rigged) - You can rob the café or bar, but you have to be quick about it.
- A2M8 (Not a Job for Tyrone) - Rob the clothes store/use the ATM near the start of the mission. You can also rob two news stands within the area.
- A2M9 (Uninvited) - News stand near where Bedbug is.
- After A2M9 (Uninvited) - $700-$1200 from robbing the pawn shop.
- Breadcrumbs (A2M10) - There is a lot of waiting around, so you can hack people for money during this time. You can also rob the news stand before starting the mission and ones during the mission.
Manipulating Enemy NPCs to Walk Faster (Fast Walking Strat)
By shooting a silenced weapon near an enemy's head, you can manipulate them to walk faster. They will be forced into a state where they're holding a gun and still walk to their next destination if you do it right. It's recommended to shoot in front of the enemy's head (in the direction they are walking).
You might fail the strat for these reasons:
- Hitting the enemy with the gun.
- Hitting an object/wall close to the enemy.
- Being too close to the enemy when shooting.
- Shooting at the wrong time.
Examples:
-
A2M8 (Not a Job for Tyrone) -
-
A2M9 (Uninvited) -
-
Breadcrumbs (A2M10) Beginning: Ending:
Skipping Investigation News Broadcast/Phone Calls By Doing Them Early
- A2M8 (Not a Job for Tyrone) - Can possibly skip the Tobias call about the weapon trade prior to this mission if you complete the whole investigation before.
- A3M2 (Pit of Paranoia) - Can skip the serial killer news broadcast before this mission by investigating the body of Michelle Strauss.
Exiting out of Tutorials Quickly (PC)
You can normally exit out of tutorials/the sleep menu by pressing Esc, but it is faster/more convenient to use the RMB (right mouse button).
Using First Person Camera to Hack/Profile Targets that are Farther Away
Switching to the first person camera in vehicles allow you to hack things that are farther away so that you don't have to drive closer.
Examples:
-
A1M8 (A Wrench in the Works) - You can profile/hack Helena from the sidewalk by using the first person camera:
-
Act 2 (Brandon Docks ctOS Control Center) - You can hack the first camera from farther away by using the first person camera.
-
A2M9 (Uninvited) - You can hack Bedbug/hack the displays by using the first person camera.
Power Turning
You can use the focus while in vehicles to make turns at speeds that you normally wouldn't be able to without. Power turning can save time at wide turns by allowing you to take a better line through them. At turns that require you to slow down a lot, you can use power turns to go through them at much higher speeds than by braking. Power turns can be substituted for braking at turns if you know how to use them properly.
Power turns work better with certain cars when wanting to do a 90 degree turn. The cars with 4.5 or 5 handling, and some cars with a 4.5 or 5 handling work weirdly like that and do a U-turn. For the bikes, they all work the same because they have good handling. It's worth trying the power turns with bikes than cars. But if you know how every car reacts to power turns, you can decide to do it or not. But for a majority of cars, they do a nice 90 degree turn.
You just tap on the focus button when you want to turn into whichever direction you want.
Handbrake Boosts
There is a way to use handbraking to speed up your vehicle. It works bests with vehicles that rotate their wheels a lot when accelerating and it can basically "skip" the rotation of the wheels. This works with every vehicle in the game, but it is difficult to do with bikes and you lose time if you handbrake for too long.
Roll Cancelling
You can cancel the slow roll animation when dropping/falling down if you press the climb down button on a ledge or stop sprinting when falling down.
Using Both Braking and Handbraking to Slow Down
You can use both the regular brake and the handbrake at the same time to slow down while in a vehicle.
FPS Capping
If you get high fps in this game, you will want to keep it at that except for at these locations. 100+ fps is needed if you want to skip intercepted audio dialogue by hacking explosion boxes. Going 60 or below prevents elevators/lifts from bugging out, and going to 20/30 prevents explosions from killing you when you want to do dialogue skips:
- Any time where Aiden gets on a container/lift and it goes up (A2M5, A5M1) - Cap to 60 fps or lower
- Dressed in Peels (A1M9) - Cap to 60 fps or lower when Aiden is in the elevator at the end of the mission (the one that the enforcer enters in)
- Entering/Exiting Bunker in Container - Cap to 60 fps or lower
- First time entering bunker in A2M5 - Cap to 30 fps or lower
- Not a Job for Tyrone (A2M8) - Cap to 30 fps or lower when you hack Bedbug's terminal
- After Risky Bid - Right after finishing this mission, make sure you are capped to 60 or below to prevent the game from crashing when you use the CR/fast travel
- Explosion Dialogue Skips from Explosives on Ground (Possibly A2M11, A2M15, A3M6) - Cap to 20 fps or lower
- A3M5 (For the Portfolio) - When T-bone goes to plant the detonator on the box, cap to 60 fps or lower
Bathroom Breaks
- A2M7 (Grandma's Bulldog) - Unskippable cutscene at end of mission: 3+ minutes
- A3M1 (Hope is a Sad Thing) - Cutscene where T-bone throws Aiden out of the bar: About 50 seconds
- A3M4 (The Future is in Blume) - Cutscene where Damien is talking to Charlotte Gardner: Little over a minute
- A4M7 (No Turning Back Pt.I) - Mayor Rushmore Cutscene: 2.5+ minutes
- A4M7 (No Turning Back Pt.I) - Lucky Quinn Room
Some Glitches Not Used in Runs
https://www.speedrun.com/wd/thread/rqufo
Buffering Cover Walk:
Duping:
-
Duping A2M1 - You wait for the XP reward to come up and bring up the smartphone app keeping the smartphone app basically let you do what you want without finishing the mission. Then save the game by getting a car you never drive e.g. Then reload autosave and bam you duped. It also works with A1M8. You could technically finish act 1 in only 32 minutes or something
-
Duping A3M4:
Explosion-Proof Car:
Runs on the leaderboard are now timed with loads removed. The autosplitter is recommended to be used if you are running on PC to obtain the time with loads removed. Console runs will also be split from PC now because of this.