[big]__Level by level explanations[/big]__
__World 1-1__ When you go into the underground section, start holding "right" when Mario has fallen about half the way down and jump as soon as you're able, trying to land on the very edge of the bricks in the middle. The farther to the left you land, the sooner you start accelerating to full speed. When the pipe transition happens, you should have 380 on the timer.
Later just hit the flagpole at the very top. If you have 370 remaining on the timer, the level is flawless. If you have 369 remaining on the timer, it can also be flawless, but it's very likely you missed the framerule.
__World 1-2 (Warp to 4-1)__
The first difficult part here is jumping over the Koopa with the Goomba directly behind it. The best way to do it is to run at full speed and do a jump where you hold A for 1 to 3 frames and then immediately jump again.
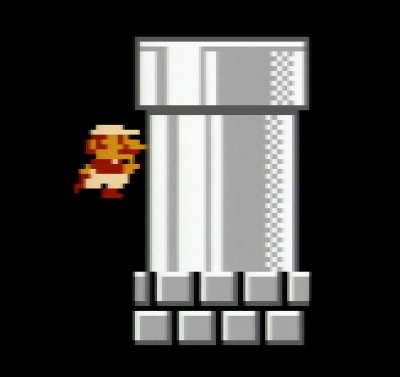
At the end of the level, when you go to the warp zone, you actually do not have to make a tight turnaround. Unless you land on the very right edge of the rightmost pipe, you will not lose the framerule if you never slowed down elsewhere.
__World 4-1__
This level is the easiest of the run. Jump at the top of the flagpole and you have a perfect time.
__World 4-2 (Warp to 8-1)__
In this level you need to do a Wrong Warp glitch. To do this, you must scroll the screen farther to the right than usual so that both level exits are on the screen at once.
To scroll the screen, you must jump backwards into the corner of a block. If you just want to get the glitch, you can do as many backwards jumps as you like and will get the trick quite easily. For a good time you need to limit it to 3 backwards jumps. To save another framerule, that must be made in 2 backwards jumps, but this almost requires perfection. A perfect run will show 354 or 355 remaining on the timer.
See this video and its description for examples:
A wallclip can be done on the wall directly after the powerup at the start of the stage. The ejection from the wall can be used as an alternative way to get Mario to the right side of the screen to perform the Wrong Warp. However this is a very hard trick and must also be done in a very optimized manner to match the time from the optimal backwards jumps method instead, so this is likely useless.
__World 8-1__
Even if you do not slow down at all in this level, you may lose a framerule. To get a perfect time in 8-1, you need to not slow down anywhere in the level and hit the star block around the middle of this level. 75% of the time this will work as long as you just hit the block anywhere. 25% of the time it will only work if you hit the star block on the first possible frame. (in depth explanation: http://www.speedrun.com/smb1/thread/6cgwo)
You can save yourself from having to perform a frame-perfect jump over 3 Goombas onto the wall behind them:
- At the part, where you would usually jump over a piranha plant and stomp one of the 3 Goombas behind it, perform a jump standing next to the plant and jump over it and the 3 Goombas without stomping any of them. This will prevent two of the Koopas coming up from despawning.
- Hit these 2 Koopas:

- Jump behind the 2 Goombas and over the wall.
__World 8-2__
A perfect run will end with a high 342 on the timer, if you do not use the bullet bill glitch (343 is possible, but yields fireworks), and a high 337 or low 338, if you do the full flagpole glitch using a bullet bill. The best known way to get a favorable bullet bill spawn is to wait a specific number of framerules on the title screen.
__World 8-3__
In this level you need to slow down to prevent the fireworks. You should finish with 242 left. Hitting the top of the flagpole is not strictly necessary, but you need to time it very well when jumping at the bottom. If you know what framerule you're on, you can predict the pseudorandom enemy patterns. Otherwise you need to get lucky.
__World 8-4__
This is the only level where the framerule doesn't apply due to how the run is timed, so every frame matters.
Room 1 Just go right and enter the pipe. The piranha plant will mysteriously vanish before you touch it. The big jump over the elevator has a 3 frame window. Instead you can jump onto the elevator, but it risks losing time, if you don't immediately jump off it again. You can save up to 5 frames by doing a backwards jump at the stairs at the start:
- Hold left while the level loads and let go at the first frame.
- Press nothing for 1 frame and then press A and right.
- Land on and run off the first stair.
- Jump off the bottom stair.
Room 2 This is the room with the walljump. When you run off the first pipe while holding B and right all the time, you only have 1 frame to make your next jump. If you briefly press left or just let go of right, you have more leeway at the expense of 1 or 2 frames lost. The walljump is explained in detail in the "Useful Glitches" guide. You will save about 5 frames if you do the walljump facing left instead of right. Depending on how well you do the walljump, you can expect to lose between 1 to 7 frames from "perfect" if you were facing left. There is a consistent way of doing the walljump in this room: Do not hold B at the start of the room and only start pressing it when Mario has run off the pipe at the start. Then, if you do it forwards and don't slow down, you will have 2 frames for the walljump.
Room 3 This room has another Wrong Warp glitch, but it is much easier than the 4-2 one. It is surprisingly easy to lose lots of frames in this room. You can perform a backwards jump after exiting the pipe leading into this room for a tiny time save of up to 3 frames.
Room 4 It doesn't matter, when Mario starts swimming as long as he doesn't reach maximum walking speed before you do it. If you hold right and touch the ground, Mario will be immediately reduced to maximum walking speed (2/3 of maximum swimming speed), so hold down+right, if you are about to briefly touch the ground (note that if you hit the pipe without entering it, you will not enter it, if you don't hold just right).
Room 5 Hope neither the Podoboo nor Bowser will kill your run due to pure randomness and hit the switch as far to the left as possible. A good run will have 314 or 315 remaining on the timer. 315 is not neccessarily faster than 314, it just means you did the third room well. The fastest possible ingame time is 316 with a backwards jump in the first room.
[big]__Specific goal time strategies[/big]__
The history of this game is driven by the desire to reach specific full second goal times. Although there is no longer a requirement to reach a new second boundary to constitute a new record, runs continue to be judged by what second they fall into and a time below 5 minutes is seen as significant by many people.
As a perfect run up until 8-4 and a decent 8-4 yields a time of about 4:57.4 and every mistake outside 8-4 costs a multiple of 0.35 seconds, one only needs to see how much time one has to waste and add up how much "mistakes" one is allowed to do.
4:59.XX You have about 2.6 seconds to lose and still be below 5 minutes. A way to do it would be:
- Perfect until 4-2.
- Do the easy 3 jump 4-2 (first method in the video above). (0.35-0.7 seconds lost)
- Perfect 8-1.
- Do a low risk 8-2. (0.7-1.05 seconds lost)
- Perfect 8-3. (memorize all possible patterns and use a split program to know, which one you're on)
- Do the consistent walljump method.
4:58.XX You have about 1.6 seconds to lose. A way to do it would be:
- Perfect until 4-2.
- Do the hard 3 jump 4-2 (second method in the video above). (0.35 seconds lost)
- Perfect 8-1.
- Do the regular 8-2. (0.7 seconds lost)
- Perfect 8-3. (memorize all possible patterns and use a split program to know, which one you're on)
- Do the consistent walljump method or risky walljump method depending on your pace.
4:57.XX Wait 1 framerule on the title screen. Do everything except the 2 jump 4-2.
below 4:57.XX flagpole glitch territory
[big]__TASes[/big]__
RTA WR: ... "RTA rules" TAS: 4:54.28 by HappyLee (converted to RTA timing) "left+right" TAS: 4:54.03 by HappyLee (converted to RTA timing, uses left+right) "human theory" TAS: ... It's important to note that RTA and TAS time the run differently. RTA timing starts when the timer appears in 1-1 and TAS timing starts on reset (197 frames difference). They both end on hitting the axe in 8-4. Also TAS allows left+right, which is banned in RTA, but RTA allows waiting on the start screen for good RNG without time loss.
Any% (NTSC) runs below 4:57.000 must now fulfill additional requirements in order to be verified.
- The run's full session must be included in the submission description.
- For emulator runs below 4:57.000, some form of input display must be visible for the duration of the run. A hand-cam or input